Template Installation
The section will help you with steps to install JA Healthcare template - Quickstart and Manual installation.
System requirement
JA Healthcare template is native with Joomla 3. Please make sure your system meets the following requirements:
Software
- Software: PHP (Magic Quotes GPC off): 5.3.1 + (5.4+ recommended)
Databases
- MySQL(InnoDB support required): 5.1+
- MSSQL 10.50.1600.1+
- PostgreSQL 8.3.18+
Web Severs
- Apache 2.x+
- Microsoft IIS 7
- Nginx 1.0 (1.1 recommended)
Browser requirement
- Firefox 4+
- IE (Internet Explorer) 8+
- Google Chrome 10+
- Opera 10+
- Safari 5+
Development Environment
During development process, Localhost is preferred. You can use the following servers on your PC to develop your site.
Windows
- WAMPSEVER
- XAMPP for Windows
Linux
- LAMP Bubdle
- XAMPP for Linux
Mac OS
- MAMP & MAMP Pro
- XAMPP for Mac OS
Download packages
Important:
1. JA Healthcare template is built on T3 Framework so it requires T3 Framework to be installed and enabled in your system.
2. We highly recommend you to use stable version of Joomla 3.
Download Packages
The download package includes:
- Quickstart package
- JA Healthcare template
- T3 Framework plugin
- JA K2 Filter component
- JA ACM Module
- JA Masthead Module
- Source file
Quickstart installation
Why Quickstart
The quickstart allows you to replicate JA Healthcare demo to your server. It means, after install the quickstart, you will have a site exactly the same as the demo site.
Download JA Healthcare quickstart package →, upload to your server and extract it.
Step 1 - Configuration: add Site name, Admin email, Admin username and password
Step 2 - Database: select database type, host name, database username, password, database name & table prefix
Step 3 - Overview: select sample data to install, we suggest to use Default English (GB) Sample Data. You can install multilingual in the step.
Step 4 - Remove/Rename "installation" folder: for security purpose, you need to rename or remove the "installation" folder
Detail documentation with screenshots
Manual Installation
Install T3 Framework
Step 1 - Install T3 Framework
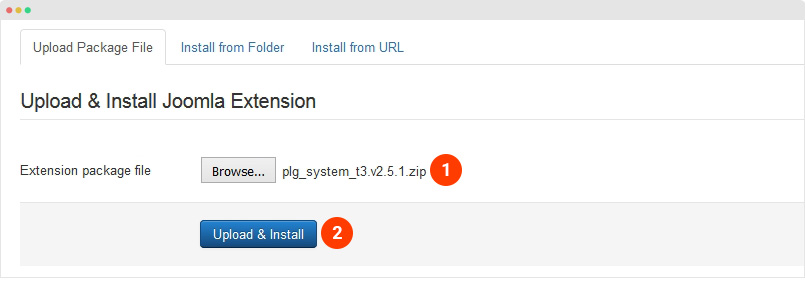
From your back-end setting panel, go to: "Extensions → Extension Manager", browse T3 plugin installation package then hit the "Upload and Install"
Step 2 - Enable T3 Framework
When you install T3 Framework, it's auto enabled by default. You can check this by going to: "Extensions → Plugin Manager" then find T3 Plugin.
Install JA Healthcare template
Step 1 - Install JA Healthcare template
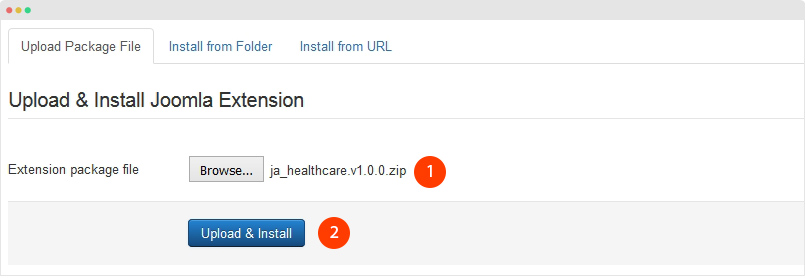
From your back-end setting panel, go to: "Extensions → Manage", browse JA Healthcare template installation package then hit the "Upload and Install"
Step 2 - Set default template style
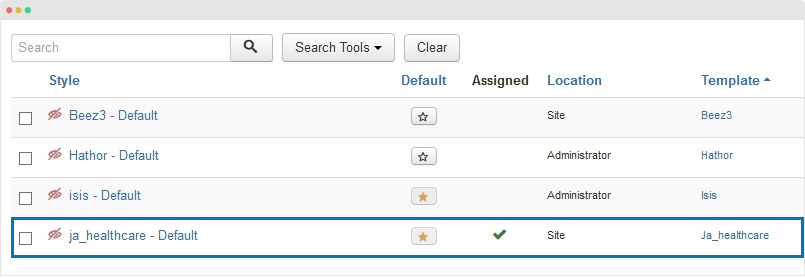
Go to: "Extensions → Template", set JA Healthcare template style as your default template style.
Install all supported extensions
- K2 Component
- JA K2 Filter Component
- JA ACM Module
- JA Masthead Module
Template folder structure
This section is to help you understand the folder structure of JA Healthcare template, where to find the files you want.
JA Healthcare template
JA Healthcare template is built on T3 Framework so its folder structure is almost the same with any other JA Templates that are developed with T3 Framework.
templates/ja_healthcare/
+-- less/                 /*  all LESS files */
¦    +-- template.less
¦    +-- style.less
¦    +-- home.less
¦    +-- joomla.less
¦    +-- themes/            /*theme folders and theme files */
+-- css/                     /*compiled files from less*/
¦    +-- template.css
¦    +-- style.css
¦    +-- home.css
¦    +-- joomla.css
¦    +-- themes/            /*Compiled themes */
+-- tpls/             /* all layout files and block files*/
¦    +-- default.php
¦    +-- default-nosidebar.php
¦    +-- blocks/       /*block files*/
¦    ¦    +-- header.php
¦    ¦    +-- mainbody.php
¦    ¦    +-- spotlight-1.php
¦    ¦    +-- off-canvas.php
¦    ¦    +-- section.php
¦    ¦    +-- mainnav.php
¦    ¦    +-- footer.php
¦    ¦    +-- mainbody/
+-- html/               /*override modules and Joomla com_content*/
¦    +-- com_content/
¦    ¦    +-- article/
¦    ¦    +-- category/
¦    ¦    +-- categories/
¦    ¦    +-- featured/
¦    +-- com_contact/
¦    +-- mod_jak2filter/
¦    +-- layouts/
¦    +-- ...
+-- acm/               /*JA Advanced Custom Module content type*/
¦    +-- slideshow/
¦    ¦    +-- css/
¦    ¦    +-- less/
¦    ¦    +-- tmpl/
¦    ¦    +-- js/
¦    +-- features-intro/
¦    +-- accordion/
¦    +-- testimonials/
¦    +-- video/
¦    +-- spotlight/
¦    +-- timetable/
+-- fonts/
¦    +-- font-awesome/
¦    +-- flaticon/
+-- js/
¦    +-- script.js
¦    +-- inview.js
¦    +-- owl-carousel/
+-- images/
+-- language/
+-- templateDetails.xml
+-- templateInfo.php/
+-- thememagic.xml/     /*the file is to add new group, parameters to ThemeMagic*/
+-- templateHook.php/
T3 Framework
You can find the folder structure of T3 Framewotk at: http://t3-framework.org/documentation/installation#folder-structure.
Recommendation
Any customization in the T3 plugin is not recommended. To customize your template, please do it in the "local" folder: templates/ja_healthcare/local. Check out detail documentation →
Upgrade Instruction
Take a full backup
Please always make a back-up before proceeding to any of the upgrade process. In case there is any problem, you can always restore from the back-up files.
1. Set up JA Extension Manager Component
The best method to upgrade JoomlArt products is using JA Extension Manager. The FREE extension brings a new way to manage extensions: upgrade, roll back, remote install, internal repository and compare versions.
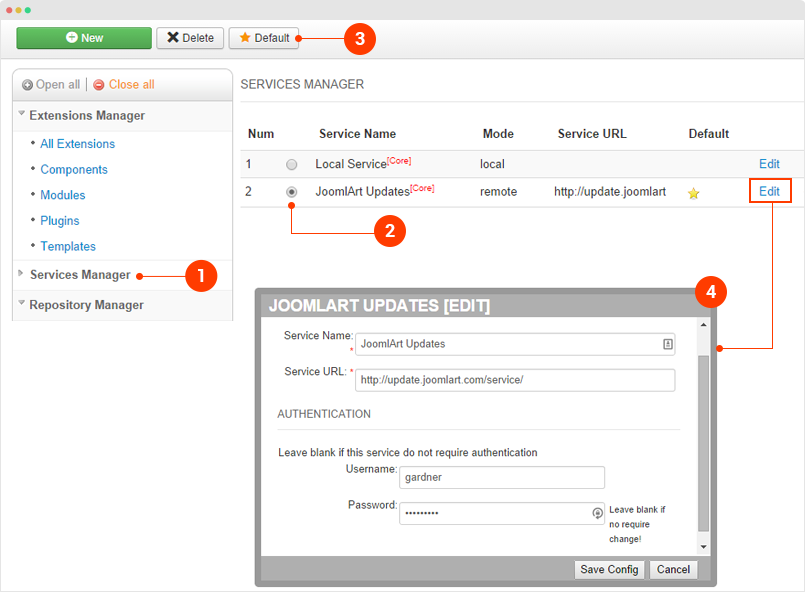
From back-end, go to: Components → JA Extension Manager then select Service Manager, now set JoomlArt as your default service. Next, hit the "Edit" button then add your Username and Password that you signed up in JoomlArt.com.
2. Upgrade JA Healthcare template
Step 1 - check the new version of JA Healthcare template. Using the filter to find the JA Healthcare template then hit the "Check Update" button.
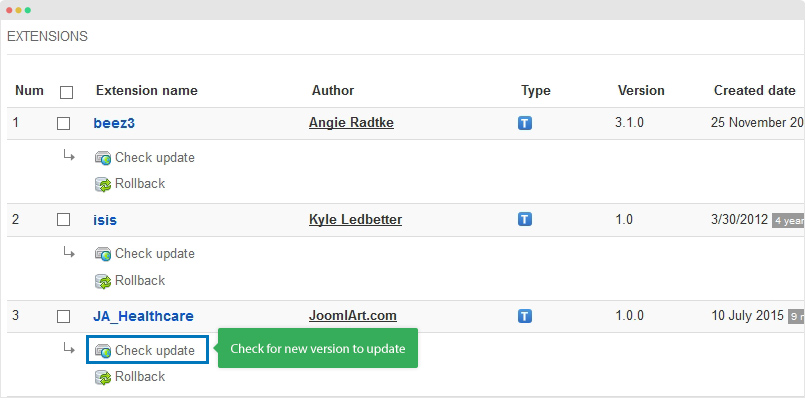
Step 2 - Upgrade JA Healthcare template to latest version. You should compare the changes before upgrading. We only pay attention to conflicted files - files that have been modified by both user and developer. When upgrading, the conflicted files will be overridden by files in new version, that means what you customized in the files will be lost.
3. Upgrade T3 Framework and other JA extensions
Using the filter to find the extensions you want to upgrade (JoomlArt products only), hit the Check Update button to check for new version then hit the Upgrade Now to upgrade the extension to latest version.
K2 Component configuration
JA Healthcare template supports K2 component. The K2 content is to build the Doctor page. This section provides detailed instruction to configure the extension as the demo site.
Install K2 component
K2 component is free, follow the link: Download K2 component
Once you have installation package of the extension, install it via installation panel: Extensions » Manage.
K2 Configuration
Step 1: configuration
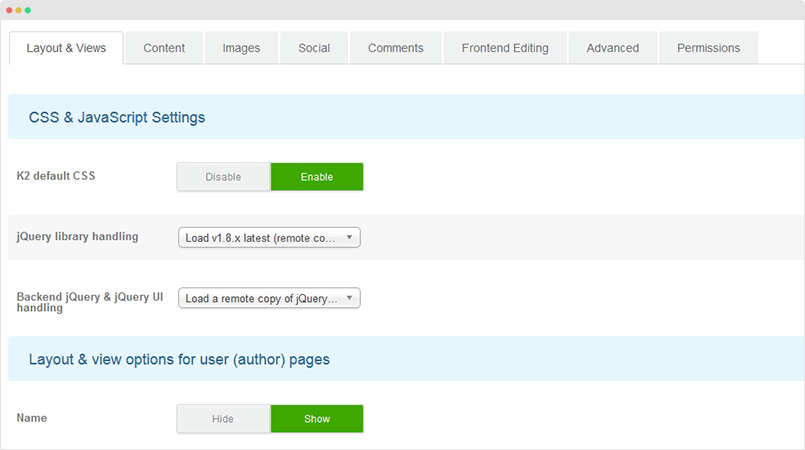
Go to Component » K2 and hit the Parameters button on the top right corner and configure layouts, images, content, comment, etc. In the demo site, we keep default settings.
Step 2: create category
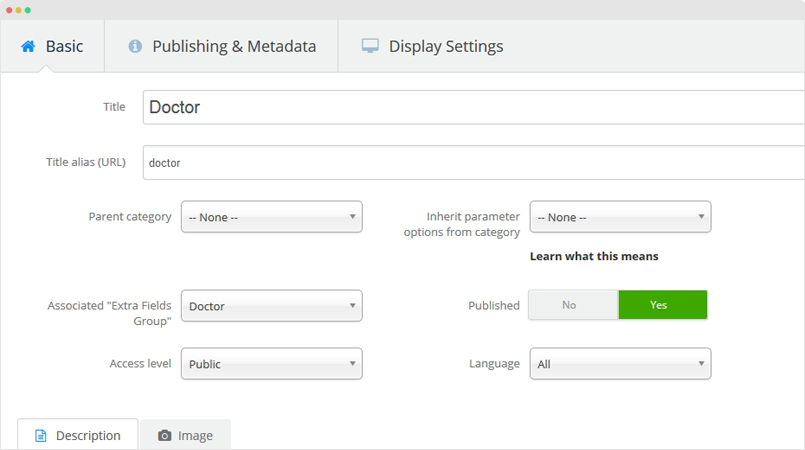
Access Components » K2 » Categories and create new category. In the category page, add title and configure other fields.
Doctor Category Settings
In the Display Settings setting panel, please make sure it is assigned to doctors template.
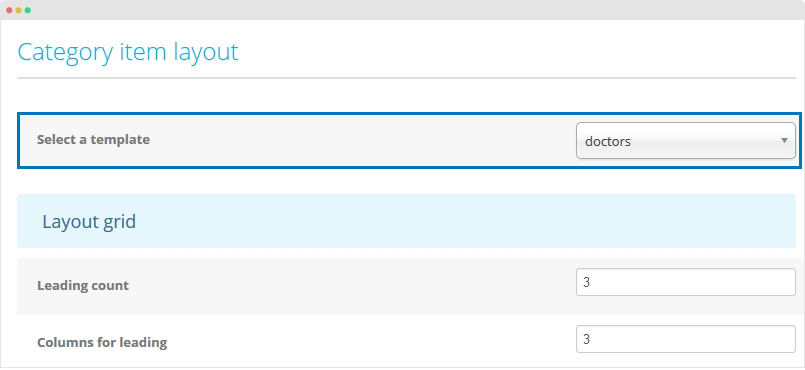
Display Settings - full screenshot
"All Category" Category Settings
Other categories settings are inheritted from the All Category category.
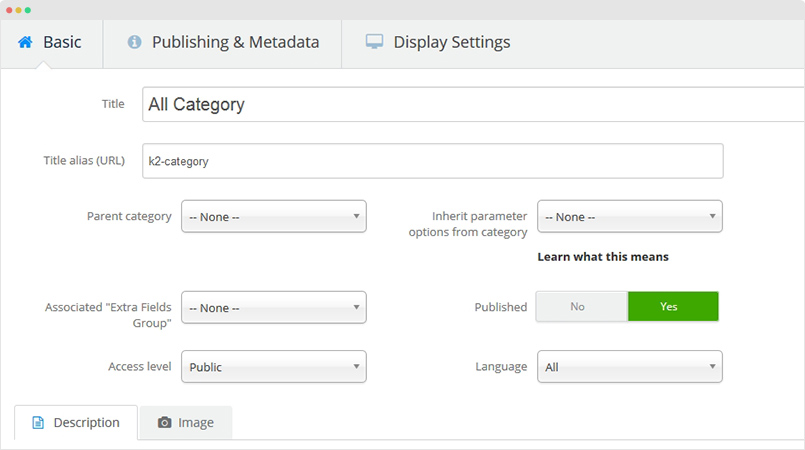
Step 3: create K2 menu item
1. Doctors page: Display list of K2 items from "Doctors" category.
Create new menu item, select menu type K2 » Item listings » Categories. Check out the menu setting in the screenshot below:
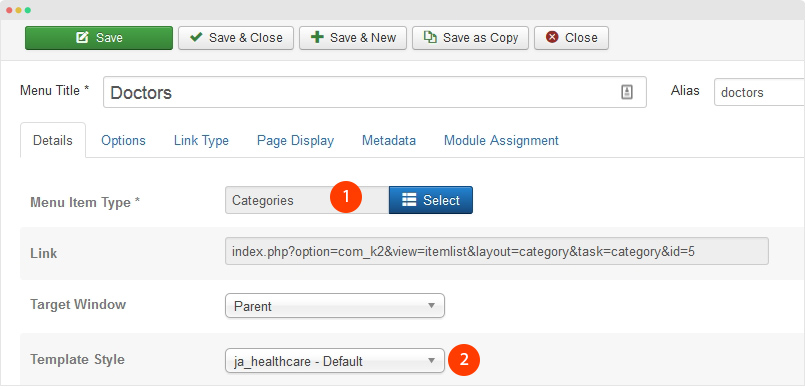
In the , please assign the "Doctors" category for the "Categories Selection" field.
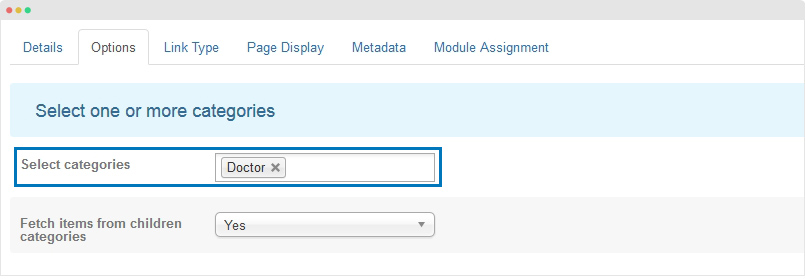
Option Settings - full screenshot
Create K2 Filter module on the page
The Filter module is JA K2 Search and Filter module. Please refer to the JA K2 Filter configuration section.
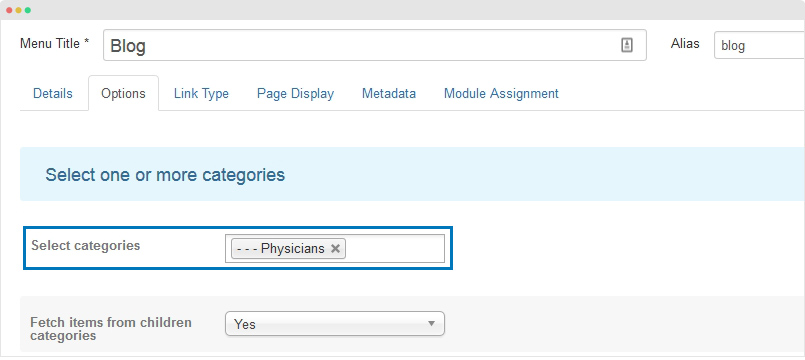
2. Blog page: Display list of K2 items in blog layout.
Create new menu item, select menu type K2 » Item listings » Categories. Check out the menu setting in the screenshot below:
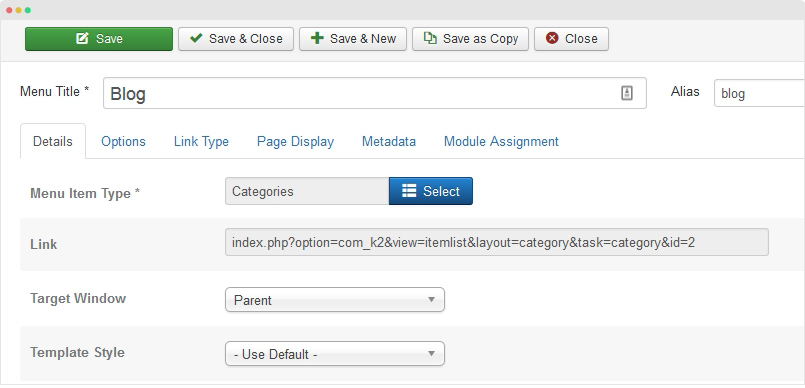
In the , please assign the "Physicians" category for the "Categories Selection" field.
JA K2 Filter configuration
The extension is to build K2 Filter on the Doctors page (you can use it for other pages depending your requirement). It is to filter doctors based on extra fields and other fields.
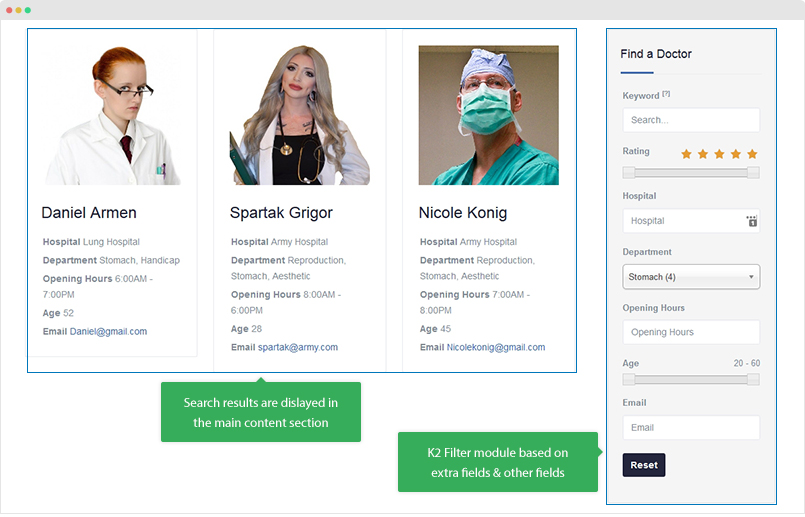
The extension includes:
- JA K2 Filter component
- JA K2 Search & Filter module
- JA K2 Filter plugin
Download the extension and get it installed to your site, the installation package is all-in-one, all required extensions are included.
JA K2 filter component configuration
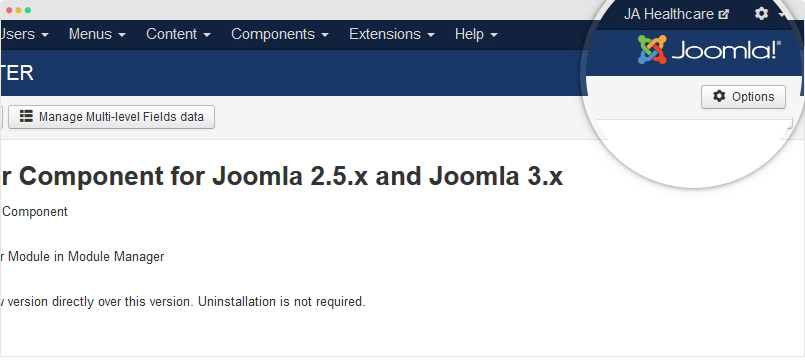
Go to "Components » JA K2 Filter" and hit the "Options" button on the top right corner.
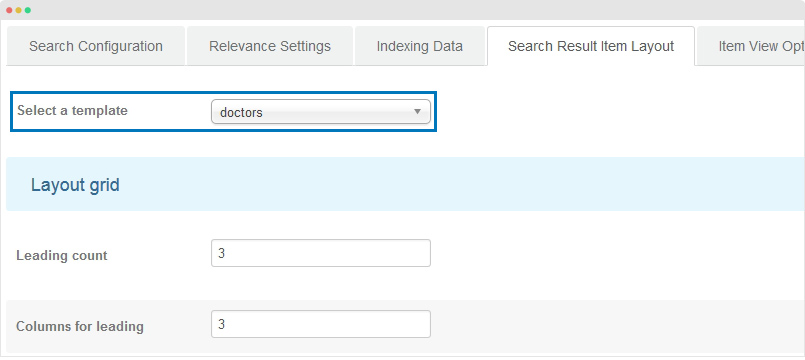
In the setting panel of JA K2 Filter component, open the tab "Search Result Item Layout" and assign "decors" template for the field: "Select a template"
For other settings, you can use default settings.
JA K2 filter module configuration
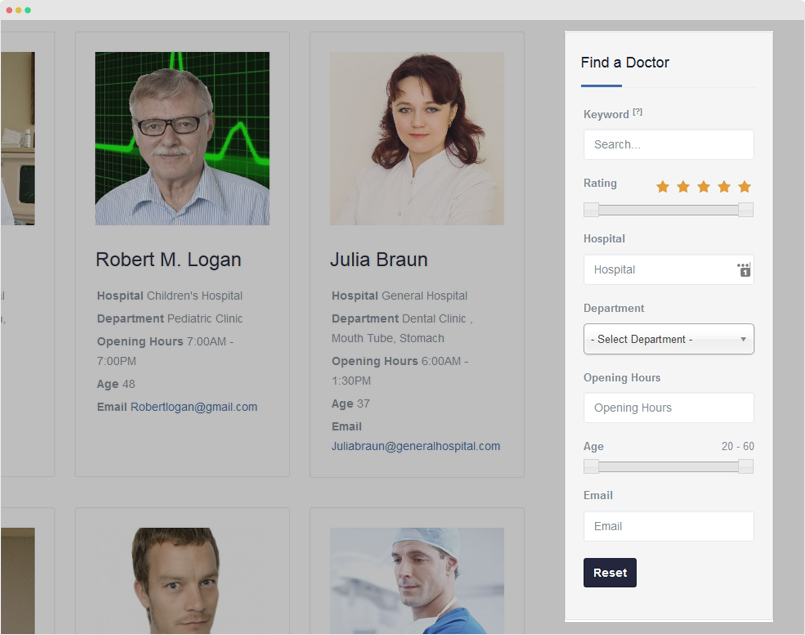
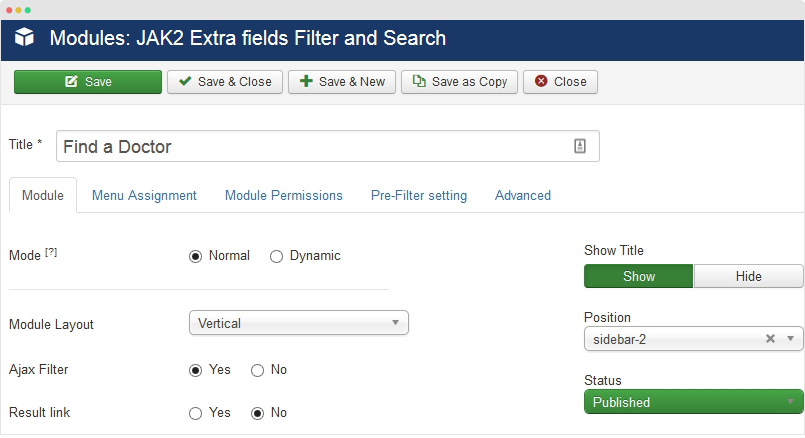
Create new module and select module type: "JAK2 Extra fields Filter and Search". Check the module settings below:
Module position: sidebar-2
Module Suffix: well
Module settings:
Build Demo Pages
This section will help you build demo pages as JA Healthcare demo site: Homepage, Departments, Doctors, K2 Blog
Home page
Here are steps to replicate the same Home page.
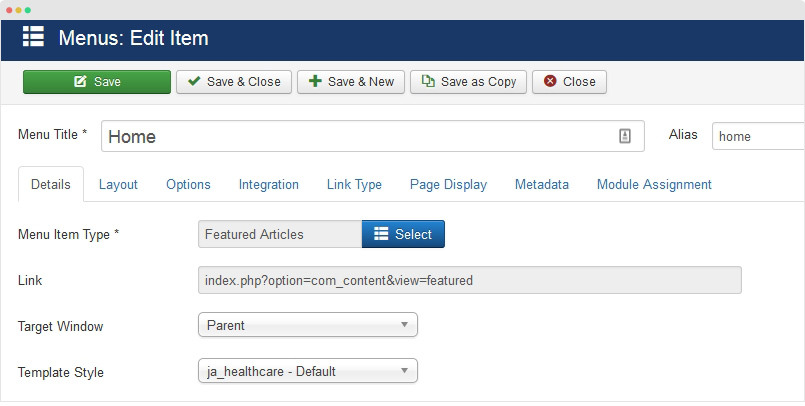
Step 1 - Create Home menu item
Go to Menu » Main menu, add new menu item, select Articles » Featured Articles menu type and assign "ja_healthcare - Default" template style.
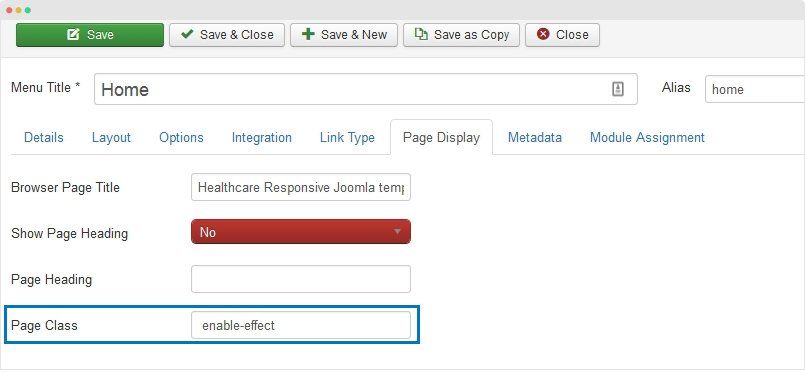
Enable in-time animation for Homepage
The Homepage page uses in-time animation, when you scroll down, content is animated, it is not pre-loaded as usual. To enable this feature, in the Advanced setting panel, add the class enable-effect for the Page Class field.
Step 3 - Assign content to the homepage
Content of Home page is loaded from modules. Here is the detail configuration of each module.
1. Slideshow - JA ACM Module
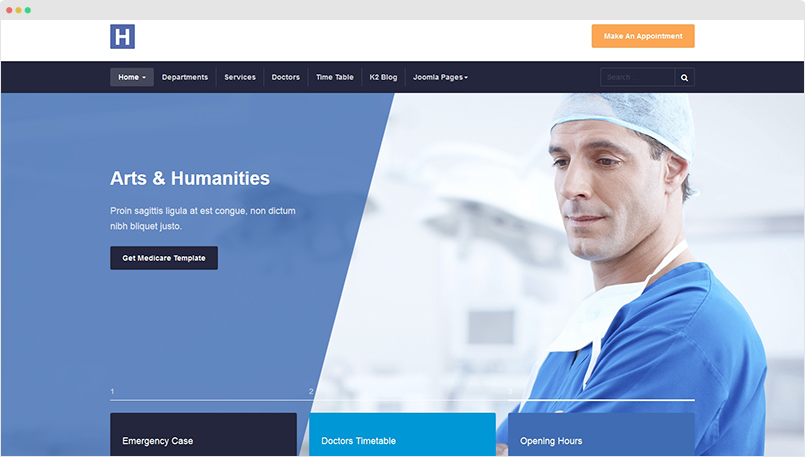
Module position: slideshow
Module Suffix: NOT USED
{":type":"ja_healthcare:slideshow","slideshow":{"jatools-layout-slideshow":"style-owl","slideshow[effect]":["effect-slow"],"slideshow[data]":{"slideshow[data][title]":["Medical Services that You can Trust","Arts & Humanities","Arts & Humanities"],"slideshow[data][desc]":["Proin sagittis ligula at est congue, non dictum nibh bliquet justo.","Proin sagittis ligula at est congue, non dictum nibh bliquet justo.","Proin sagittis ligula at est congue, non dictum nibh bliquet justo."],"slideshow[data][btn-title]":["Get Medicare Template","Get Medicare Template","Get Medicare Template"],"slideshow[data][btn-link]":["#","#","#"],"slideshow[data][image]":["images/joomlart/slideshow/sl-1.jpg","images/joomlart/slideshow/sl-2.jpg","images/joomlart/slideshow/sl-2.jpg"],"rows":3,"cols":6,"type":"list"}}}
Slideshow background image size suggested: 1600x720px
2. Spotlight content block
The content section includes 3 modules assigned to positions: position-1, position-2 and position-3

2.1 Emergency Case - Custom HTML module
Module position: position-1
Module Suffix: module-bg bg-gray-dark  ja-animate dl-1 fadeIn
Custom HTML code:
<p>Proin sagittis ligula at est congue, non dictum nibh aliquet. Etiam justo dolor, barius ac est ut, dolo sit uenenatis sodales libero.</p>

<a class="btn btn-secondary" href="#">More Info Emergency</a>
2.2 Doctors Timetable - Custom HTML module
Module position: position-2
Module Suffix: module-bg bg-cyan ja-animate dl-4 fadeIn
Custom HTML code:
<p>Maecenas mattis id nunc non accumsan.<br>

Phasellus id rutrum nunc. Nulla posuere orci vitae erat bulputate, nec euismod risus.</p>

<a class="btn btn-default" href="/">Read More</a>
2.3 Opening Hours - Custom HTML module
Module position: position-3
Module Suffix: module-bg bg-primary ja-animate dl-8 fadeIn
Custom HTML code:
<ul>

<li><b>Monday - Friday</b> <span>8.30am - 5.00pm</span></li>

<li><b>Monday - Friday</b> <span>8.30am - 5.00pm</span></li>

<li><b>Monday - Friday</b> <span>8.30am - 5.00pm</span></li>

</ul>
3. [Home] About us - JA ACM Module
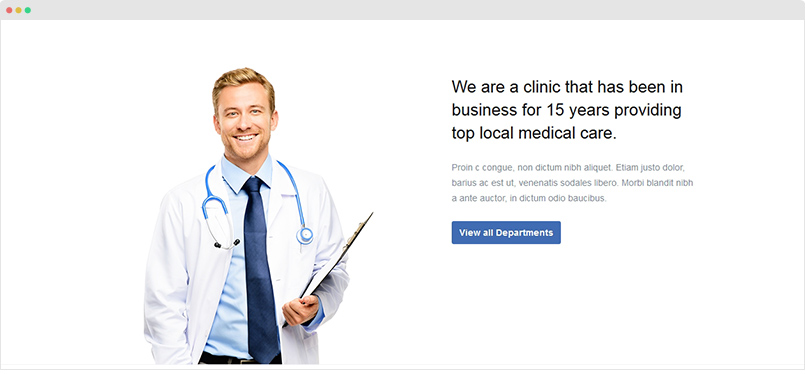
Module position: section
Module Suffix: full-width
{":type":"ja_healthcare:features-intro","features-intro":{"jatools-layout-features-intro":"style-3","features-intro[align]":["1"],"features-intro[img-features]":["images/joomlart/other/feature-6.png"],"features-intro[title]":["We are a clinic that has been in business for 15 years providing top local medical care."],"features-intro[description]":["Proin c congue, non dictum nibh aliquet. Etiam justo dolor, barius ac est ut, venenatis sodales libero. Morbi blandit nibh a ante auctor, in dictum odio baucibus."],"features-intro[button]":["View all Departments"],"features-intro[title-link]":["index.php?option=com_content&view=category&layout=ja_healthcare:department&id=8&Itemid=102"]}}
4. Features Intro
The ACM type is to build features list content block.
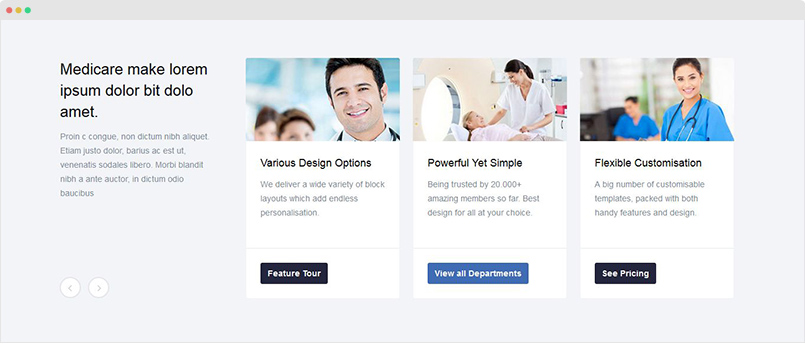
Module position: section
Module Suffix: NOT USED
{":type":"ja_healthcare:features-intro","features-intro":{"jatools-layout-features-intro":"style-1","features-intro[block-title]":["Medicare make lorem ipsum dolor bit dolo amet."],"features-intro[block-intro]":["Proin c congue, non dictum nibh aliquet. Etiam justo dolor, barius ac est ut, venenatis sodales libero. Morbi blandit nibh a ante auctor, in dictum odio \nbaucibus"],"features-intro[columns]":["3"],"features-intro[data]":{"features-intro[data][img]":["images/joomlart/other/feature-1.jpg","images/joomlart/other/feature-2.jpg","images/joomlart/other/feature-3.jpg","images/joomlart/other/feature-1.jpg"],"features-intro[data][title]":["Various Design Options","Powerful Yet Simple","Flexible Customisation","Regular Updates"],"features-intro[data][description]":["We deliver a wide variety of block layouts which add endless personalisation.","Being trusted by 20.000+ amazing members so far. Best design for all at your choice.","A big number of customisable templates, packed with both handy features and design.","Our templates are updated each time a bug is discovered or there is new features."],"features-intro[data][link]":["#","#","#","#"],"features-intro[data][btn-value]":["Feature Tour","View all Departments","See Pricing",""],"features-intro[data][btn-type]":["default","primary","default","default"],"rows":4,"cols":7,"type":"list"}}}
5. Spotlight Block
The ACM type load modules from selected module position in spotlight block, you can set the width for each module position.

Module position: section
Module Suffix: NOT USED
{":type":"ja_healthcare:spotlight","spotlight":{"jatools-layout-spotlight":"style-1","spotlight[module-full-width]":["1"],"spotlight[module-equal-height]":["1"],"spotlight[module-title]":["raw"],"spotlight[data]":{"spotlight[data][position]":["section-left","section-right"],"spotlight[data][xs]":["col-xs-12","col-xs-12"],"undefined":["","","","","","","",""],"spotlight[data][sm]":["col-sm-12","col-sm-12"],"spotlight[data][md]":["col-md-6","col-md-6"],"spotlight[data][lg]":["col-lg-6","col-lg-6"],"rows":2,"cols":6,"type":"list"}}}
The next step is creating modules loaded into the spotlight block. In demo site, we are loading modules from 2 module positions: section-left and section-right
5.1 Video module - ACM Module
Module position: section-left
Module Suffix: NOT USED
{":type":"ja_healthcare:video","video":{"jatools-layout-video":"style-1","video-style[video-style]":["style-dark"],"video-style[video-link]":["youtube=qr1znPlfOxc"]}}
5.2 Feature Intro 2 - ACM Module
Module position: section-right
Module Suffix: NOT USED
{":type":"ja_healthcare:features-intro","features-intro":{"jatools-layout-features-intro":"style-2","features-intro[block-image]":["images/joomlart/other/feature-5.jpg"],"features-intro[block-title]":["Medicare malesuada odio ut turpis luctus luctus"],"features-intro[block-intro]":["Donec auctor ultrices orci sit amet luctus. Suspendisse vel eros lectus. Maecenas ut leo non eros ultricies tristique. Pellentesque habitant morbi tristique senectus."],"features-intro[data]":{"features-intro[data][img]":["images/joomlart/other/feature-4.jpg","images/joomlart/other/feature-7.jpg","images/joomlart/other/feature-8.jpg"],"features-intro[data][title]":["Health Care Services dolo sit\nsodales libero.","Sodales libero Services","Health benenatis sodales "],"features-intro[data][description]":["Proin sagittis ligula at est congue, non dictum nibh aliquet. Etiam justo dolor, barius ac est ut, benenatis sodales libero.","Duis vulputate enim elementum lectus gravida tincidunt et iaculis mauris. Nam malesuada odio ut turpis luctus luctus","Proin sagittis ligula at est congue, non dictum nibh aliquet. Etiam justo dolor, barius ac est ut, benenatis sodales libero."],"features-intro[data][link]":["","",""],"features-intro[data][btn-value]":["","",""],"features-intro[data][btn-type]":["","",""],"rows":3,"cols":7,"type":"list"}}}
6. [Home] Articles - Category: Articles - Category
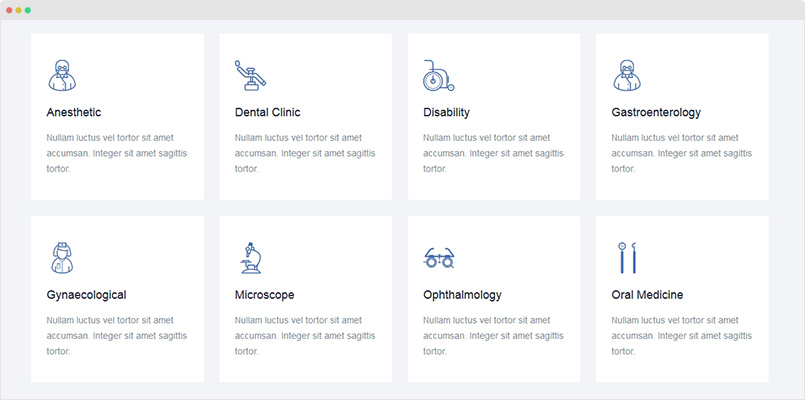
Module settings
Module position: section
Module Suffix: NOT USED
Alternative Layout: articles-grid
7. Spotlight 2 Block
The ACM type load modules from selected module position in spotlight block, you can set the width for each module position.
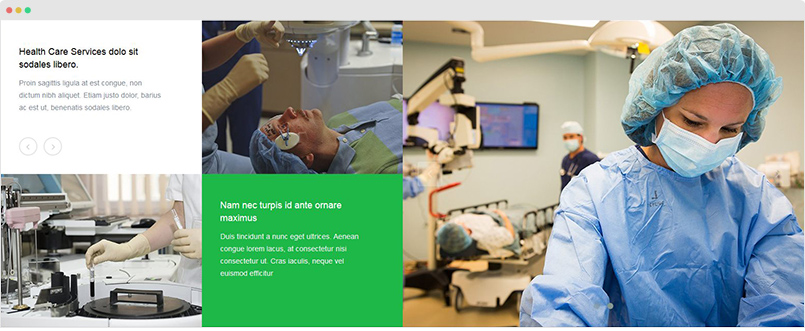
Module position: section
Module Suffix: NOT USED
{":type":"ja_healthcare:spotlight","spotlight":{"jatools-layout-spotlight":"style-1","spotlight[module-full-width]":["1"],"spotlight[module-equal-height]":["1"],"spotlight[module-title]":["raw"],"spotlight[data]":{"spotlight[data][position]":["section-1","section-2"],"spotlight[data][xs]":["col-xs-12","col-xs-12"],"undefined":["","","","","","","",""],"spotlight[data][sm]":["col-sm-12","col-sm-12"],"spotlight[data][md]":["col-md-6","col-md-6"],"spotlight[data][lg]":["col-lg-6","col-lg-6"],"rows":2,"cols":6,"type":"list"}}}
The next step is creating modules loaded into the spotlight block. In demo site, we are loading modules from 3 module positions: section-1 and section-2
7.1 [Home] Feature Intro 2 - 2 - ACM Module
Module position: section-1
Module Suffix: NOT USED
{":type":"ja_healthcare:features-intro","features-intro":{"jatools-layout-features-intro":"style-2","features-intro[block-image]":["images/joomlart/other/feature-11.jpg"],"features-intro[block-title]":["Nam nec turpis id ante ornare maximus"],"features-intro[block-intro]":["Duis tincidunt a nunc eget ultrices. Aenean congue lorem lacus, at consectetur nisi consectetur ut. Cras iaculis, neque vel euismod efficitur"],"features-intro[data]":{"features-intro[data][img]":["images/joomlart/other/feature-12.jpg","images/joomlart/other/feature-10.jpg","images/joomlart/other/feature-9.jpg"],"features-intro[data][title]":["Health Care Services dolo sit\nsodales libero.","Health Care Services dolo sit\nsodales libero.","Health Care Services dolo sit\nsodales libero."],"features-intro[data][description]":["Proin sagittis ligula at est congue, non dictum nibh aliquet. Etiam justo dolor, barius ac est ut, benenatis sodales libero.","Proin sagittis ligula at est congue, non dictum nibh aliquet. Etiam justo dolor, barius ac est ut, benenatis sodales libero.","Proin sagittis ligula at est congue, non dictum nibh aliquet. Etiam justo dolor, barius ac est ut, benenatis sodales libero."],"features-intro[data][link]":["","",""],"features-intro[data][btn-value]":["","",""],"features-intro[data][btn-type]":["","",""],"rows":3,"cols":7,"type":"list"}}}
7.2 Gallery - ACM Module
Module position: section-2
Module Suffix: NOT USED
{":type":"ja_healthcare:slideshow","slideshow":{"jatools-layout-slideshow":"style-gallery","slideshow[data]":{"slideshow[data][image]":["images/joomlart/slideshow/sl-4.jpg","images/joomlart/slideshow/sl-3.jpg"],"rows":2,"cols":2,"type":"list"}}}
8. [ACM Spotlight] Block accordion - Blog - JA ACM Module
The ACM type load modules from selected module positions in spotlight block, you can set the width for each module position.
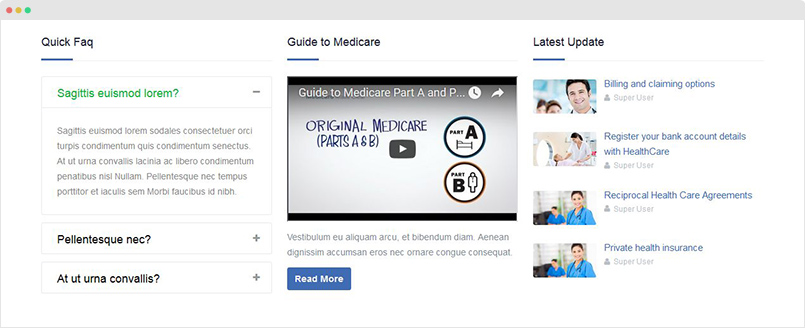
Module position: section
Module Suffix: NOT USED
{":type":"ja_healthcare:spotlight","spotlight":{"jatools-layout-spotlight":"style-1","spotlight[module-full-width]":["0"],"spotlight[module-equal-height]":["1"],"spotlight[module-title]":["T3xhtml"],"spotlight[data]":{"spotlight[data][position]":["accordion","video-medicare","blog-latest"],"spotlight[data][xs]":["col-xs-12","col-xs-12","col-xs-12"],"undefined":["","","","","","","","","","","",""],"spotlight[data][sm]":["col-sm-12","col-sm-12","col-sm-12"],"spotlight[data][md]":["col-md-4","col-md-4","col-md-4"],"spotlight[data][lg]":["col-lg-4","col-lg-4","col-lg-4"],"rows":3,"cols":6,"type":"list"}}}
The next step is creating modules loaded into the spotlight block. In demo site, we are loading modules from 3 module positions: accordion, video-medicare and blog-latest
8.1 Quick Faq - ACM Module
Module position: accordion
Module Suffix: ja-animate dl-item-0 fadeInUp
{":type":"ja_healthcare:accordion","accordion":{"jatools-layout-accordion":"style-1","accordion[data]":{"accordion[data][accordion-name]":["Sagittis euismod lorem?","Pellentesque nec?","At ut urna convallis?"],"accordion[data][accordion-desc]":["Sagittis euismod lorem sodales consectetuer orci turpis condimentum quis condimentum senectus. At ut urna convallis lacinia ac libero condimentum penatibus nisl Nullam. Pellentesque nec tempus porttitor et iaculis sem Morbi faucibus id nibh. ","Sagittis euismod lorem sodales consectetuer orci turpis condimentum quis condimentum senectus. At ut urna convallis lacinia ac libero condimentum penatibus nisl Nullam. Pellentesque nec tempus porttitor et iaculis sem Morbi faucibus id nibh. ","Sagittis euismod lorem sodales consectetuer orci turpis condimentum quis condimentum senectus. At ut urna convallis lacinia ac libero condimentum penatibus nisl Nullam. Pellentesque nec tempus porttitor et iaculis sem Morbi faucibus id nibh. "],"rows":3,"cols":3,"type":"list"}}}
8.2 Guide to Medicare - Custom HTML Module
Module position: video-medicare
Module Suffix: ja-animate dl-item-1 fadeInUp
Custom HTML code:
<div class="videoWrapper">

<iframe width="560" height="315" src="https://www.youtube.com/embed/AN8aTVy5hP4" allowfullscreen></iframe>

</div>

<p style="margin-top: 12px">

  Vestibulum eu aliquam arcu, et bibendum diam. Aenean dignissim accumsan eros nec ornare congue consequat.

</p>

<a href="#" class="btn btn-primary">Read More</a>
8.3 Latest Blog - Custom HTML Module
Module position: blog-latest
Module Suffix: ja-animate dl-item-3 fadeInUp
9. [Home] Call To Actions - Custom HTML Module

Module position: section
Module Suffix: full-width
Custom HTML code:
<div class="call-to-actions">

	<div class="container">

		<div class="pull-left">

				<div class="ja-animate" data-animation="move-from-right" data-delay="200">

					<h4>Not sure that to do?</h4>

				</div>

				<div class="ja-animate" data-animation="move-from-right" data-delay="400">

					<h4>The advice Nurse will help you figure it out</h4>

				</div>

		</div>

		<a href="#" class="btn btn-lg btn-border pull-right ja-animate" data-animation="fadeIn" data-delay="600">Make An Appointment</a>

	</div>

</div>
Departments Page
The Page displays list of articles from selected category in grid view. This page uses extended category blog layout.
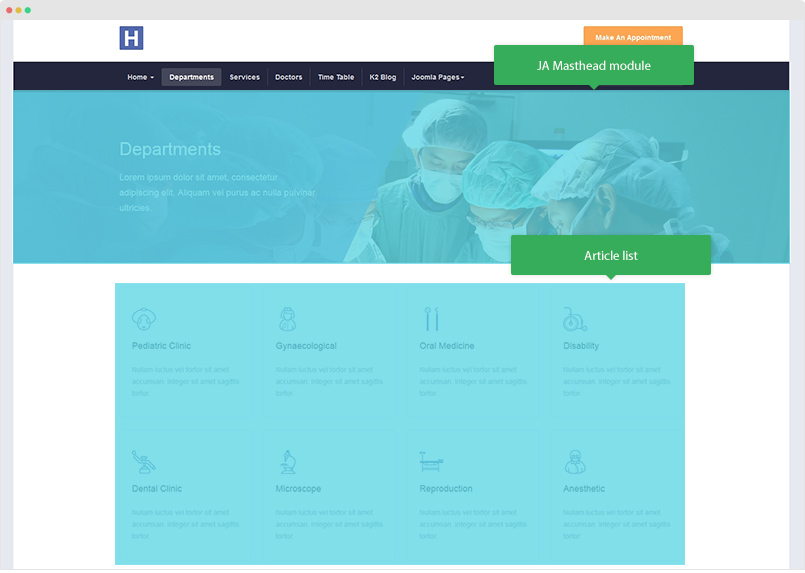
Here are steps to replicate the same page.
Step 1 - Create menu item
Go to Menu » Main menu, add new menu item, select Articles » xLayout - Departments menu type, assign "Departments" category then assign "ja_healthcare - Default" template style.
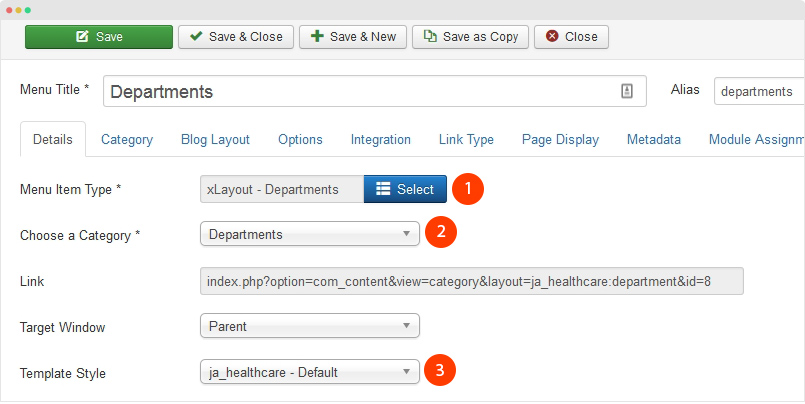
- Blog layout setting - please select the "departments" article layout
- Options setting
- Page Display setting - add class
enable-effectif you want to enable in-time animation for the page.
Step 2 - Create Masthead module - JA ACM Module
Create new module and select module "JA Masthead" and configure the masthead by selecting menu item, adding masthead title, masthead description and masthead background image.
Module position: masthead
Module Suffix: NOT USED
Step 3 - Add icons for article
Each article in the listing page has icon, the template supports Flaticon icon.
![]()
Here is the steps to add icon for article.
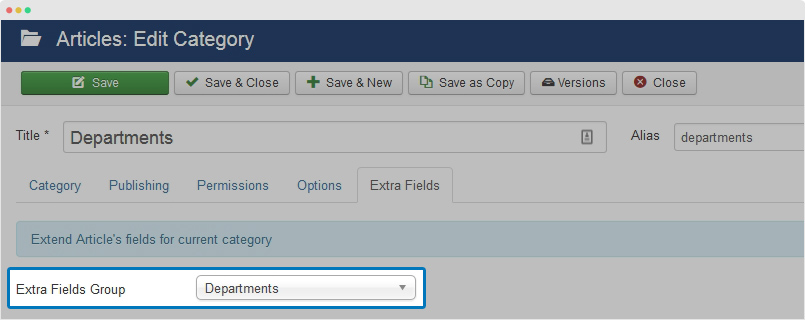
#1: Add extra field group for "Departments" category - open the setting page of the "Departments" category, in the "Extra Fields" tab, assign "Departments" extra fields group then save the setting.
#2: Add icon for articles of "Departments" category - open articles of the "Departments" category, in the "Extra Fields" tab, add flaticon class, for example: flaticon-operating-mask
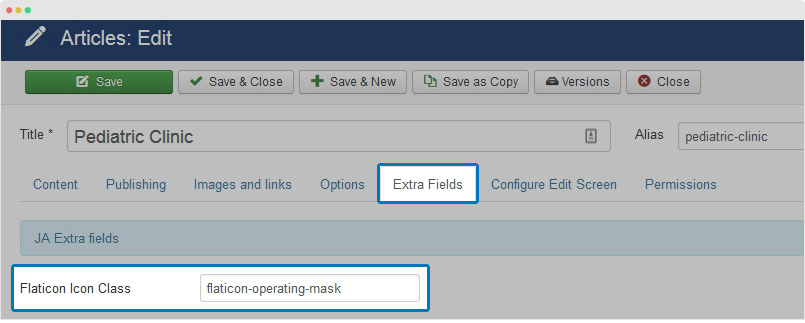
The template integrates Flation, you can find icons from the flation main site: http://www.flaticon.com/
Services Page
The page displays list of articles from selected category in grid view. This page uses extended category blog layout.
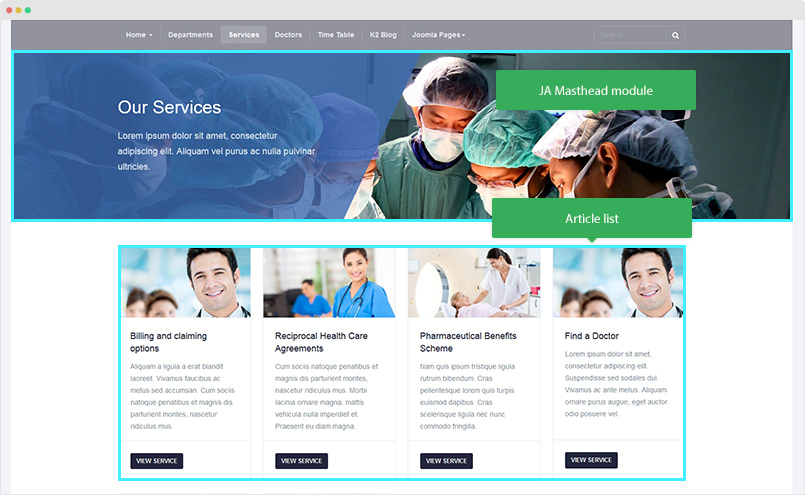
Here are steps to replicate the same page.
Step 1 - Create menu item
Go to Menu » Main menu, add new menu item, select Articles » xLayout - Service menu type, assign "Services" category then assign "ja_healthcare - No Sidebar" template style.

In the , please assign the "Doctors" category for the "Categories Selection" field.

Option Settings - full screenshot
Create K2 Filter module on the page
The Filter module is JA K2 Search and Filter module. Please refer to the JA K2 Filter configuration section.
Step 2 - Create Masthead module - JA ACM Module
Create new module and select module "JA Masthead" and configure the masthead by selecting menu item, adding masthead title, masthead description and masthead background image.
Module position: masthead
Module Suffix: NOT USED
Doctors Page
The page displays list of K2 articles from selected categories in grid view.
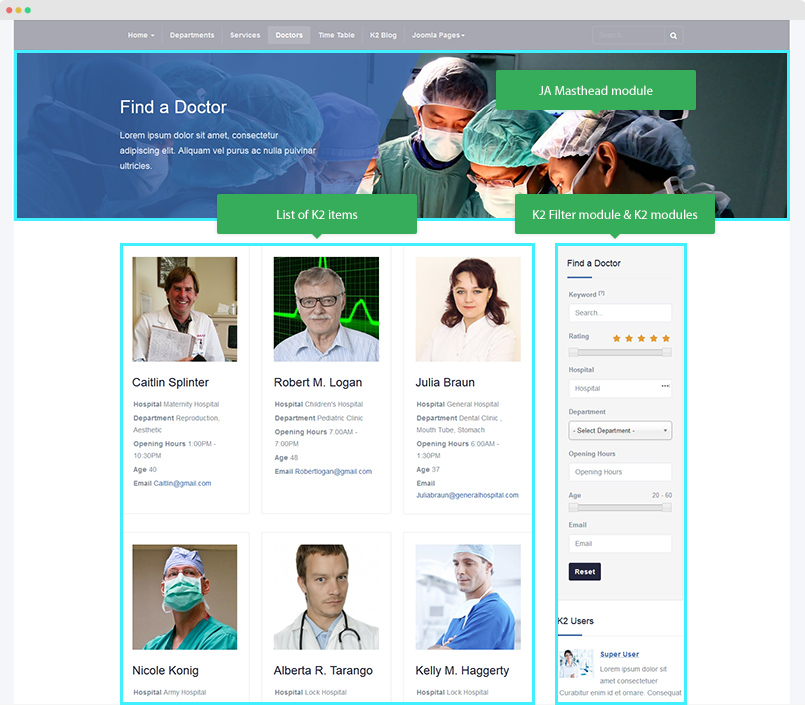
Here are steps to replicate the same page.
Step 1 - Create menu item
Go to Menu » Main menu, add new menu item, select K2 » Item listings » Categories menu type, assign "Doctors" category then assign "ja_healthcare - No Sidebar" template style.
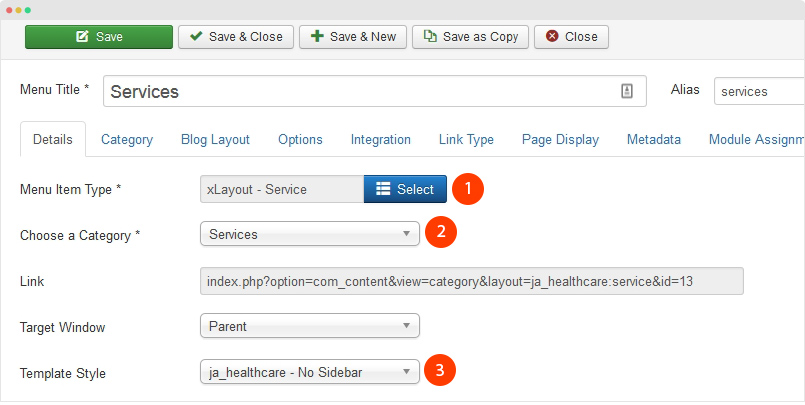
- Blog layout setting - please select the "service" article layout
- Options setting
Step 2 - Create Masthead module - JA ACM Module
Create new module and select module "JA Masthead" and configure the masthead by selecting menu item, adding masthead title, masthead description and masthead background image.
Module position: masthead
Module Suffix: NOT USED
K2 Blog Page
The K2 Blog page displays list of K2 items from seclected categories in blog layout.
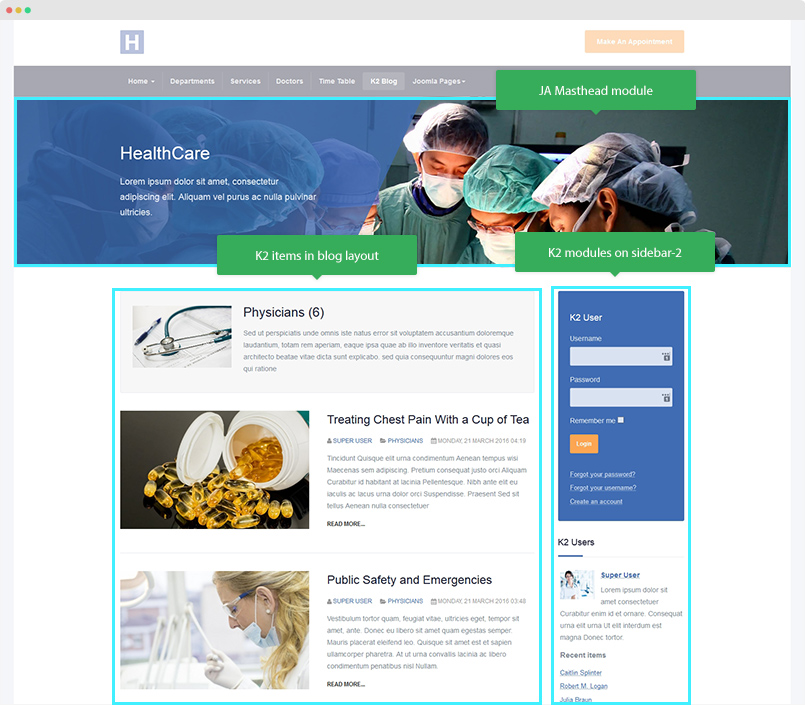
Create new menu item, select menu type K2 » Item listings » Categories. Check out the menu setting in the screenshot below:

In the , please assign the "Physicians" category for the "Categories Selection" field.

ACM Module settings
JA ACM module (JoomlArt Advanced Custom module) is to help you build content blocks (Slideshow, Tabs, Testimonials, etc) for your Joomla site easily based on pre-made layouts and styles.
Create new ACM module
We built a lot of content blocks in JA Healthcare template based on JA ACM module. Here is the step to create a content block with JA ACM.
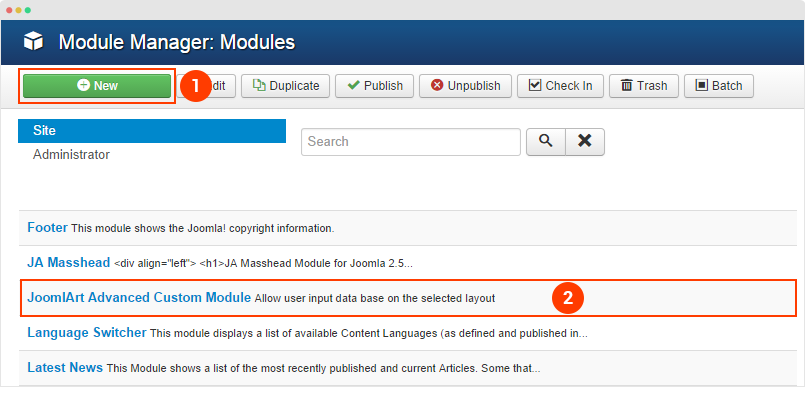
Step 1 - Create JA ACM module
From your site back-end, go to: Extensions » Module, hit the "New" button to create module then select JoomlArt Advanced Custom Module
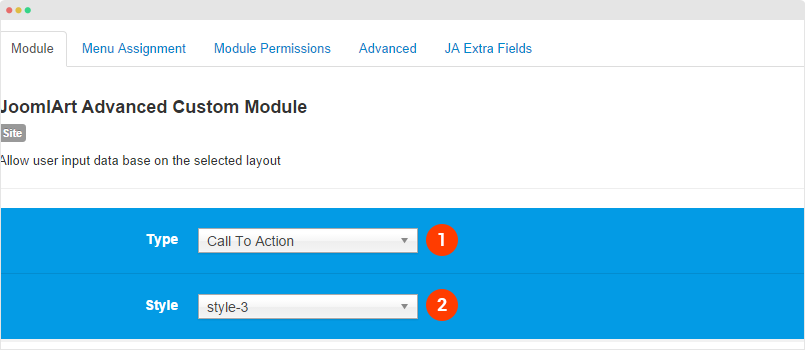
Step 2 - Select type and style
The module supports many types (12 for now, more to come), in each type, it includes multiple styles.
Step 3 - Select position, pages to display the module
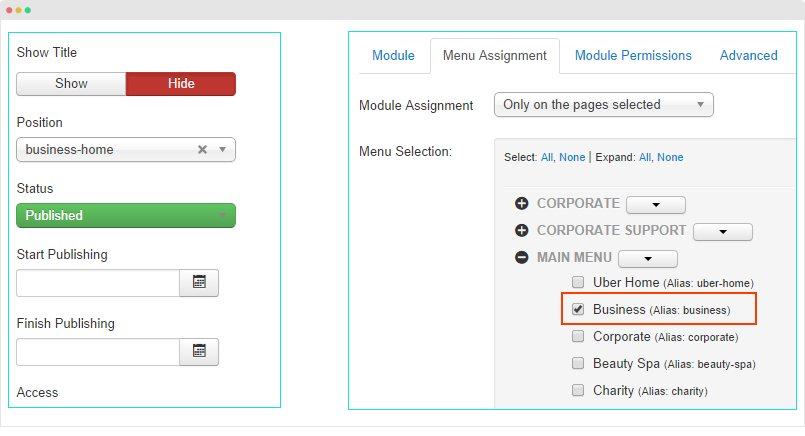
Step 4 - Edit content
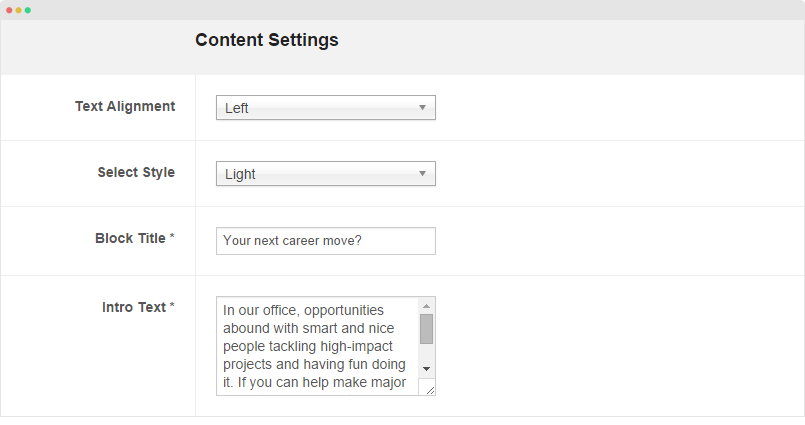
Once you select type, style, you would see the corresponding fields. For each type, it includes sample data by default that help you understand the structure of content block. Now you can change setting of the fields, add content, etc.
Add Sample Data
Sample data is to quickly add content for a ACM module. You can add sample data from one JA ACM module to an other JA ACM module. In the setting panel of JA ACM module, hit the Advanced button on the top options bar then copy the sample data.
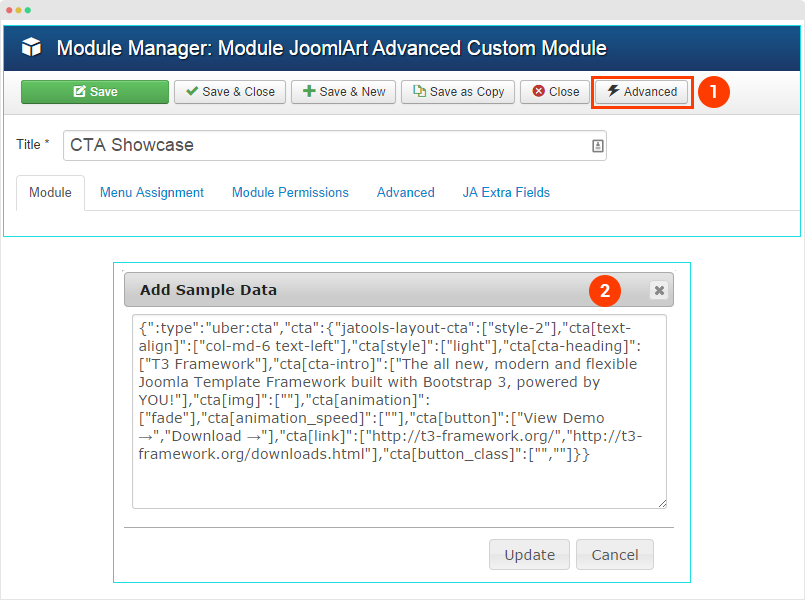
The sample data includes: type, style, settings and values in all fields of the corresponding type and style.
Here is an example of sample data
{":type":"ja_healthcare:video","video":{"jatools-layout-video":"style-1","video-style[video-style]":["style-dark"],"video-style[video-link]":["youtube=qr1znPlfOxc"]}}
Replicate a content block as JA Healthcare demo
JA Healthcare template demo site includes a lot of content blocks that based on JA ACM module, we will provide you with sample data for each content block and detail configuration so that you can create such content blocks as our Demo. Just copy the sample data, paste it to your JA ACM module and the content will be updated for the module.
Content Block Settings
You can view all content blocks that we build from JA ACM in the JA Healthcare template Demo site →. In the section, we will provide with detail configuration and sample data for each content block.
1. Slideshow
The slideshow type is to build slideshow with images, title, description, link and the abiliy to configure animation speed.

Module position: slideshow
Module Suffix: NOT USED
{":type":"ja_healthcare:slideshow","slideshow":{"jatools-layout-slideshow":"style-owl","slideshow[effect]":["effect-slow"],"slideshow[data]":{"slideshow[data][title]":["Medical Services that You can Trust","Arts & Humanities","Arts & Humanities"],"slideshow[data][desc]":["Proin sagittis ligula at est congue, non dictum nibh bliquet justo.","Proin sagittis ligula at est congue, non dictum nibh bliquet justo.","Proin sagittis ligula at est congue, non dictum nibh bliquet justo."],"slideshow[data][btn-title]":["Get Medicare Template","Get Medicare Template","Get Medicare Template"],"slideshow[data][btn-link]":["#","#","#"],"slideshow[data][image]":["images/joomlart/slideshow/sl-1.jpg","images/joomlart/slideshow/sl-2.jpg","images/joomlart/slideshow/sl-2.jpg"],"rows":3,"cols":6,"type":"list"}}}
Slideshow background image size suggested: 1600x720px
2. Accordion
The module display text in accordion
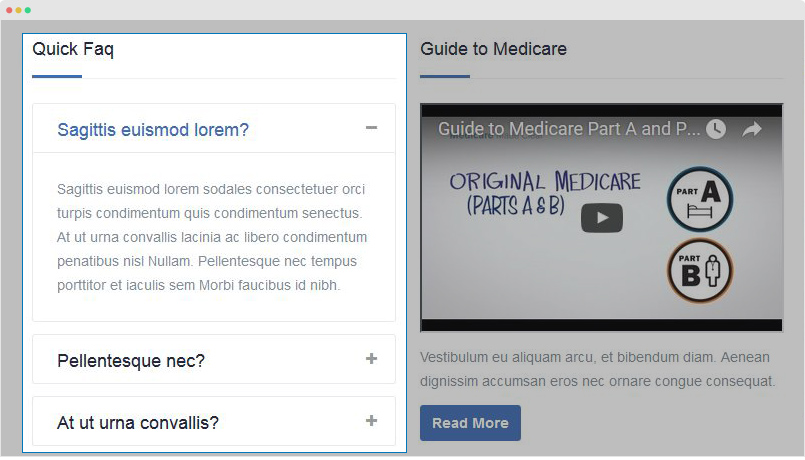
Module position: accordion
Module Suffix: NOT USED
{":type":"ja_healthcare:accordion","accordion":{"jatools-layout-accordion":"style-1","accordion[data]":{"accordion[data][accordion-name]":["Sagittis euismod lorem?","Pellentesque nec?","At ut urna convallis?"],"accordion[data][accordion-desc]":["Sagittis euismod lorem sodales consectetuer orci turpis condimentum quis condimentum senectus. At ut urna convallis lacinia ac libero condimentum penatibus nisl Nullam. Pellentesque nec tempus porttitor et iaculis sem Morbi faucibus id nibh. ","Sagittis euismod lorem sodales consectetuer orci turpis condimentum quis condimentum senectus. At ut urna convallis lacinia ac libero condimentum penatibus nisl Nullam. Pellentesque nec tempus porttitor et iaculis sem Morbi faucibus id nibh. ","Sagittis euismod lorem sodales consectetuer orci turpis condimentum quis condimentum senectus. At ut urna convallis lacinia ac libero condimentum penatibus nisl Nullam. Pellentesque nec tempus porttitor et iaculis sem Morbi faucibus id nibh. "],"rows":3,"cols":3,"type":"list"}}}
3. Features Intro
The ACM type is to build list of features content block

Module position: section
Module Suffix: NOT USED
{":type":"ja_healthcare:features-intro","features-intro":{"jatools-layout-features-intro":"style-1","features-intro[block-title]":["Medicare make lorem ipsum dolor bit dolo amet."],"features-intro[block-intro]":["Proin c congue, non dictum nibh aliquet. Etiam justo dolor, barius ac est ut, venenatis sodales libero. Morbi blandit nibh a ante auctor, in dictum odio \nbaucibus"],"features-intro[columns]":["3"],"features-intro[data]":{"features-intro[data][img]":["images/joomlart/other/feature-1.jpg","images/joomlart/other/feature-2.jpg","images/joomlart/other/feature-3.jpg","images/joomlart/other/feature-1.jpg"],"features-intro[data][title]":["Various Design Options","Powerful Yet Simple","Flexible Customisation","Regular Updates"],"features-intro[data][description]":["We deliver a wide variety of block layouts which add endless personalisation.","Being trusted by 20.000+ amazing members so far. Best design for all at your choice.","A big number of customisable templates, packed with both handy features and design.","Our templates are updated each time a bug is discovered or there is new features."],"features-intro[data][link]":["#","#","#","#"],"features-intro[data][btn-value]":["Feature Tour","View all Departments","See Pricing",""],"features-intro[data][btn-type]":["default","primary","default","default"],"rows":4,"cols":7,"type":"list"}}}
4. Spotlight Block
The ACM type load modules from selected module position in spotlight block, you can set the width for each module position.

Module position: section
Module Suffix: NOT USED
{":type":"ja_healthcare:spotlight","spotlight":{"jatools-layout-spotlight":"style-1","spotlight[module-full-width]":["1"],"spotlight[module-equal-height]":["1"],"spotlight[module-title]":["raw"],"spotlight[data]":{"spotlight[data][position]":["section-left","section-right"],"spotlight[data][xs]":["col-xs-12","col-xs-12"],"undefined":["","","","","","","",""],"spotlight[data][sm]":["col-sm-12","col-sm-12"],"spotlight[data][md]":["col-md-6","col-md-6"],"spotlight[data][lg]":["col-lg-6","col-lg-6"],"rows":2,"cols":6,"type":"list"}}}
The next step is creating modules loaded into the spotlight block. In demo site, we are loading modules from 2 module positions: section-left and section-right
4.1 Video module - ACM Module
Module position: section-left
Module Suffix: NOT USED
{":type":"ja_healthcare:video","video":{"jatools-layout-video":"style-1","video-style[video-style]":["style-dark"],"video-style[video-link]":["youtube=qr1znPlfOxc"]}}
4.2 Feature Intro 2 - ACM Module
Module position: section-right
Module Suffix: NOT USED
{":type":"ja_healthcare:features-intro","features-intro":{"jatools-layout-features-intro":"style-2","features-intro[block-image]":["images/joomlart/other/feature-5.jpg"],"features-intro[block-title]":["Medicare malesuada odio ut turpis luctus luctus"],"features-intro[block-intro]":["Donec auctor ultrices orci sit amet luctus. Suspendisse vel eros lectus. Maecenas ut leo non eros ultricies tristique. Pellentesque habitant morbi tristique senectus."],"features-intro[data]":{"features-intro[data][img]":["images/joomlart/other/feature-4.jpg","images/joomlart/other/feature-7.jpg","images/joomlart/other/feature-8.jpg"],"features-intro[data][title]":["Health Care Services dolo sit\nsodales libero.","Sodales libero Services","Health benenatis sodales "],"features-intro[data][description]":["Proin sagittis ligula at est congue, non dictum nibh aliquet. Etiam justo dolor, barius ac est ut, benenatis sodales libero.","Duis vulputate enim elementum lectus gravida tincidunt et iaculis mauris. Nam malesuada odio ut turpis luctus luctus","Proin sagittis ligula at est congue, non dictum nibh aliquet. Etiam justo dolor, barius ac est ut, benenatis sodales libero."],"features-intro[data][link]":["","",""],"features-intro[data][btn-value]":["","",""],"features-intro[data][btn-type]":["","",""],"rows":3,"cols":7,"type":"list"}}}
5. Testimonials Block
The ACM type is to build testimonial content section.
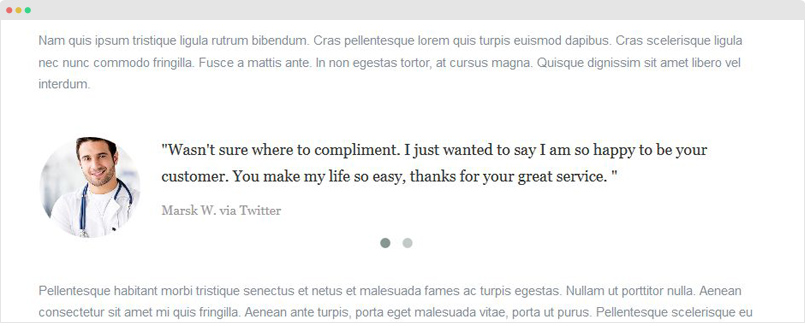
Module position: testimonials
Module Suffix: NOT USED
{":type":"ja_healthcare:testimonials","testimonials":{"jatools-layout-testimonials":"style-1","testimonials[acm-style]":["style-light"],"testimonials[enable-controls]":["0"],"testimonials[data]":{"testimonials[data][testimonial-text]":["Wasn't sure where to compliment. I just wanted to say I am so happy to be your customer. You make my life so easy, thanks for your great service. ","We love the theme, it allows me to seek creativity. I set up my e-store without having to be a coding expert."],"testimonials[data][testimonial-img]":["images/joomlart/demo/doctors/doctor-1.jpg","images/joomlart/demo/doctors/doctor-4.jpg"],"testimonials[data][author-name]":["Marsk W. via Twitter","Trung Chu"],"testimonials[data][author-img]":["",""],"rows":2,"cols":5,"type":"list"}}}
Customizing Style
JA ACM module content type structure
Each content type of JA ACM module is a folder stored in templates\ja_healthcare\acm\.
templates/ja_healthcare/acm
+-- slideshow/
¦    +-- css/
¦    +-- less/
¦    +-- tmpl/
¦    +-- js/
+-- features-intro/
+-- accordion/
+-- testimonials/
+-- video/
+-- spotlight/
+-- timetable/
In each folder (content type folder), it includes:
.xmlfile: define the fields in the layout- tmpl folder: include all style files that the content type support, each style is a
.phpfile, the file is to define how the fields in the.xmlfile displayed in front-page. - less folder: include
.lessfile to style for the content type and each style.
1.style.less: global style of the content type and to import.lessfile of each style.
2.style-1.less: contain style of Style 1 (tmpl/style-1.php). The .less file name is the same with .php style name in the tmpl folder. - css folder: the compiled CSS files from the less folder, all files are joined so you just have
style.cssin this folder. - .js folder (if necessary): include JavaSripts files for the content type.
3. Customize style
You can customize style for any content block and style that the content block supports. Open .less file in the less folder of the block folder, for example: templates\ja_healthcare\acm\features-intro\less then go ahead with your customization. Once done, please save the file and compile LESS to CSS via Uber template administration panel.
Please do not use .css files in the templates\ja_healthcare\acm\features-intro\css folder to customize as the files are just compiled files from less folder so if you compile LESS to CSS, the files will be overridden and your customization will be lost.
Create new fields, style
1. Add new fields for a content type
You can add new fields for any content type, open the .xml file then define new fields using the format below:
<field name="button" type="text" default="" label="FIELD_LABEL" description="FIELD_DESC" required="1" />
Select fields to display in specific style: styles in a content type load different fields depend on the purpose of the style. To do this, when defining a field in .xml file, select layouts to active the field, please follow the format:
<field name="button" type="text" default="" label="FIELD_LABEL" description="FIELD_DESC" required="1" layouts="default, style-5"/>
2. Create new style for a content type
The best way to create new style for a type is cloning a style file then rename the cloned file and customize the PHP code.
Create new content type
You can create new content type to build content for your site.
- Step 1 - create folder inside
templates\ja_healthcare\acmfolder - Step 2 - create
.xmlfile in the folder and define fields for the content type - Step 3 - create tmpl folder, add style files for the content type (style-1.php, style-2.php) and call the fields, define layout, class for fields for the style
- Step 4 - create less folder, add
.lessfiles (style.less, style-1.less, style-2.less) and add style for the content block, style in those files. - Step 5 (if required) - create js folder, add
.jsfiles and add JavaScripts that is used for the content block.
Configuration
Supported Layouts
JA Healthcare supports 2 layouts by default: default and default-nosidebar. Here are the structure of the supported layouts.
Assign Layout for a template style
You can create multiple templates style for JA Healthcare template, each template style is assigned to one layout and the template style is assigned to specific menu items so that in one site, you use 1 template but you can use as many layouts as you want.
To assign a layout for a JA Healthcare template style, open the template style » Layout setting panel » assign layout for the template style.
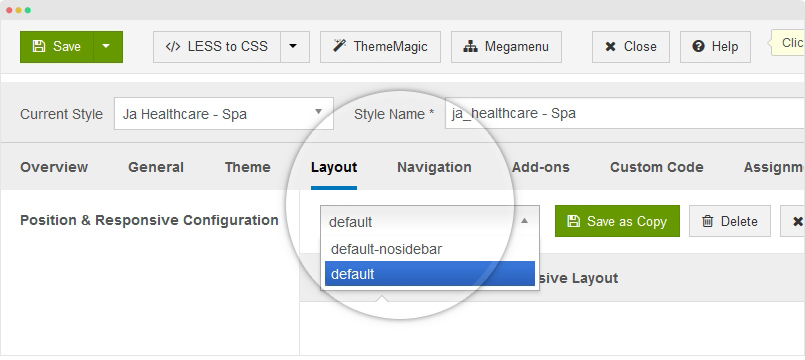
Layout configuration
Once you assign layout for a template style, you can configure the layout to meet your requirements. There are 2 configuration panels: Layout Structure configuration and responsive layout configuration.
1. Layout Structure configuration
The layout structure allows you to change position for any position in the layout, configure number of positions in spotlight block.

2. Responsive Layout configuration
In the "Responsive Configuration", select the responsive layout you want to configure layout for.
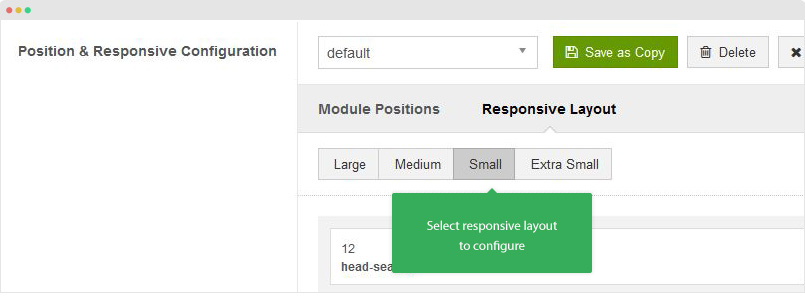
In the responsive layout configuration, you can disable any position you don't want to show in the layout, resize positions in spotlight block.
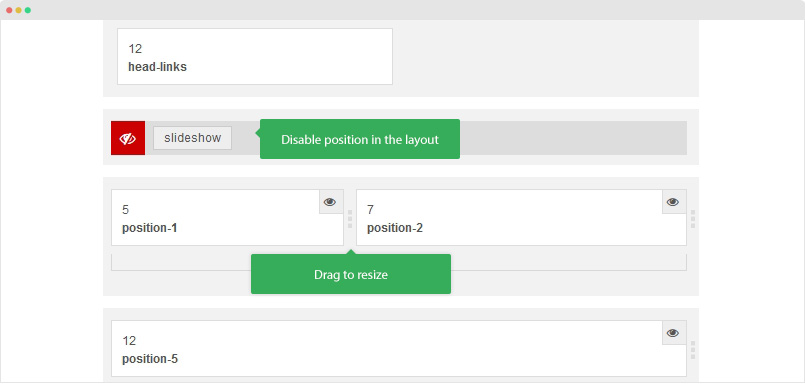
Logo Setting
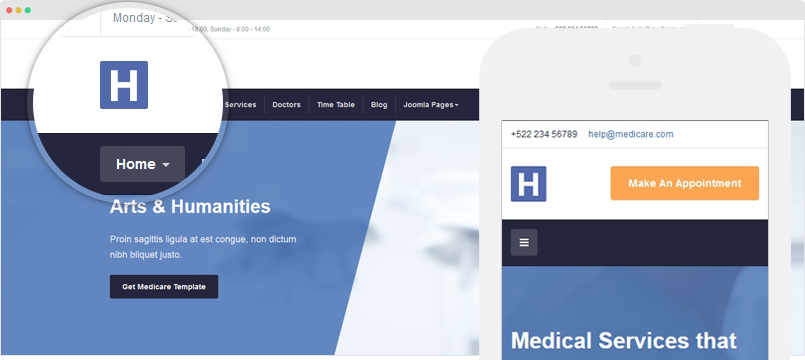
The logo settings are included in the Template Setting panel and its not global settings so you can use different logo for each template style. To change the logo, open template style setting panel » Theme Setting and you would see the logo setting
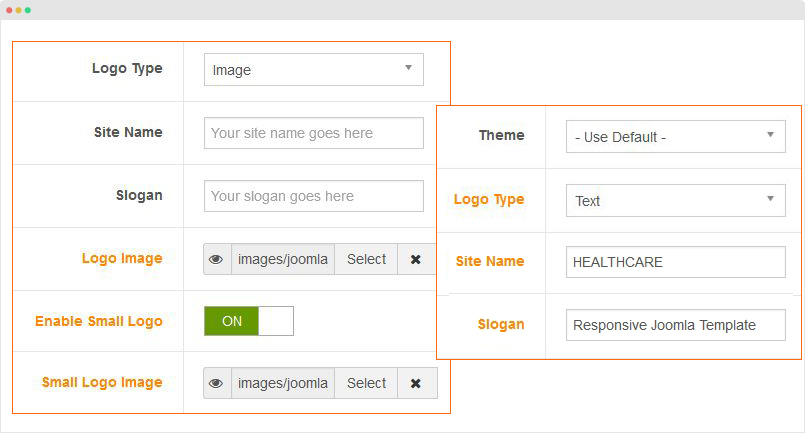
Text Logo
There are 2 Logo types: Text and Image. For the Text Logo, just type the Site Name and Slogan.
The text logo is the same in all responsive layouts.
Image Logo
Browse image you want to display as your site logo. If you want to use different logo in small screens like tablet and mobile, enable the "Small Logo" option and browse logo image.
2. Megamenu and Mobile Menu Configuration
JA Healthcare supports 2 menu systems: Megamenu on Desktop layout and Off-canvas on collapsed layouts: Tablet and Mobile.
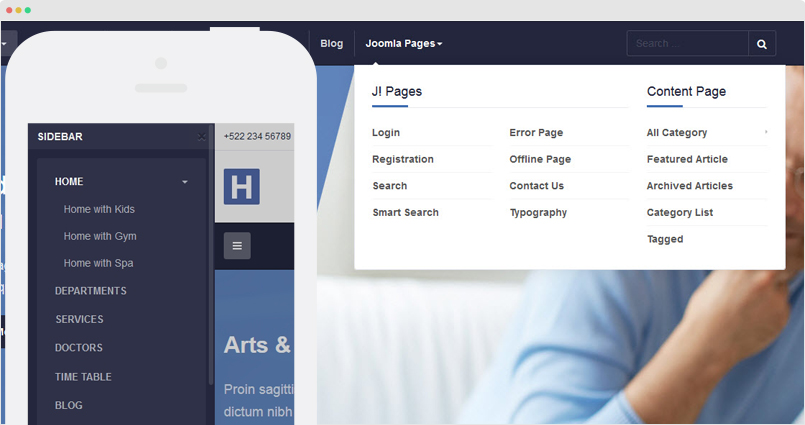
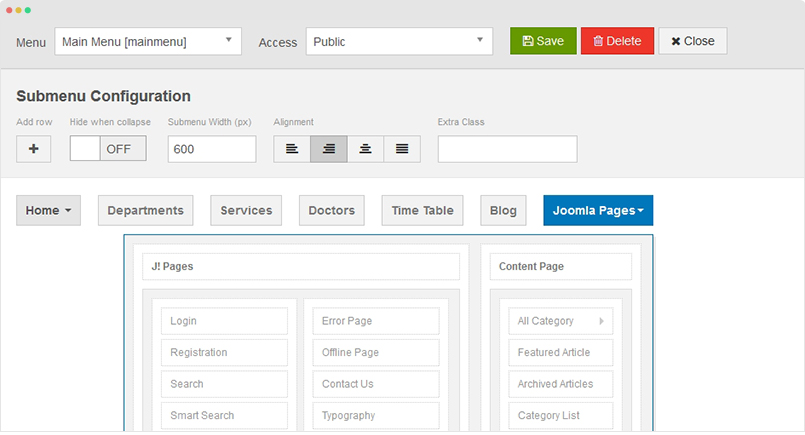
3.1 Megamenu Menu
In the Navigation setting panel, enable Megamenu, assign Menu and hit the Megamenu button to open the Megamenu configuration panel.
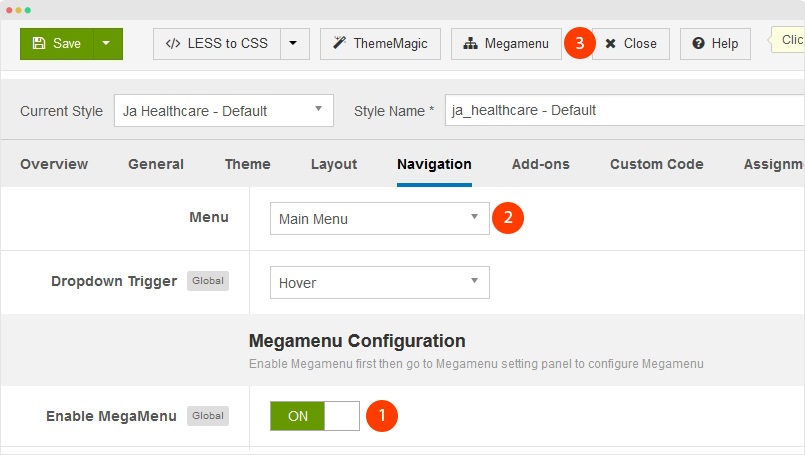
In the configuration panel, select menu item and use the built-in options to configure the megamenu for the menu item.
3.2 Off-canvas Sidebar
There are 2 steps to activate Off-canvas as mobile menu.
To enable Off-canvas sidebar, go to JA Healthcare template style > Addon-ons and enable the Off-canvas sidebar option.
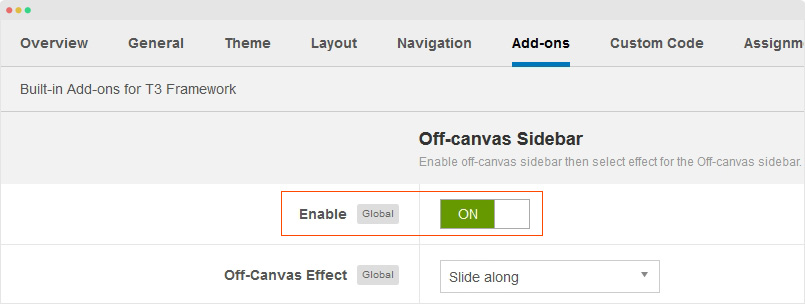
Next, create Menu module and assign to the off-canvas position. Check out the module settings below:
Module position: off-canvas
Module Suffix: NOT USED
Back-end Settings
Footer Info modification
The footer info includes 2 sections: Copyrights and T3 footer logo.

Copyrights Info modification
To change the copyrights info, open the templates/ja_healthcare/html/mod_footer/default.php file, find the following info and change to what you want.
<small><?php echo $lineone; ?> Designed by <a href="http://www.joomlart.com/" title="Visit Joomlart.com!" <?php echo method_exists('T3', 'isHome') && T3::isHome() ? '' : 'rel="nofollow"' ?>>JoomlArt.com</a>.</small>
Disable T3 Footer Logo
You can disable the T3 Footer Logo in the template style manager, open the General setting panel, disable the Show T3 Logo option.

Documentation is a WIP. If you have any specific request or feedback as well as suggestions, feel free to drop us a line in JA Healthcare template forum. We'll try to cover them all.
