Template Installation
The section will help you with steps to install JA Simpli template - Quickstart and Manual installation.
System requirement
JA Simpli template is native with Joomla 3. Please make sure your system meets the following requirements:
Software
- Software: PHP (Magic Quotes GPC off): 5.3.1 + (5.4+ recommended)
Databases
- MySQL(InnoDB support required): 5.1+
- MSSQL 10.50.1600.1+
- PostgreSQL 8.3.18+
Web Severs
- Apache 2.x+
- Microsoft IIS 7
- Nginx 1.0 (1.1 recommended)
Browser requirement
- Firefox 4+
- IE (Internet Explorer) 8+
- Google Chrome 10+
- Opera 10+
- Safari 5+
Development Environment
During development process, Localhost is preferred. You can use the following servers on your PC to develop your site.
Windows
- WAMPSEVER
- XAMPP for Windows
Linux
- LAMP Bubdle
- XAMPP for Linux
Mac OS
- MAMP & MAMP Pro
- XAMPP for Mac OS
Download packages
The download package of JA Simpli includes:
- Quickstart package
- JA Simpli template
Quickstart installation
Why Quickstart
The quickstart allows you to replicate JA Simpli demo to your server. It means, after installing the quickstart, you will have a clone of our demo site on your server.
Download JA Simpli quickstart package →, upload to your server and extract it.
Step 1 - Configuration: add Site name, Admin email, Admin username and password
Step 2 - Database: select database type, host name, database username, password, database name & table prefix
Step 3 - Overview: select sample data to install, we suggest to use Default English (GB) Sample Data. You can install multilingual in the step.
Step 4 - Remove/Rename "installation" folder: for security purpose, you need to rename or remove the "installation" folder
Detail documentation with screenshots
Manual Installation
Step 1 - Install JA Simpli template
From your back-end setting panel, go to: "Extensions → Manage", browse JA Simpli template installation package then hit the "Upload and Install"

Step 2 - Set default template style
Go to: "Extensions → Template", set JA Simpli template style as your default template style.
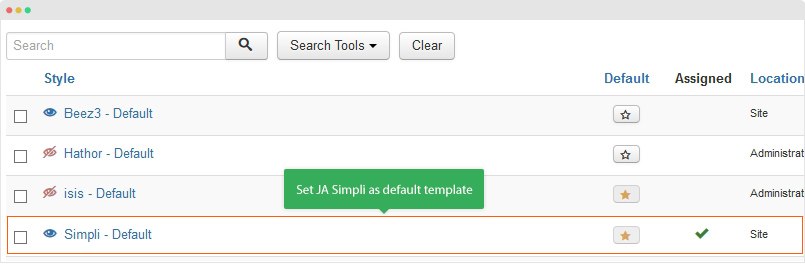
In case you want to apply JA Simpli for specific menu items, open the template style, in the Assignment tab, select the menu items to apply JA Simpli template style.
Template folder structure
This section is to help you understand the folder structure of JA Simpli template, where to find the files you want.
JA Simpli template
templates/ja_simpli/
+-- less/                 /*  all LESS files */
¦    +-- _components.less
¦    +-- _core.less
¦    +-- _joomla.less
¦    +-- _mixins.less
¦    +-- _styles.less
¦    +-- _typo.less
¦    +-- _variables.less
¦    +-- template.less
+-- css/                     /*compiled from less*/
¦    +-- custom.css
¦    +-- template.css
¦    +-- _typo.css
¦    +-- error.css
¦    +-- offline.css
¦    +-- custom-styles.tpl.css
+-- html/               /*override modules and Joomla com_content*/
¦    +-- com_search/
¦    +-- field/
¦    +-- layouts/
¦    +-- mod_articles_category/
¦    +-- modules.php
+-- etc/
¦    +-- presets/
¦    +-- supported-classes.ini
+-- vendors/
¦    +-- font-awesome-4.5.0/
¦    +-- icomoon.less
+-- js/
¦    +-- template.js
+-- info/
+-- images/
+-- language/
+-- templateDetails.xml
+-- component.php/
+-- helper.php/
+-- index.php/
+-- offline.php/
+-- error.php/
Build Demo Pages
This section will help you build Home pages as JA Simpli demo site: Landing page (One page), Magazine, Coporate, Business
Landing page - One pages
Here are steps to replicate the same Landing page.
Step 1 - Create template style for the landing page
Go to Extensions » Templates and duplicate the JA Simpli default template style then configure as the screenshot below:
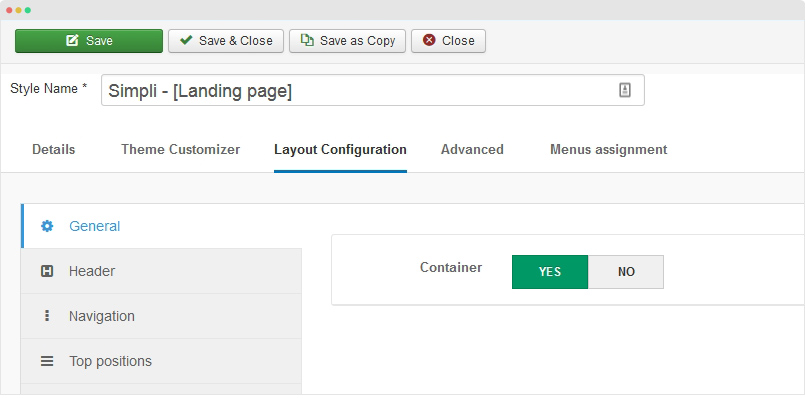
Layout Configuration
- General settings
- Header settings
- Navigation settings
- Top positions settings
- Main Content settings
- Bottom positions settings
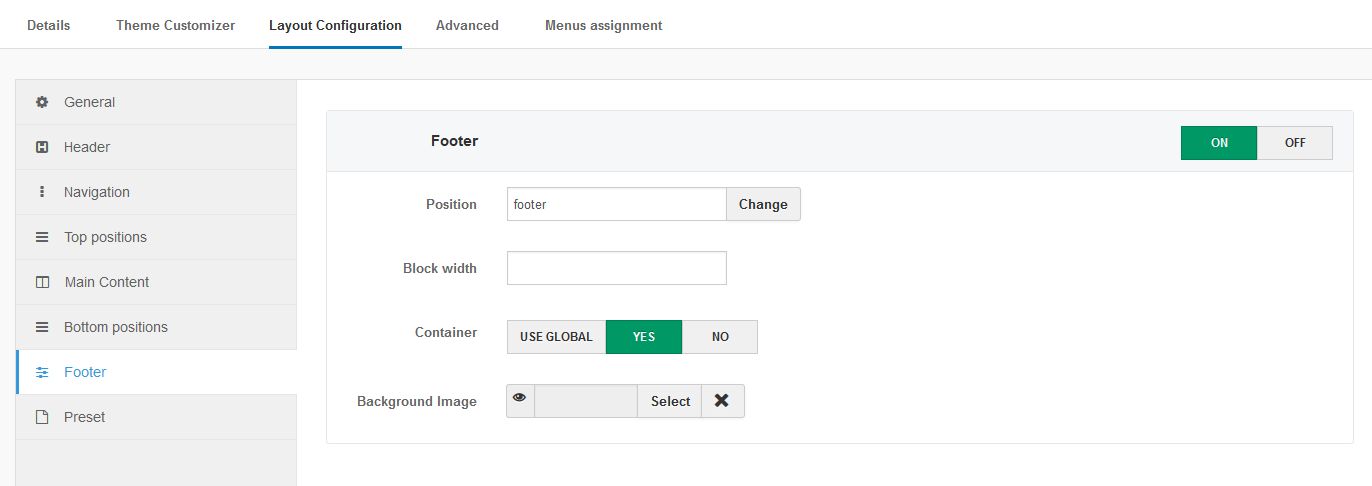
- Footer settings
- Preset settings
Advanced Settings
Step 2 - Create menu item
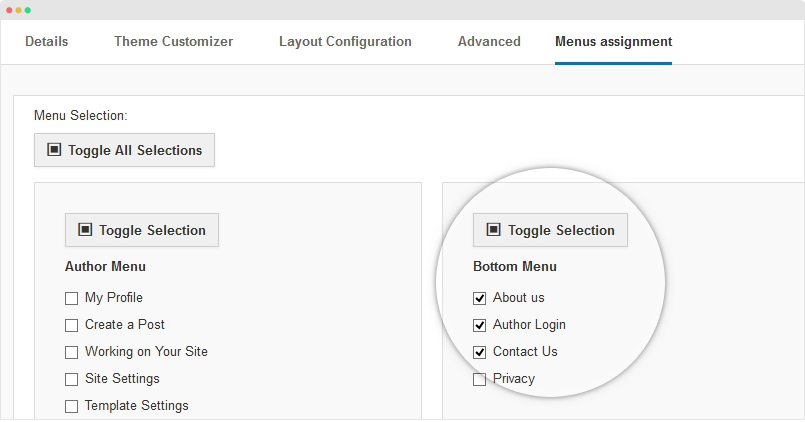
Go to Menu » Main menu, add new menu item, select Articles » Single Article menu type and assign "Simpli - [Landing page]" template style.

In the Page Display setting panel, please add page class landing-page, check out the setting screenshot.
Step 3 - Assign content to the landing page
Content of landing page is loaded from modules. Here is the detail configuration of each module.
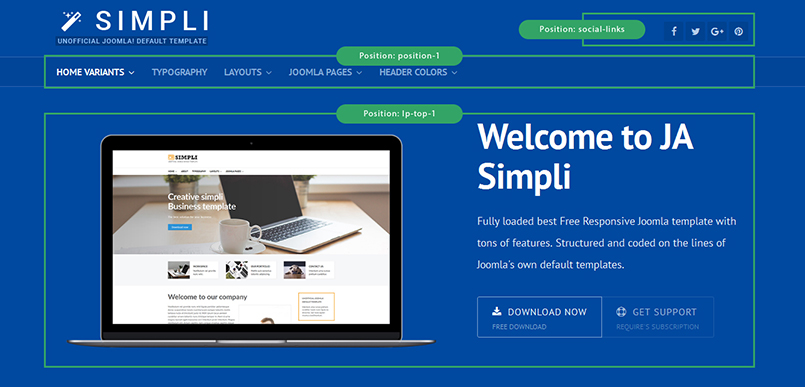
1. [Landing page] Top 1 - Custom HTML module
Module position: lp-top-1
Module Suffix: NOT USED
<div class="row-fluid hero-unit">
<div class="span7 unit-image">
<img src="/images/demo/landing/bp.png" alt="Free Joomla Template" style="margin-top: 20px;"/>
</div>
<div class="span5 unit-text">
<div class="hero-unit text-left">
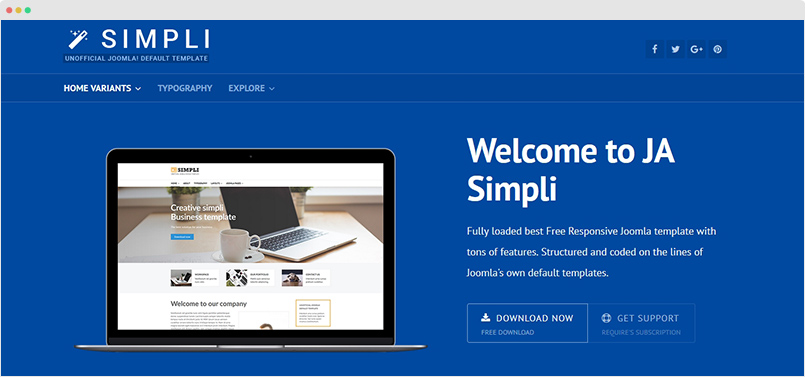
<h1 style="margin-top: 0;">Welcome to JA Simpli</h1>
<p class="big">Fully loaded best Free Responsive Joomla template with tons of features. Structured and coded on the lines of Joomla's own default templates.</p>
<div class="badge-icon-group">
<span class="badge-icon active first-item"><i class="fa fa-download"></i>Download now<small>Free download</small></span>
<span class="badge-icon last-item"><i class="fa fa-support"></i>Get support<small>Require's Subscription</small></span>
</div>
</div>
</div>
</div>
2. [Landing page] Top 2 - Custom HTML module

Module position: lp-top-2
Module Suffix: NOT USED
<div class="container">

<div class="row-fluid features-intro style-1">


<div class="span6 text-center">

<img src="/images/demo/landing/img-scetion2.png" alt="Iphone"/>

</div>


<div class="span6">

<h2 class="features-title">Outstanding Core Features</h2>

<ul>

<li>

<strong>1</strong><span class="line-icon"></span><h4>Simplicity</h4>

The template is not based on any framework. It's clean and simple for quick implementation & comes loaded with a powerful admin backend for easy customization. No coding required.

</li>

<li>

<strong>2</strong><span class="line-icon"></span><h4>4 pre-made unique layouts</h4>

To jumpstart your imagination, we have included 4 different home page variants viz. Business, Magazine, Corporate and Landing page (Onepage with <b>sticky menu</b>). More layouts would be added in the coming versions, for now these layouts should get you started.</li>

<li>

<strong>3</strong><span class="line-icon"></span><h4>Fully responsive</h4>

The Free Joomla template is fully responsive and uses the default Joomla! <b>Bootstrap 2.3.2</b>. Why? (Scroll down to FAQ section for answer). Outstanding look and feel in all responsive layouts: Desktop, Tablet & Mobile.</li>

<li>

<strong>4</strong><h4>Inbuilt powerful customizer</h4>

Tweaking css elements is a breeze with realtime preview right in the backend. Customize layouts with clicks. JA Simpli ships with a intuitive Admin panel with special focus on basic Joomla users. Its fun to play around.</li>

</ul>

</div>


</div>


</div>
3. [Landing page] Top 3 - Custom HTML module

Module position: lp-top-3
Module Suffix: NOT USED
<div class="container"><div class="features-intro style-2">
<div class="row-fluid">
<div class="span4 feature-item">
<span class="icon"><img src="/images/demo/landing/no-framework.png" alt="No Framework"/></span>
<h3>No Framework</h3>
<p>To keep the template clean, lightweight, easy to use and customize, we decided not to use any Framework for the template.</p>
</div>
<div class="span4 feature-item">
<span class="icon"><img src="/images/demo/landing/bootstrap.png" alt="Bootstrap 2 integration"/></span>
<h3>Bootstrap 2 integration</h3>
<p>Bootstrap is a powerful front-end framework, it will be extramently helpful for web development and content building based on tons of premade markups.</p>
</div>
<div class="span4 feature-item">
<span class="icon"><img src="/images/demo/landing/less-css.png" alt="LESS & CSS"/></span>
<h3>LESS & CSS</h3>
<p>JA Simpli is built with LESS - a dynamic style sheet language, once development is done, it is complied to CSS, that means you can develop with CSS or LESS.</p>
</div>
</div>
<div class="row-fluid">
<div class="span4 feature-item">
<span class="icon"><img src="/images/demo/landing/font-awesome.png" alt="Font Awesome 4.6"/></span>
<h3>Font Awesome 4.5</h3>
<p>The integration of the latest Font Awesome version - v4.5 allows you to add any font Awesome icon by adding the class like: <code>fa fa-home</code>.</p>
</div>
<div class="span4 hilite feature-item">
<span class="icon"><img src="/images/demo/landing/layout.png" alt="Flexible layout system"/></span>
<h3>Flexible layout system</h3>
<p>JA Simply supports multiple layouts by default, they are standard layouts: 3 columns, 2 column and 1 colum with boxed or full width style.</p>
</div>
<div class="span4 feature-item">
<span class="icon"><img src="/images/demo/landing/theme-customizer.png" alt="Theme customizer"/></span>
<h3>Theme Customizer Tool</h3>
<p>The magic tool helps user customize style and other elements in your website based on predefined parameters in real time. What you do is what you see.</p>
</div>
</div>
<div class="row-fluid">
<div class="span4 feature-item">
<span class="icon"><img src="/images/demo/landing/powerful-layout.png" alt="Powerful Layout configuration"/></span>
<h3>Powerful Layout configuration</h3>
<p>Customizing layout is just simple with JA Simpli, the layout configuration with lots of option built-in help you build layout your ways with ease.</p>
</div>
<div class="span4 feature-item">
<span class="icon"><img src="/images/demo/landing/custom-code.png" alt="Custom Code" /></span>
<h3>Custom Code</h3>
<p>No need to look for correct files to add scripts like Google Analytics code, all are implemented as fields in admin panel. Just add scripts to the tags you want: <code><head></code>, <code><body></code>.</p>
</div>
<div class="span4 feature-item">
<span class="icon"><img src="/images/demo/landing/more.png" alt="More features" /></span>
<h3>More feature...</h3>
<ul>
<li>Sticky Menu</li>
<li>Compatible with most popular 3rd extensions</li>
<li>Intuitive admin panel</li>
</ul>
</div>
</div>
</div></div>
4. [Landing page] Testimonials - Custom HTML module

Module position: lp-top-4
Module Suffix: NOT USED
<div id="myCarousel" class="carousel slide">

  <!-- Carousel items -->

  <div class="carousel-inner">

    <div class="active item">

      <div class="testimonial style-2 text-left">

      <span class="author-img"><img src="/images/demo/other/mark.jpg" alt="Avatar"/></span>

      <h4>From just an idea to realization - Mark Lee, StackIdeas.com</h4>

      <p class="testimonial-text">Glad to see this one see the light of the day, current Joomla! default templates have been topic of discussion for late and JA Simpli should help to fill the gap. JoomlArt, For the love of Joomla, you guys now got to roll out a admin template too.</p>

      </div>

    </div>

    <div class="item">

      <div class="testimonial style-2 text-left">

      <span class="author-img"><img src="/images/demo/other/parth.jpg" alt="Avatar"/></span>

      <h4>Parth lawate, TechJoomla</h4>

      <p class="testimonial-text">This is a simply fantastic effort ! In a time where templates without any special 'frameworks' are not thought of anymore, you have proven yet again that there is plenty of room to innovate. Now that you have shown what you can do with the Joomla frontend, how about a breath of fresh air for the Joomla admin?</p>

      </div>

    </div>

  </div>

  <ol class="carousel-indicators">

    <li data-target="#myCarousel" data-slide-to="0" class="active"></li>

    <li data-target="#myCarousel" data-slide-to="1"></li>

  </ol>

</div>
5. [Landing page] Bot 1 - Custom HTML module

Module position: lp-bot-1
Module Suffix: NOT USED
<div class="container">

<div class="row-fluid features-intro style-3">


<div class="span6 item-first">

<img src="/images/demo/landing/lp-1.png" alt="Sample image"/>

<h2 class="features-title">Elegant Frontend</h2>

<p>Covering popular layouts, responsive by default, multiple module positions, fast yet simple.</p>

</div>


<div class="span6 item-last">

<img src="/images/demo/landing/lp-2.png" alt="Sample image"/>

<h2 class="features-title">powerful Backend</h2>

<p>No coding skills required, customize colors, layouts right from the backend with live preview smile as your template take shape.</p>

</div>


</div>

</div>
6. [Landing page] Gallery - Custom HTML module

Module position: lp-bot-2
Module Suffix: NOT USED
<div class="row-fluid">

    <ul class="thumbnails">

      <li class="span3"><span class="thumbnail">

        <span class="thumb-wrap"><img alt="Default Layout" src="/images/demo/gallery/default-layout.jpg" data-toggle="gallery" title="Default Layout Test" data-width="1000"></span>

        <strong>Default Layout</strong>

      </span></li>


      <li class="span3"><span class="thumbnail">

        <span class="thumb-wrap"><img alt="Magazine Layout" src="/images/demo/gallery/magazine-layout.jpg" data-toggle="gallery" title="Magazine Layout" data-width="50%"></span>

        <strong>Magazine Layout</strong>

      </span></li>


		  <li class="span3"><span class="thumbnail">

        <span class="thumb-wrap"><img alt="Coporate Layout" src="/images/demo/gallery/coporate-layout.jpg" data-toggle="gallery" title="Coporate Layout"></span>

        <strong>Coporate Layout</strong>

		  </span></li>


		  <li class="span3"><span class="thumbnail">

        <span class="thumb-wrap"><img alt="One page" src="/images/demo/gallery/landing-page.jpg" data-toggle="gallery" title="One page"></span>

        <strong>One page</strong>

		  </span></li>

		</ul>

	</div>


	<div class="row-fluid">

		<ul class="thumbnails">

		  <li class="span3"><span class="thumbnail">

			  <span class="thumb-wrap"><img alt="Theme Customizer" src="/images/demo/gallery/customize.jpg" data-toggle="gallery" title="Theme Customizer"></span>

        <strong>Theme Customizer</strong>

		  </span></li>


		  <li class="span3"><span class="thumbnail">

        <span class="thumb-wrap"><img alt="Custom Code" src="/images/demo/gallery/layout-config.jpg" data-toggle="gallery" title="Layout Configuration"></span>

        <strong>Layout Configuration</strong>

		  </span></li>


		  <li class="span3"><span class="thumbnail">

        <span class="thumb-wrap"><img alt="Custom Code" src="/images/demo/gallery/customcode-config.jpg" data-toggle="gallery" title="Site Info"></span>

        <strong>Site Info</strong>

		  </span></li>


		  <li class="span3"><span class="thumbnail">

        <span class="thumb-wrap"><img alt="Custom Code" src="/images/demo/gallery/customcode-code.jpg" data-toggle="gallery" title="Custom Code"></span>

        <strong>Custom Code</strong>

		  </span></li>

		</ul>

	</div>
7. [Landing page] FAQs - Custom HTML module

Module position: lp-bot-3
Module Suffix: NOT USED
<div class="container"><div class="faq-block">

<div class="row-fluid">


<div class="span6">

<h4 class="faq-question"><i class="fa fa-question-circle"></i>Why BootStrap 2.3.2?</h4>

<p>Well thats what Joomla! uses as default. We will add Bootstrap 3 support later on. Right now this baby got to act like a default Joomla template.</p>

</div>


<div class="span6">

<h4 class="faq-question"><i class="fa fa-question-circle"></i>Where can I download?</h4>

<p>We still have few things to tweak. Subscribe to Simpli mailing list to get the early access and updates.</p>

</div>


</div>


<div class="row-fluid">


<div class="span6">

<h4 class="faq-question"><i class="fa fa-question-circle"></i>What about 3rd party extension support?</h4>

<p>Works well with StackIdeas extensions to start with, other popular extensions will be tested soon. So far no issues.</p>

</div>


<div class="span6">

<h4 class="faq-question"><i class="fa fa-question-circle"></i>Support Scope</h4>

<p>Our support scope is limited to helping users get demo site alike display and bug fixes only.</p>

</div>


</div>


<div class="row-fluid">


<div class="span6">

<h4 class="faq-question"><i class="fa fa-question-circle"></i>Why Free?</h4>

<p>Joomla! really needs a good powerful default template, instead of complaining or waiting, we went ahead and hopefully this will encourage others also to address the default templates issue of Joomla!.</a>.</p>

</div>


<div class="span6">

<h4 class="faq-question"><i class="fa fa-question-circle"></i>Want customization ?</h4>

<p>Customization requests are beyond our support scope, but we do offer customization service, please submit <a href="https://www.joomlart.com/joomlart/custom-service">custom work service request</a>.</p>

</div>


</div>


</div></div>
8. [Landing page] Newsletter - Custom HTML module
Module position: lp-bot-4
Module Suffix: NOT USED
<!-- NEWSLETTER -->
<div class="subscribe-form">
<div name="responeform" accept-charset="UTF-8" class="getResponseForm">
<input type="hidden" name="getpostdata" value="get">
<div class="subscribe-form">
<p>Get our awesome releases and latest updates with exclusive news and offers in your inbox.</p>
<div class="row">
<div class="col-xs-12">
<div class="input-group">
<span class="input-group-addon"><i class="fa fa-envelope-o"></i></span>
<input type="text" name="e" class="form-control" placeholder="Your Email" value="">
<input type="hidden" name="l" value="f3wtvKC49aSVFEMkeCcnmg"/>
<span class="input-group-btn"><input type="button" value="Subscribe" class="btn btn-primary btn-getResponse" name="Subscribe" /></span>
</div>
</div>
</div>
</div>
<div class="subscribe-result">
</div>
</div>
</div>
<script>
(function($){
$('.btn-getResponse').on('click', function () {
var $form = $(this).closest('.getResponseForm'),
email = $form.find('input[name="e"]').val(),
list = $form.find('input[name="l"]').val();
if (!isEmail(email)) {
alert('Please enter a valid email!');
$('#getResponseEmail').focus();
return false;
}
$form.addClass('loading').find('input').prop('disabled', true);
// loading
$form.find('i.fa').attr('class', 'fa fa-spinner fa-spin');
$.ajax({
dataType: 'JSONP',
url: 'https://www.joomlart.com/newsletter-subscribe/?email=' + email + (list ? '&list=' + list : ''),
data: {},
crossDomain: true,
success: function(html){
$form.removeClass('loading');
// show result
if (html == 'ok') {
$form.find('.subscribe-result').html('Woohoo! You\'re almost there! Check your inbox and click the link in the confirmation email.<br />Thank You.');
} else if (html == 'fail') {
$form.find('.subscribe-result').html('Woohoo! Please refresh the page and do the subscription again.<br />Thank you.');
} else if (html == 'Already subscribed.') {
$form.find('.subscribe-result').html('Woohoo! You\'re already subscribed!<br />Thank you.');
} else {
$form.find('.subscribe-result').html(html);
}
// hide form and show message
$form.find('.subscribe-form').fadeOut();
$form.find('.subscribe-result').hide().fadeIn();
}
});
return false;
});
function isEmail(email) {
var regex = /ˆ([a-zA-Z0-9_.+-])+\@(([a-zA-Z0-9-])+\.)+([a-zA-Z0-9]{2,4})+$/;
return regex.test(email);
}
})(jQuery);
</script>
<!-- //NEWSLETTER -->
Coporate page

Here are steps to replicate the same coporate page.
Step 1 - Create template style for the coporate page
Go to Extensions » Templates and duplicate the JA Simpli default template style then configure as the screenshot below:

Layout Configuration
- General settings
- Header settings
- Navigation settings
- Top positions settings
- Main Content settings
- Bottom positions settings
- Footer settings
- Preset settings
Advanced Settings
Step 2 - Create menu item
Go to Menu » Main menu, add new menu item, select Articles » Single Article menu type and assign "Simpli - [Corporate style]" template style.

In the Page Display setting panel, please add page class corporate, check out the setting screenshot.
Step 3 - Assign content to the landing page
Content of landing page is loaded from modules and an article. Here is the detail configuration of each module.
1. [Corporate] Slideshow - Custom HTML module
Module position: topsl-1
Module Suffix: NOT USED
<div class="container" style="min-height: 500px;">

<div class="hero-unit text-left">

<h1>Creative simpli<br />

Business template</h1>

<p class="lead">The best solution for your business</p>

<a href="#" title="Sample link" class="btn btn-primary btn-large">Download now</a>

</div>

</div>
2. Custom modules in position "topsl-2"
The section includes 3 modules, here is the detail configuration of the modules.

2.1 About us - Custom HTML module
Module position: topsl-2
Module Suffix: NOT USED
<div class="media">

    <div class="media-img  pull-left">

      <img src="/images/demo/other/sam-15.jpg" alt="Our workspace"/>

    </div>

        <div class="media-body">

          <h4 class="media-heading">Workspace</h4>

          <p class="hidden-sm">Vestibulum vel gravida nunc wisi.</p>

    </div>

</div>
2.2 Portfolio - Custom HTML module
Module position: topsl-2
Module Suffix: NOT USED
<div class="media">

    <div class="media-img  pull-left">

      <img src="/images/demo/other/sam-16.jpg" alt="Portfolio"/>

    </div>

        <div class="media-body">

          <h4 class="media-heading">Our portfolio</h4>

          <p class="hidden-sm">Mattis quis senectus lobortis adipiscing.</p>

    </div>

</div>
2.3 Contact us - Custom HTML module
Module position: topsl-2
Module Suffix: NOT USED
<div class="media">

    <div class="media-img  pull-left">

      <img src="/images/demo/other/sam-17.jpg" alt="Contact us"/>

    </div>

        <div class="media-body">

          <h4 class="media-heading">Contact us</h4>

          <p class="hidden-sm">Interdum urna cursus pretium curabitur.</p>

    </div>

</div>
3. Modules on position "position-7"
The section includes 2 modules, here is the detail configuration of the modules.

3.1 Highlight module 2 - Custom HTML module
Module position: position-7
Module Suffix: mod-hilite
<h4 style="margin-top: 0; text-transform: uppercase;">Unofficial Joomla! default template</h4>

Interdum urna cursus pretium curabitur turpis nunc ligula eu dictumst. Sed nulla sapien vivamus condimentum.
3.2 Our Staff - Custom HTML module
Module position: position-7
Module Suffix: NOT USED
<ul class="staff">

<li>

<img src="/images/demo/other/sam-3.jpg" alt="Sample image"/>

<h5>T.Schlossnagle</h5>

<span>CEO - Co-founder</span>

<a href="#" title="Email">dr@corporate.com</a>

</li>


<li>

<img src="/images/demo/other/sam-4.jpg" alt="Sample image"/>

<h5>T.Schlossnagle</h5>

<span>CTO</span>

<a href="#" title="Email">dr@corporate.com</a>

</li>


<li>

<img src="/images/demo/other/sam-5.jpg" alt="Sample image"/>

<h5>T.Schlossnagle</h5>

<span>CEO - Co-founder</span>

<a href="#" title="Email">dr@corporate.com</a>

</li>


<li>

<img src="/images/demo/other/sam-6.jpg" alt="Sample image"/>

<h5>T.Schlossnagle</h5>

<span>Director</span>

<a href="#" title="Email">dr@corporate.com</a>

</li>

</ul>
4. Modules on position "botsl-1"
The section includes 4 modules, here is the detail configuration of the modules.

4.1 Use for Any Website - Custom HTML module
Module position: botsl-1
Module Suffix: NOT USED
<div class="img-wrap"><img src="/images/demo/other/sam-9.jpg" alt="Sample image"  /></div>

Vestibulum in tortor tortor aenean fames id wisi enim. Quis id consequat nulla.
Other modules in the position have same configuration and HTML markup, follow the module configuration to create other modules.
5. Modules on position "botsl-2"
The section includes 2 modules, here is the detail configuration of the modules.

5.1 [Corporate] Customer testimonial - Custom HTML module
Module position: botsl-2
Module Suffix: NOT USED
<div class="testimonial">

<div class="author-info">

<span class="author-img"><img src="/images/demo/other/sam-11.jpg" alt="Sample author"/></span>

<strong class="author-name">Roderick Holmes</strong>

<span class="author-title">Co-Founder - <a href="#" title="Website">www.joomlart.com</a></span>

</div>

<p class="testimonial-text">Lacinia faucibus consectetuer vestibulum elit quisque at et ultrices sed libero. Ut nam eu nunc enim curabitur non metus eu turpis eget.</p>

</div>
Other module in the position have same configuration and HTML markup, follow the module configuration to create other modules.
6. Partner - Custom HTML module
Module position: botsl-3
Module Suffix: NOT USED
<div class="row client-list">

<div class="span2"><a href="#" title="Sample link"><img src="/images/demo/other/client-11.png" alt="Sample client"/></a></div>

<div class="span2"><a href="#" title="Sample link"><img src="/images/demo/other/client-14.png" alt="Sample client"/></a></div>

<div class="span2"><a href="#" title="Sample link"><img src="/images/demo/other/client-17.png" alt="Sample client"/></a></div>

<div class="span2"><a href="#" title="Sample link"><img src="/images/demo/other/client-18.png" alt="Sample client"/></a></div>

<div class="span2"><a href="#" title="Sample link"><img src="/images/demo/other/client-19.png" alt="Sample client"/></a></div>

<div class="span2"><a href="#" title="Sample link"><img src="/images/demo/other/client-20.png" alt="Sample client"/></a></div>

</div>
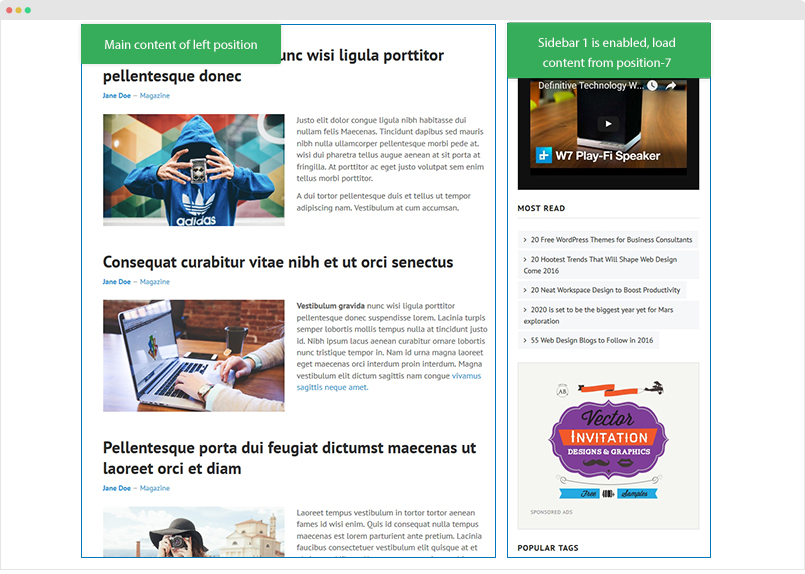
Magazine page
Here are steps to replicate the same Magazine page.
Step 1 - Create template style for the Magazine page
Go to Extensions » Templates and duplicate the JA Simpli default template style then configure as the screenshot below:
Layout Configuration
- General settings
- Header settings
- Navigation settings
- Top positions settings
- Main Content settings
- Bottom positions settings
- Footer settings
- Preset settings
Advanced Settings
Step 2 - Create menu item
Go to Menu » Main menu, add new menu item, select Articles » Category Blog menu type and assign "Simpli - [Magazine style]" template style.

In the Page Display setting panel, please add page class magazine, check out the setting screenshot.
Step 3 - Assign content to the landing page
Content of landing page is intro articles list of assigned category and modules assigned to the page. The display of intro articles is configured in the menu item setting page. Here is the detail configuration of modules assigned to the page.
1. Articles Grid: Articles - Category module

Module position: topsl-1
Module Suffix: NOT USED
Alternative Layout: grid
In the Advanced setting panel, please assign the "grid" for the "Alternative Layout" field, check out the setting screenshot.
2. Modules in position "position-7"

There are multiple modules assigned to the "position-7" module position on the Magazine page. Here is configuration of the modules.
2.1 Video trends - Custom HTML module
Module position: position-7
Module Suffix: module-dark
<iframe width="350" height="197" src="https://www.youtube.com/embed/2j8kPyqM7Eg" frameborder="0" allowfullscreen></iframe>
2.2 Most read: Articles - Category module
Module position: position-7
Module Suffix: NOT USED
3. Modules in position "botsl-2" - Newsletter Form

There are 2 modules assigned to the "botsl-2" module position, here is configuration of the modules.
3.1 [Magazine] Newsletter - Custom HTML module
Module position: botsl-2
Module Suffix: NOT USED
3.2 [Magazine] Newsletter form - Custom HTML module
Module position: botsl-2
Module Suffix: NOT USED
Configuration
The section is to help you understand the template admin panel with options & settings to customize style and configure layouts.
Theme Customizer
This tool allows you to customize style, font, changing logo ... for specific pages in real time. The panel has 2 sections: the customizer tool and the font-end, what you change in the customizer will be previewed in the front-end panel.

Settings devided into groups based on its functionality.
Once the customization is done, save the changes. The changes is not saved directly to the customizer, it is saved as a preset. Open the Preset setting panel and select the version you saved. The preset works like a theme, it contains all the changes you did with the customier.

Each preset is a file stored in folder: media\ja_simpli\revisions\styles, you can rename the files or delete them in case you don't have intention to use that.
Google Webfont embed format
When customizing, if you want to use Google fonts, you need to embed it first. In the Google Font tab, embed the Google fonts you want, here is a sample format:
PT+Sans:400,400italic,700,700italic
Layout Configuration
The layout configuration allows you to configure layouts the ways you want. It includes lots of settings and options to manage layout with ease.
1. General settings
The general setting panel has 1 option only: Container. If enable the option, the site is put in class container, if not, it will be full-width layout.
2. Header configuration
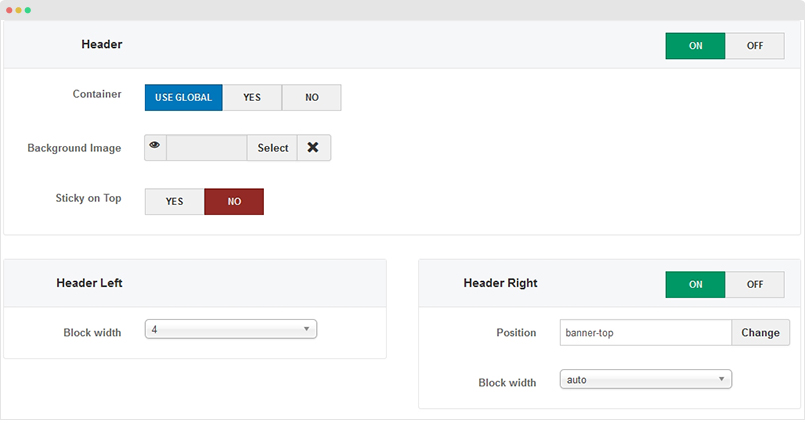
The header configuration panel includes settings to set background image for header section, put it in "container" class or not (this "container" setting will override the setting in General setting), setting to make the header sticky or not and width setting for header blocks: left and right. The "Header Left" is the logo and the "Header Right" is a module position where you can put any content.

3. Navigation Setting

The Navigation configuration panel is to configure the main menu. It includes settings to set background image for navigation section, put it in "container" class or not (this "container" setting will override the setting in General setting), setting to make the header sticky or not and width setting for left and right blocks.
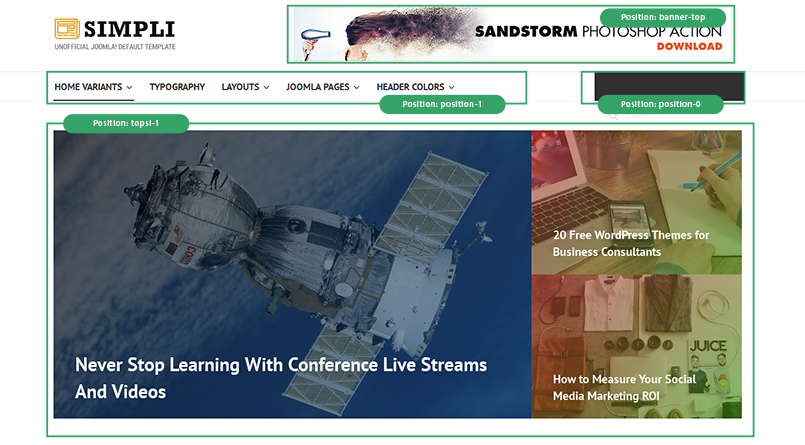
4. Top positions Setting

The setting panel includes settings for 4 sections, when enable a section, assign module position that the section load content from. For example, you assign position "lp-top-1" for the "Top spotlight 1" section, it will load all published modules in the "lp-top-1" position.
You can add section title and description, width for each section.

5. Main Content Setting

Enable this option if you want the main content to be displayed in the pages using the template style. You can also enable or disable the 2 sidebars. For each sidebar block, assign module position that the content is loaded from and set the width for the sidebar. The width of the main content section is based on Bootstrap grid - 12 columns.
Upgrade Instruction
Take a full backup
Please always make a back-up before proceeding to any of the upgrade process. In case there is any problem, you can always restore from the back-up files.
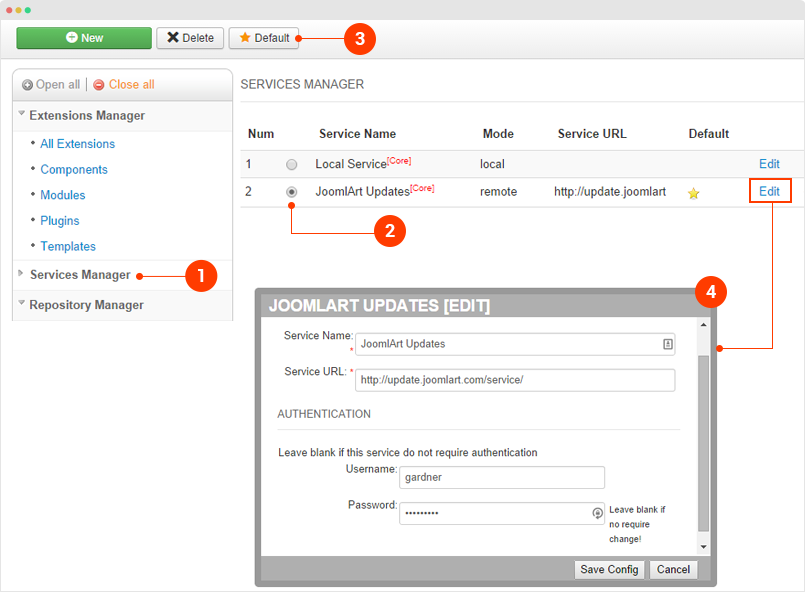
1. Set up JA Extension Manager Component
The best method to upgrade JoomlArt products is using JA Extension Manager. The FREE extension brings a new way to manage extensions: upgrade, roll back, remote install, internal repository and compare versions.
From back-end, go to: Components → JA Extension Manager then select Service Manager, now set JoomlArt as your default service. Next, hit the "Edit" button then add your Username and Password that you signed up in JoomlArt.com.
2. Upgrade JA Simpli template
Step 1 - check the new version of JA Simpli template. Using the filter to find the JA Simpli template then hit the "Check Update" button.
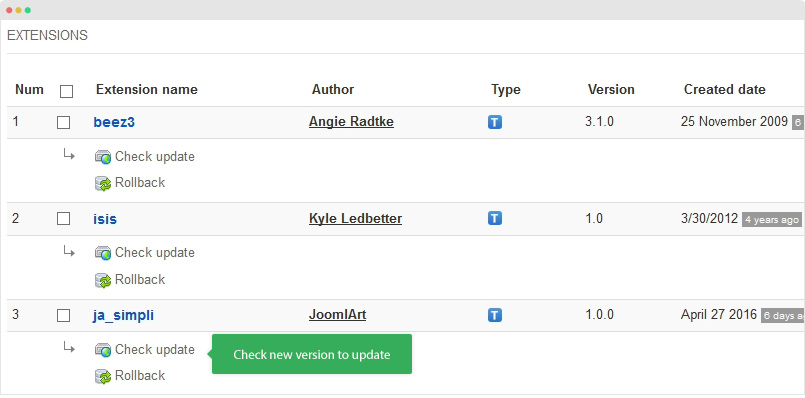
Step 2 - Upgrade JA Simpli template to latest version. You should compare the changes before upgrading. We only pay attention to conflicted files - files that have been modified by both user and developer. When upgrading, the conflicted files will be overridden by files in new version, that means what you customized in the files will be lost.
Detail documentation - Video tutorials
Documentation is a WIP. If you have any specific request or feedback as well as suggestions, feel free to drop us a line in JA Simpli template forum. We'll try to cover them all.