Introduction
In this section we are going to explore
- The Structure & The Extensions - explore the file & folder structure, purpose of most important files;
- Layouts & Blocks - explore the concept, features and advanced parameters
- Themes - explore the concept, typology, override coding
- Profiles - explore the concept, typology, override coding
- Template Administration - full usage instructions for all panels
Structure
The structure of the framework changed since the introduction of the JA Menu Parameters Plugin. Generally, the template is lighter and faster, core scripts are now hold inside JA T3 Framework Plugin.
The latest release of the JA T3 Framework 1.0 comes with JA Menu Parameters Plugin to solve all SEO related issues and also to make menu management easier.
JA T3 Framework 2.0 now incorporates this plugin to easily update the core files separately from your customized template design.
This documentation section is entirely about menu management and usage of the integrated plugin.
The new version introduces the new JA Typo Button Plugin to ease the work on editing special content. Click here to read now.
Extensions
Starting the JA T3 Framework 2.0 you will need to have:
JA T3 Framework Plugin
The core folder
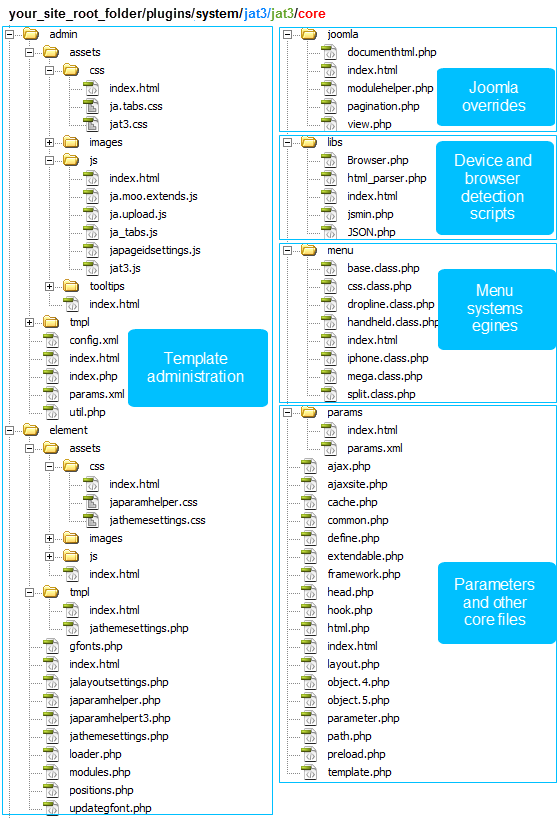
- Template administration - these files manage the template administration panel with all scripts and back-end views.
- Device and browser detection scripts - these are the scripts to detect user device (desktop computer, mobile device) and user browser client.
- Menu system engines - these scripts power up all the menu systems T3 Framework use.
- Parameters and other core files - files to power the AJAX capabilities, caching, override features, and general parameters.
The base-themes folder
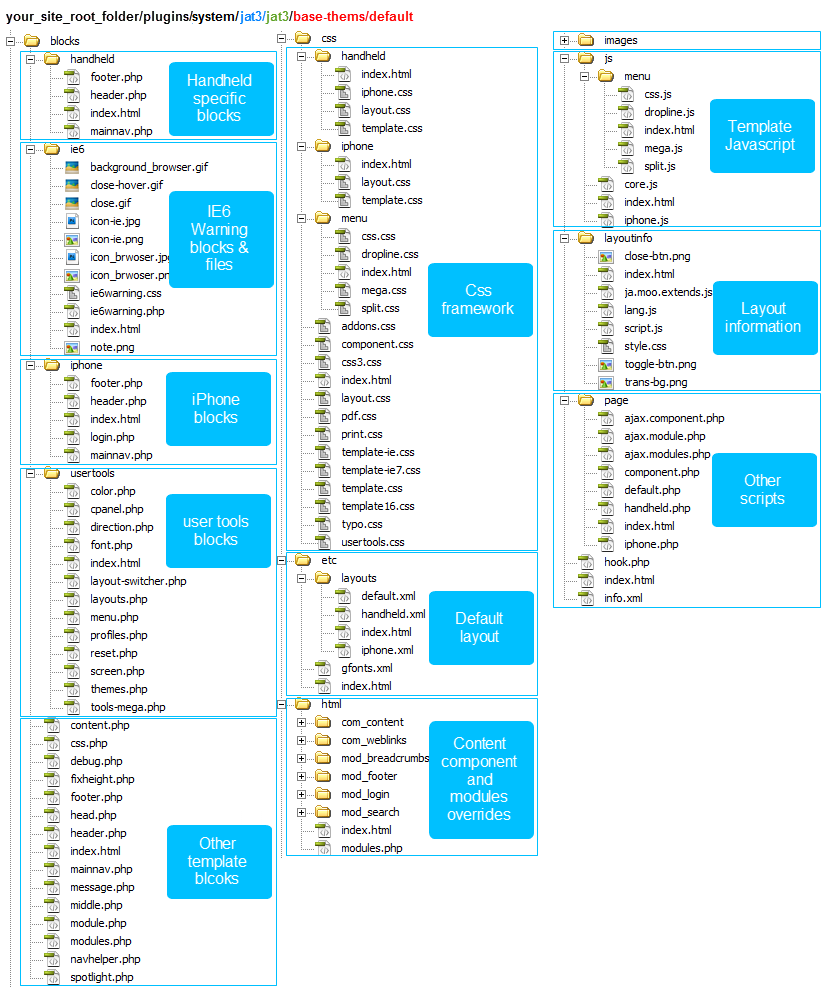
This is the folder to hold the core default template with default:
- blocks to hold all default blocks: IE6warning, header, footer, middle, etc;
- css to hold default Core CSS Framework of the template styling;
- html content components and modules override;
- etc to hold default layouts, themes and profiles;
- js to hold default template javascript files;
- page to hold layout generating scripts and others.
The sample-themes folder
This is to hold the sample template you will need for creating your own T3 Framework based template.
Coming soon..
T3 Framework 2.0 Based Template
The Default theme
The latest version of your JA T3 Framework 2.0 Template now incorporates the default layout, and this way it could work as a regular Joomla! template.
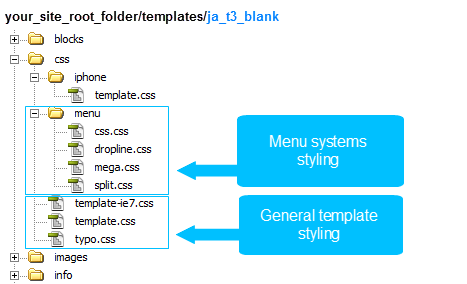
These files and folders hold the default theme of the template to override the core plugin base-themes styling. As you can see:
- can hold block overrides;
- styles the menu systems and general styling;
- holds own images;
- can override javascript code;
- it is recognized as a theme because of the info.xml file.
The T3 Framework Specific Files
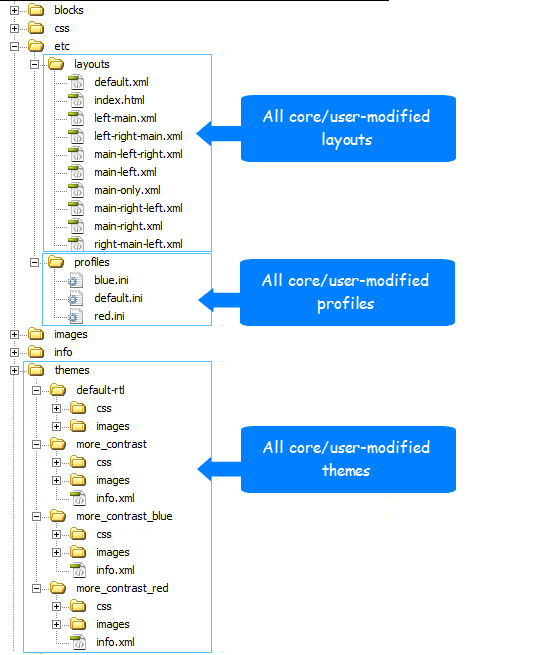
The etc folder holds:
- etc/profiles: All user-modified profiles;
- etc/layouts: All user-modified layouts;
The themes folder holds:
- All user-modified themes;
Other files
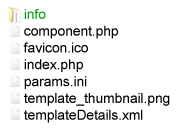
Folder and files information:
- the info folder holds template specific information;
- general template files (thumbnail, template details, favicon).
JA Typography Button Plugin
A new plugin to help editors to easily add special typography styles for special content.
In your favorite editor, you will notice a new button JA Typo.
![]()
Click this button to open the Typography selection window.
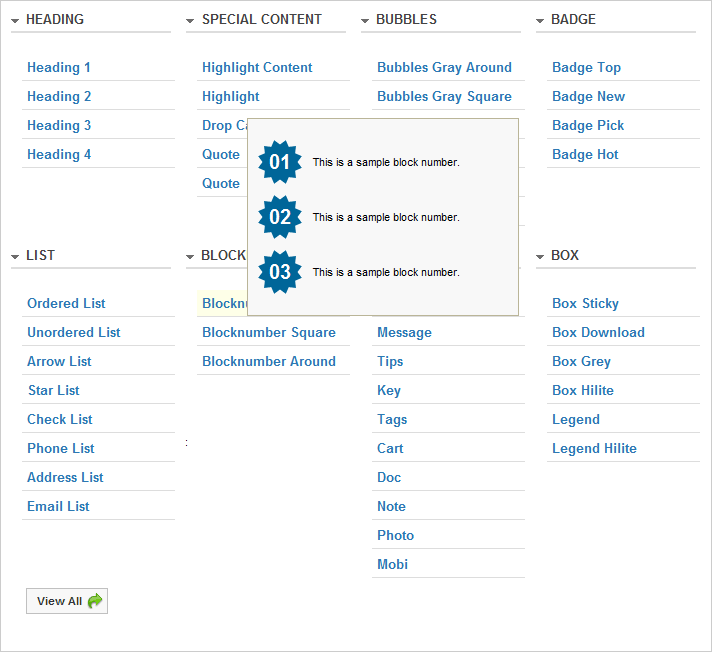
In this window, hover any of the styling and click to insert it in your content on the fly.
Layouts
JA T3 Framework 1.0 introduced multiple layouts feature to add more flexibility in design. A layout is by definition a concept design for content arrangement within a page, but our developers thought about a template framework to use a simple index.php file to keep only the very general routers, and never manage layout design, module positions or script calls. Other files can do a better job within a modular design.
Introducing Layouts and Blocks
Concepts and ideas behind
- Layouts are the files to hold the HTML generation of your front-end design. They load other files called blocks to perform various functions. By using various styles and positions for these blocks you can create unlimited layouts your users can select and use for best convenience. These layouts are then loaded by the new template index.php file.
- Blocks are files to hold module positions, perform specific script calls and prepare the HTML generation of the content. As you know, the most popular elements: header, footer, left, right, spotlights, pathway, etc. these are now separate files, no longer HTML elements defined in the index.php file.
- The idea is to have a website to use a single template, but having a unique design for your homepage, another custom design for your Blog and another for your forums. In other cases you may want your users to pick the most convenient layout.
- Layouts can be switched in front-end from the UserTools Panel.
- Layouts can be customized in the back-end using the built in editor.
- Layouts and blocks in theme variations or user created themes can override those in the blank core theme.
- Blocks typology:
- blocks as separate files to hold specific module positions: footer, mainnav, middle;
- blocks that are automatically generated according to layout settings: spotlights, left & right, content-mass & column-mass;
- blocks that manage specific functions such as a few user-tools, or the IE6warning that cannot be customized inside the layout configuration;
- blocks that call for dynamically generated content such as: system messages or content component body;
- blocks that call for javascripts and stylesheets.
Default Layout
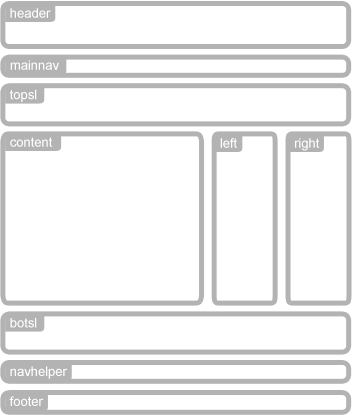
Layout xml file
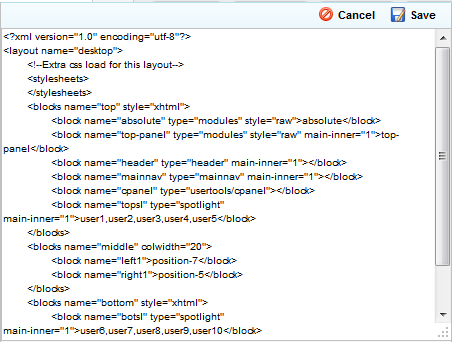
Layout information
This holds the very basic layout design of the template with all default blocks supplied by the framework. All blocks have default style, order and positioning. Other layouts may override these block settings, without having to use the entire code of the default layout to generate the layout design.
Layout blocks
- ie6 blocks set manage the Microsoft Internet Explorer 6 Warning Message;
- user-tools blocks set manage the front-end customization tools that front-end users can use to make navigation more enjoyable:
- color.php block holds the theme switcher;
- cpanel.php block loads all other user-tools mini blocks;
- direction.php block manages the text direction of the template: Right to Left or Left to Right;
- font.php block manages the font-size of the template;
- layouts.php block detects all layouts both core and user created and displayes them in the panel;
- layout-switcher.php block manages the layout switch;
- menu.php block manages the menu system switch;
- profiles.php block manages the profile settings for each page users navigate;
- reset.php block provide reset feature to restore all settings to profile defaults;
- screen.php block manages the template width switcher;
- themes.php block manages the theme switch when required by the profile;
- tools-mega.php block loads megamenu parameters;
- desktop blocks set are used for desktop devices designated layouts
- content.php holds the content component body call;
- css.php block manages the Google Font for text logo text, module titles, content titles. page titles;
- fixheight.php holds a script to force usage of the same height of the left, main and left, and a fixed height for content mass and column mass positions;
- footer.php block holds module positions for copyright notices, other menus and other advertising;
- head.php block is used for system CSS file calls;
- header.php block holds website's logo and a module position for search modules;
- mainnav.php block holds the main navigation of the template;
- message.php block holds the system message body to display system messages;
- middle.php block is where your content actually is displayed: articles, products, galleries, and this block also incorporates left and right blocks previously designed as separate block files;
- module.php and modules.php are block generators used to create blocks for special module positions needed by advertising modules, content sliders, etc;
- navhelper.php block holds the pathway module position;
- spotlight.php is a block generator script to be used as top spotlight or bottom spotlight, no matter how much spotlight blocks you may want to use.
Layout Variations
In this section we are going to explore methods on how to develop layout variations.
Different block positions
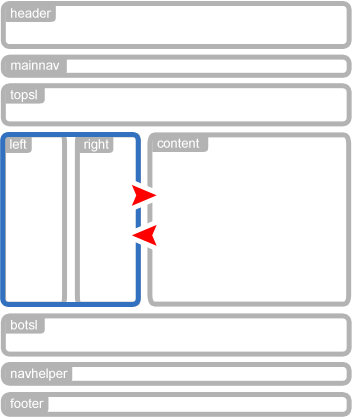
Two columns left layout
Layout xml file
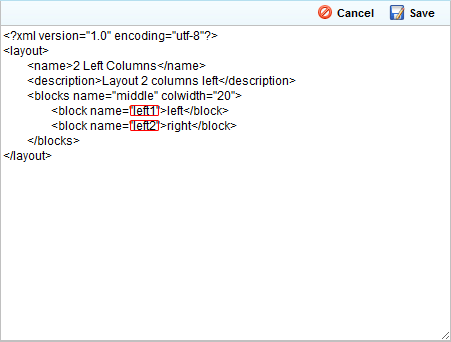
Layout information
This layout inherits blocks and their settings from the default layout, but overrides the position for left and right blocks. See more information below.
Layout blocks
- left block is using left1 layout position (default was right1);
- right block is using left2 layout position (default was right2);
Different block order within the layout
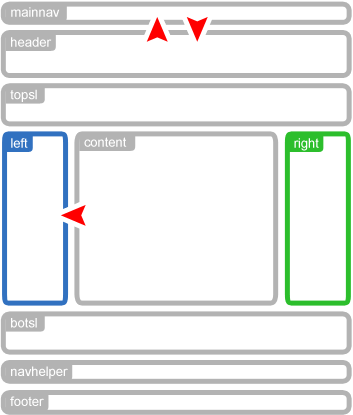
Top menu & Left-Body-Right Layout
Layout xml file
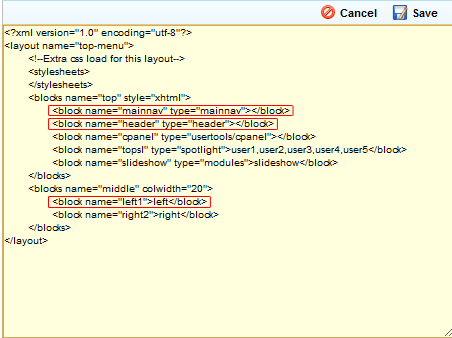
Layout information
This example layout loads all blocks of the default layout, but overrides the order for header and mainnav, and also overrides the position of the left block. Please note that whenever you use a Left-body-Right layout, the left-mass and right-mass positions are hidden. See more about just below.
Layout blocks
- mainnav block moved to top;
- header block moved below the mainnav block;
- left block is using left1 layout position;
- right block is using right2 layout position;
Different block styles
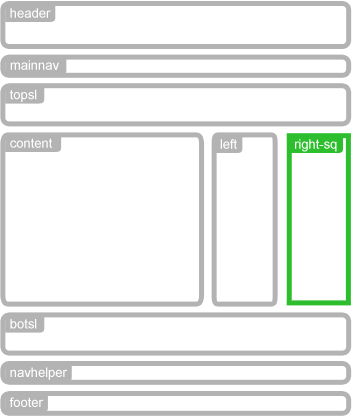
Square Layout
Layout xml file
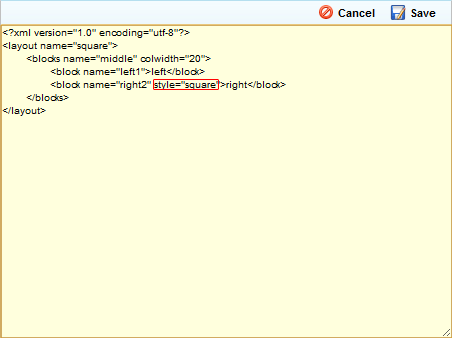
Layout information
This layout also loads all of the blocks coming with the default layout, but this time, the right block uses a different style.
Layout blocks
- right block is using style="square" style, and you can customize this styling in the template.css file, but you will need to customize the modules.php in the HTML folder and add your desired code for this style.
Mobile Ready Layouts
Multiple layouts feature is also powering the Mobile Ready feature. These layouts have their own blocks sets optimized and developed according to specific standards. In the Profiles tab of the template administration panel, you can assign these layouts for each mobile device type.
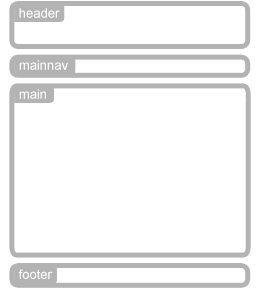
The Handheld layout
- handheld specific blocks override the default blocks and they are optimized for fast loading:
- footer holds the website copyright information;
- head holds the scripts;
- header holds the template logo;
- main holds the main content body;
- mainnav block holds a special designed main navigation;
- toolbar block is in charge to allow user to show / hide the main navigation.
The framework uses this handheld layout when it detects devices such as:
- Windows Mobile devices
- Android powered mobile devices
- Blackberry mobile devices
- Palm mobile devices
- and other mobile devices
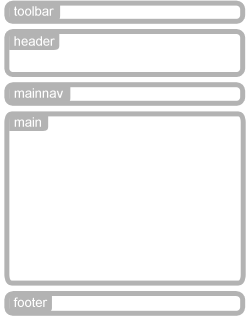
The iPhone layout
- iphone blocks set override the default blocks and they are designed according to iPhone standards:
- footer holds the website copyright information;
- head holds the scripts;
- header holds the template logo;
- main holds the main content body;
- mainnav block holds a special designed main navigation;
- menu block generates iPhone specific navigation system.
Block attributes and parameters
JA T3 Framework 2.0 comes with advanced layouts feature. Blocks that form layouts can be manipulated with a series of parameters and settings to easily change the HTML rendering behavior.
General block parameters
Block name
Expression: <block name="top" ...>
Purpose: this attribute serves as an identifier for the blocks, as there is always a chance some of your blocks to be the same type, so the framework needs to know how to identify them. The identifier refers to the layout position within the layout.
Example: <block name="left1">left</block>
Click here to find out more.
Block type
Expression: <block name="header" type="header" ...>
Purpose: this parameter sets the behavior and the functionality of the block as there are several files to manage behavior of these blocks:
- head.php
- header.php
- middle.php
- footer.php
Click here to learn more about block functions in the default layout. You will also learn that not all block types can be configured and don't even show up inside the layout file as they stand for specific template functions.
Block style
Expression: <block name="top" style="JAxhtml" ...>
Purpose: this parameter sets a module style for all modules inside a block. These styles are defined in the modules.php located in the your_site/plugins/system/jat3/base-themes/default/html folder, so this way Joomla! can understand how to show the content of the modules. The styles list is:
- no style - the default block setting with no block style defined, only provide support for module class suffixes;
- raw - provides a blank design for modules, no div, no classes;
- xhtml - mostly used for macro blocks like header, middle, footer;
- JAxhtml - provides a clean design for modules;
- JArounded - provides support for rounded corners design for modules.
Click here to learn how to customize these styles.
Using a block style for a macro block (top, middle, footer) this style will be used for all blocks inside.
Generate additional div
Block markup
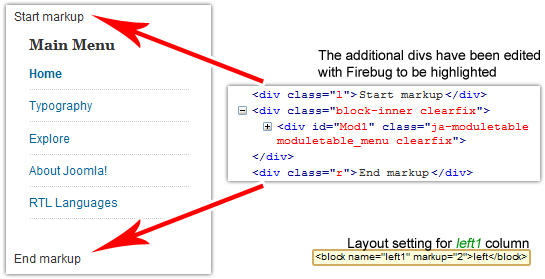
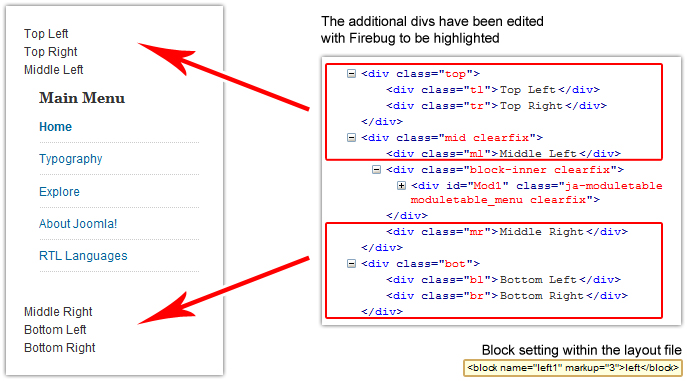
Expression: <block name="left" name="top" markup="2" ...>
Purpose: a new parameter to generate some additional div tags within the left or right columns. The idea is to provide more flexibility to designers. Values of this parameter:
- markup="1" - default value, no effect;
- markup="2" - advanced markup, will add a div class="l" (l is for left) above the column and one div class="r" (r is for right) below, see example below..
- markup="3" - complex markup, will add two div tags: class="tl" (tl is for top left) and class="tr" (tr is for top right) above the column and two div tags: class="bl" (bl is for bottom left) and class="br" (br is for bottom right), and a two middle div tags. See example below...
Block inner
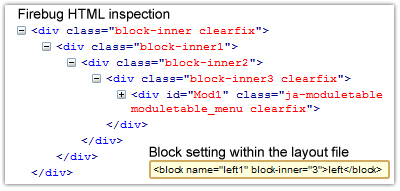
Expression: <block name="right" block-inner="3" ...>
Purpose: this parameter will add a number of inner div tags to wrap the block, only in middle content, like: right, left, content-mass-top . The value you set here is actually how deep the div structure will be. The additional div tags will have class="block-inner1", class="block-inner2", .. class="block-innerX". See image below..
Main inner
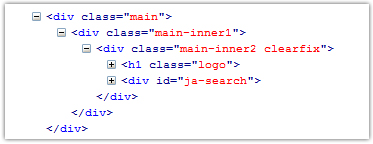
Expression: <block name="right" main-inner="2" ...>
Purpose: this parameter will add a number of inner div tags to wrap the block in div has class name 'main'. The value you set here is actually how deep the div structure will be. The additional div tags will have class="main-inner1", class="main-inner2", .. class="main-innerX".
Wrap inner
Expression: <block name="right" wrap-inner="3" ...>
Purpose: this parameter will add a number of inner div tags to wrap the block inside div has class name 'wrap'. In div class 'wrap', width is always "100%". The value you set here is actually how deep the div structure will be. The additional div tags will have class="wrap-inner1", class="wrap-inner2", .. class="wrap-innerX".
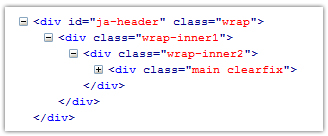
Remove div
No wrap
Expression: <block name="header" no-wrap="1" ...>
Purpose: removes the div with class="wrap" that wrap the block for any macro block that fills the entire width of the template (header, mainnav, middle, footer, etc).
No main
Expression: <block name="header" no-main="1" ...>
Purpose: removes the div with class="main" that wrap the block for any macro block that fills the entire width of the template (header, mainnav, middle, footer, etc).
Middle column width
Column general width
Expression: <block name="middle" type="middle" colwidth="20" ...>
Purpose: this parameter sets a default column width for the left, component body and right blocks inside the middle block. Left and right blocks use a column width of 20%, and main body will use the remaining 60%.
Custom column width
Expression: <block name="right" width="25" ...>
Purpose: this setting will override the default column width of 20% set for all blocks in the middle block. A higher value of this parameter will increase the width of left and / or right blocks, and will decrease the width of the main body block.
Middle Positions
Standard Columns
Purpose - middle.php macro block can render a column for each of the left, content-body (known as main) and right blocks, but can also render a column for the content-body and left & right joined into second column. Each column have distinctive class rules to be styled separately for each layout.
Variations
- left + body + right
<blocks name="middle" colwidth="20" fixheight="1">
<block name="left1/left2">left</block>
<block name="right1/right2">right</block>
</blocks> - left + right + body
<blocks name="middle" colwidth="20" fixheight="1">
<block name="left1">left</block>
<block name="left2">right</block>
</blocks> - body + left + right
<blocks name="middle" colwidth="20" fixheight="1">
<block name="right1">left</block>
<block name="right2">right</block>
</blocks> - other variations
- right + left + body
<block name="left2">left</block>
<block name="left1">right</block> - body + right + left
<block name="right2">left</block>
<block name="right1">right</block> - left + body + right
<block name="left2">left</block>
<block name="right2">right</block> - other variations
- right + left + body
Enabling mass positions
Purpose: enables you to use content-mass-top and / or content-mass-bottom, left-mass-top and / or left-mass-bottom, right-mass-top and / or right-mass-bottom positions as additional module positions. You can enable the content-mass positions anytime, but column-mass (left-mass-top, right-mass-bottom, etc) can be enabled only when left and right blocks join to form a column.
Variations
- left + body - all additional positions
	<blocks name="middle" colwidth="20" fixheight="1">

		<block name="left-mass-top">left-mass-top</block>

		<block name="content-mass-top">content-mass-top</block>

		<block name="left1">left</block>

		<block name="left2">right</block>

		<block name="content-mass-bottom">content-mass-bottom</block>

		<block name="left-mass-bottom">left-mass-bottom</block>

	</blocks>
- body + right - top additional positions
	<blocks name="middle" colwidth="20" fixheight="1">

		<block name="right-mass-top">right-mass-top</block>

		<block name="content-mass-top">content-mass-top</block>

		<block name="right1">left</block>

		<block name="right2">right</block>

	</blocks>
- body + right - various additional positions
	<blocks name="middle" colwidth="20" fixheight="1">

		<block name="right-mass-top">right-mass-top</block>

		<block name="right1">left</block>

		<block name="right2">right</block>

		<block name="content-mass-bottom">content-mass-bottom</block>

	</blocks>
Inset Columns
Expression: - <block name="inset1">left</block>
Purpose: allows you to group the main-body with left and/or right blocks to form a column with special div structure and styling classes.
Values
- inset1 - groups main body with left / right block, and sets the position of the left / left block to the LEFT side of the main-body;
- inset2 - groups main body with left / right block, and sets the position of the left / left block to the RIGHT side of the main-body.
Variations
- (left + body) + right
<block name="inset1">left</block>
<block name="right1">right</block>
- left + (body + right)
<block name="left1">left</block>
<block name="inset2">right</block>
- (left + body + right)
<block name="inset1">left</block>
<block name="inset2">right</block>
- left + (right + body)
<block name="left1">left</block>
<block name="inset1">right</block>
- (body + left) + right
<block name="inset2">left</block>
<block name="right1">right</block>
- other variations
Spotlight parameters
Total width
Expression: <block name="bottom-spotlight" type="spotlight" totalwidth="95" ...>user6,user7,user8,user9,user10</block>
Purpose: this setting will override the default width of the entire spotlight (100%) with the value you set here. In the expression above you can see a 95% width for the bottom-spotlight block.
Custom width
Expression: <block name="top-spotlight" type="spotlight" special="left" specialwidth="25">user1,user2,user3,user4,user5</block>
Purpose: - this will override the default 20% width for a single position within the layout, it could be the one in the right side, it could be the one in the left side, but let's examine these parameters closer:
- special="left" - this defines where is the module we want to use the custom width: left or right
- specialwidth="25" - this defines the new width value for this module within the spotlight block.
Themes
- Themes are in charge of filling a template with color and give your template a new look and feel.
- Themes can hold CSS and image files to override everything in the core plugin styling, and also basic template styling.
- Themes can also hold html content components and modules overrides.
- Usually they override the default theme.
- They can also override layout blocks for customization purposes.
- In Profiles tab of the template administration panel you can use multiple themes for a single profile, and set an order of priority.
Base Theme
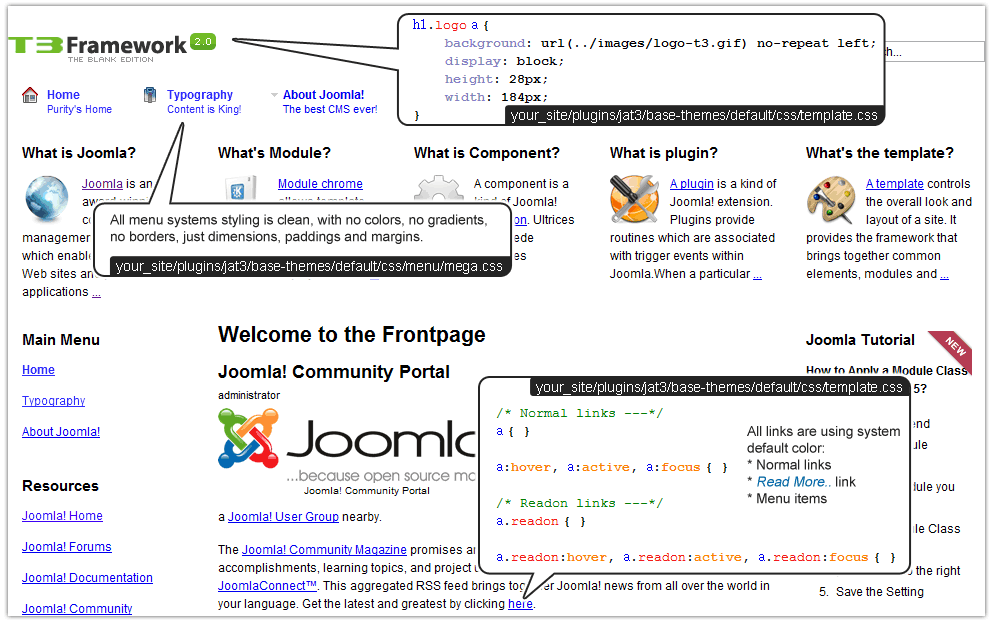
- This is the base theme to hold very basic layout design.
- This theme has no graphics, no colors, just dimensions, padding and margins.
- Additional styling should be added in theme variations to override this default layout design.
Theme Variations
- Theme variations override the base theme and have highest priority to style the template.
- They can be used to create unlimited color themes, with contrasting colors and graphics.
The Default Theme
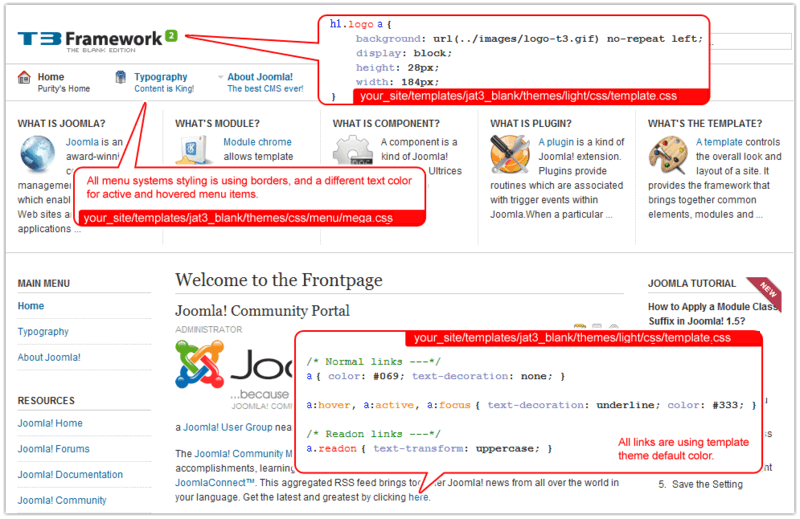
This is the default theme supplied with the T3 Framework based template. This theme will override the base theme in the core plugin. Let's have a closer look at the files and folders:
- blocks folder to hold the blocks you want to override;
- css folder to hold template.css to override general template styling and menu folder to override menu systems styling;
- html folder to override same files in the core plugin for content components and modules views;
- images folder to override the logo and generally all graphics needed to have a custom theme design;
- info.xml file to hold theme information.
See complete structure of the template in this section.
Color Contrast Themes
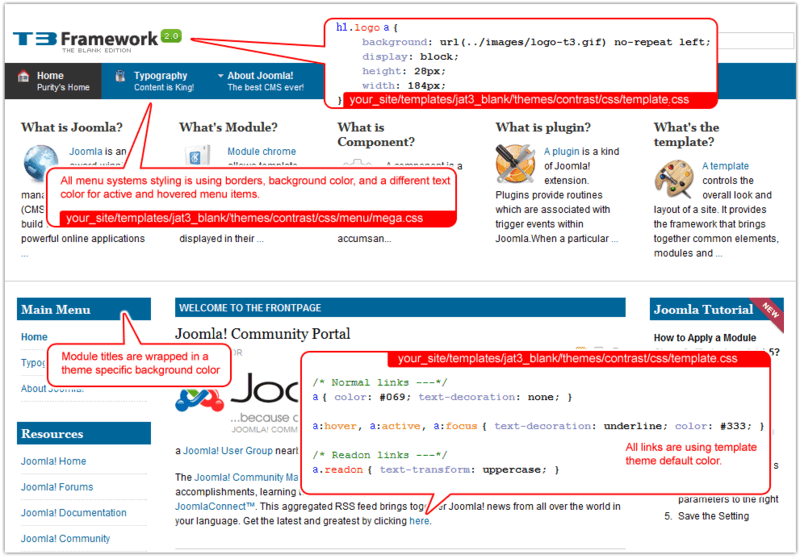
This is a theme variation to override the default theme supplied with the T3 Framework based template. Let's have a closer look at the files and folders:
- css folder to hold template.css to override general template styling and menu folder to override menu systems styling;
- info.xml file to hold theme information.
Graphics Rich Themes
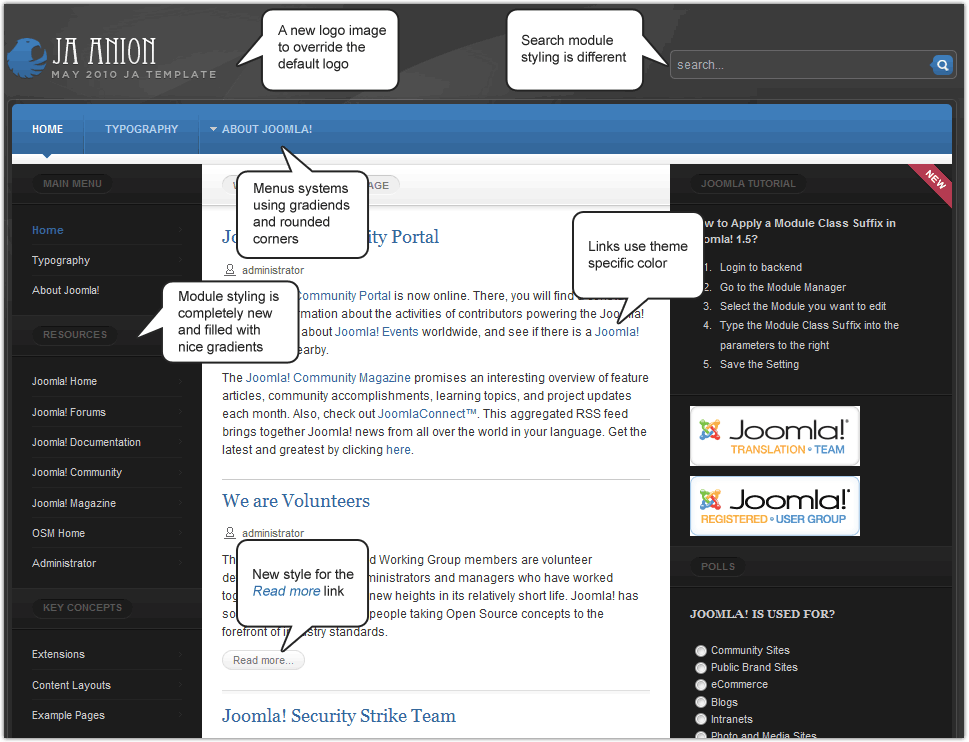
This is graphics rich theme supplied with the JA Anion T3 Framework 2.0 based template. Let's have a closer look at the files and folders:
- css folder to hold template.css to override general template styling and menu folder to override menu systems styling;
- images folder to override the logo and generally all graphics needed to have a unique theme design;
- info.xml file to hold theme information.
Important notice
The framework will load all CSS files, images, and layouts for:
- 1st: plugin base-themes
- 2nd: default themes of the template with: layouts, css, images
- 3rd: other theme variations and user created templates
You must ONLY use additional files to override what is supplied by default, and keep all simple and optimized. No need to use same code in all template.css files.
Profiles
What is a profile
Basically it is a new presets feature to hold all template settings. These settings are hold in files inside the template folders.
You can create unlimited unique profiles, combining all template settings to achieve several design goals, and these profiles you create are stored in your template etc & themes folder.
You can manage profiles in the Profiles Panel of the template administration.
What do they bring to the framework
- Profiles have taken over the menu & layout override options used in the previous version of the framework.
- When switching the layout in front-end does not redirect to home page anymore because of the improved User Tools panel.
- No more template parameters in the links! User can always customize some profile settings in front-end and reset to default profile settings, even if overrides are set for specific pages.
Default Profile
This is the file for the default profile. It holds default values for all template settings:
your_site/templates/jat3_blank/etc/profiles/default.ini
logoType=image

setting_font=3

setting_screen=fixed

setting_screen-fixed-screen_width=950px

hide_content_block=0

setting_direction=ltr

gfont_global=

gfont_logo=

gfont_slogan=

gfont_moduletitle=

gfont_pageheading=

gfont_contentheading=

menutype=mainmenu

setting_menu=mega

startlevel=0

endlevel=-1

ja_menu-mega-animation=slide

ja_menu-mega-duration=300

option_t3logo=1

option_font=1

option_screen=1

option_profiles=1

option_layouts=1

option_direction=1

option_menu=1

themes=core.light

desktop_layout=default

handheld_layout=handheld

iphone_layout=iphone
Profile Variations
Other profiles can only override some settings defined within the default profile. Example:
your_site/templates/jat3_blank/etc/profiles/your_profile.ini
themes=orange
This profile will only override the default theme used by the template with the orange theme, so as you can see, there is no need to repeat the entire profile code if the other settings are not changed.
Override Priority
Templates have the ability to override everything coming by default with the Joomla! distribution package: content components or modules front-end views, styles, language strings, etc.
The template default settings are hold in the default profile. Other profiles will then override every setting in the default profile.
You can assign a unique settings profile for your homepage, one for your online shop, one for your forum and another one for your blog. This way you can override the default profile for every single page or content component with your desired profile.
Lowest Priority
As you can see in the JA T3 Framework Plugin structure:
- it holds the default styling and code of the blank theme in the base-themes folder:
- CSS styling,
- layouts,
- HTML template overrides,
- images,
- themes.
Medium Priority
The T3 Framework based template default theme:
- holds it's own general styling to override the default general styling in the blank theme
- it does not hold javascript files of any kind, but it can also override javascript,
- will override everything in the blank theme:
- CSS styling,
- layouts and blocks,
- HTML template overrides,
- images.
High Priority
A high priority have theme variations coming with the templates powered by the T3 Framework 2.0, as they can hold CSS styling, layouts and blocks inside, HTML template overrides and images.
- will override everything in the default theme:
- CSS styling,
- blocks,
- HTML template overrides,
- images.
Highest Priority
- Priority zero have user created themes to hold custom layouts, images, stylesheets.
- When using multiple themes simultaneously, the theme priority can always be changed in the Theme Settings section of the Profiles Panel
- Front-end users can always customize everything in a profile that was loaded for a specific page: layouts, menu system, other profile settings.
- All styling marked as !important have highest priority.
Graphic representation

Note: For the T3 V1.6 and higher, there are some changes in term of folder organization --> the graphic representation in the T3 V1.6 is also changed as shown in the image below.

Template administration
The template administration was improved to make customization work easier via internal editors and upload features, but also faster via AJAX implementations. The administration is now split into five sections:
- Global Panel - general template settings and system settings
- Profiles Panel - template design settings and presets
- Layouts Panel - template layouts management
- Themes Panel - template color themes management
- Help & Update Panel - help resources and version information
The administration panel is now your best friend as each section comes with a quick guide, and every setting provide hints and usage instructions.
Global Panel
Global Panel Overview
This panel controls the general behavior of the template and also the system and compression settings. With all it's sections minimized, this panel looks like this:

Language & Page Assignments
This section allows you to set profile overrides for specific pages or content components. The default profile is used for all pages and content components by default, but you can create unlimited profile overrides.
In case you want to change the template settings for one or more pages or content components, here is a quick guide:
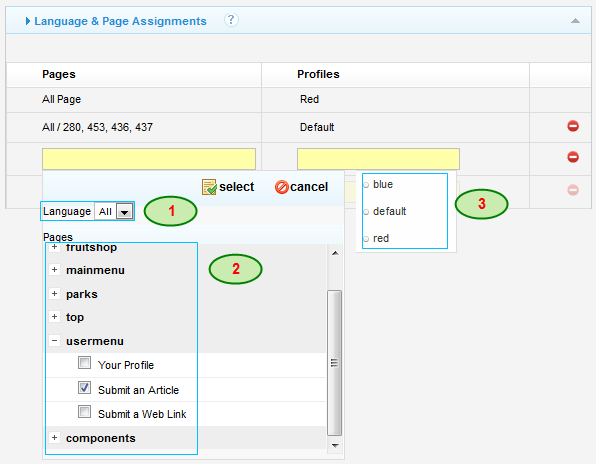
- Step 1 - Click the arrow to maximize the Language & Page Assignments section.
- Step 2 - Select one or more menu items or components in the the left drop down list (click and hold the Ctrl key for multiple selection) and then click the Select button in the selection box.
- Step 3 - Select the profile you want to use for these pages.
- Step 4 - Click the Apply button.
Please note!
There could be several reasons why profile override settings don't work when using SEF. Why?
Within a Joomla! website, there could be several links to route to certain internal pages, and these links don't always carry an Itemid value, but other SEF components like sh404SEF can solve the problem because it makes sure to route all these links with no Itemid value to the corresponding ones having Itemid=5 value. So having Itemid, T3 Framework will load the proper profile.
System Settings
This section manages the cache feature for the template. Have a look at the picture below:
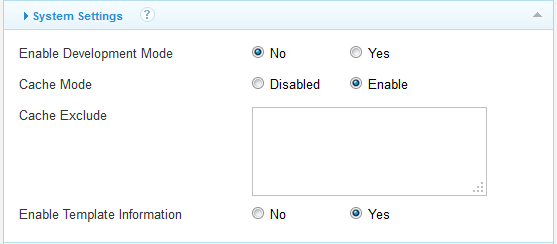
- Enable Development Mode - if you set this setting to Yes, it will completely disable all cache, so that you can always see instantly your customizations on page refresh. Setting this setting to No is recommended for production websites with huge traffic that need cache.
- Cache Mode - Enables / Disables template cache to lower all PHP queries generating the front-end HTML of your website (component/module template override views, layout files, etc).
- Cache Exclude - Option to exclude the cache feature for specific components or positions.
Example:
- position=user1,user2 - will exclude cache for these positions,
- component=com_virtuemart,com_fireboard - will exclude these components from using cache.
- position=user1,user2 - will exclude cache for these positions,
This feature was developed to avoid script conflicts for AJAX content.
Compression Settings
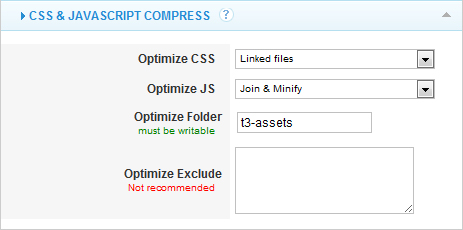
Optimize CSS - This this feature will optimize all the CSS files used in your website.
Options:
- No - Disables the CSS compression features.
- Linked files - Uses the @import function to import all CSS files into a single CSS file to have a single file call and reduce browser requests. This will fix the IE related issues caused by the maximum 30 CSS files limit.
- Join & Minify - Combines Minify and Join (file merging) optimization. Minify is an optimization technique to eliminate blank spaces and other unnecessary characters (comments usually) without changing the functionality of the code. Join will merge the content of the minified files into a single file to be stored in the folder you can configure below.
- Join & Minify & Compress - will compress the CSS file created by Join & Minify using Joomla! gZIP compression scripts.
Optimize JS - This this feature will optimize all the JS files used in your website.
Options:
- No - Disables the JS compression features.
- Join - Will only merge all JS files into a single JS file to be stored in the folder you can configure below.
- Join & Minify - Combines Minify and Join (file merging) optimization. Minify is an optimization technique to eliminate blank spaces and other unnecessary characters (comments usually) without changing the functionality of the code. Join will merge the content of the minified files into a single file to be stored in the same folder you can configure below.
- Join & Minify & Compress - will compress the JS file created by Join & Minify using Joomla! gZIP compression scripts.
Optimize Folder - Folder where optimized css/js files are stored. By default it is t3-assets in the web root.
Please note: This folder must be writable.
Optimize Exclude - Not recommended
Add the JS / CSS files name (without location path) you do NOT want to optimize, one per row.
mega.js
Please note
- The CSS & JS Compression feature can work with JA Compress Plugin enabled.
- Minify Script reguires PHP 5.x.
Profiles Panel
Profiles Panel Overview
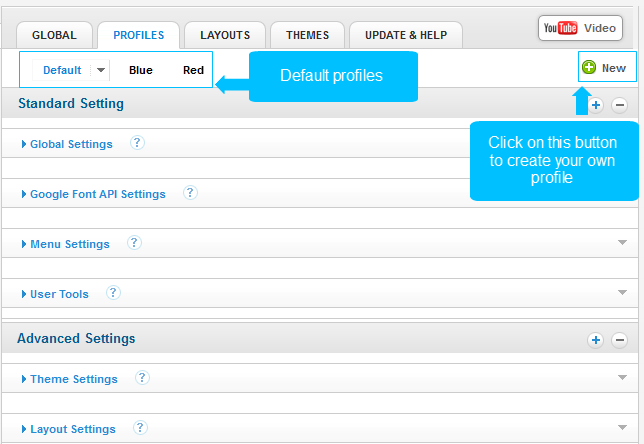
In this panel you can manage profiles: create, clone, edit, delete (your own) profiles. For each profile you can customize all template settings: logo, font-size, layouts, menu system, color theme, text-direction, etc. All these settings are split into several sections as you will see in the next chapters.
Profiles Typology
There are 2 types of profiles:
- default profiles - cannot be deleted as they are part of the framework core, but can be customized / reset to default;

- user created profiles to load user layouts, themes and other custom settings.

Editing Profiles
All user created profiles (clones of the defaults or created by user) override the settings of the default profile. To edit a user created profile, please proceed with this quick guide:
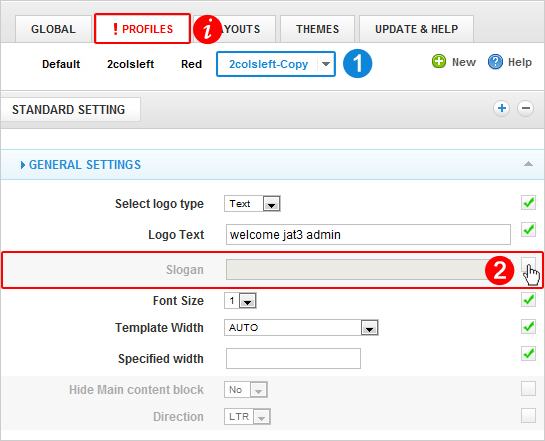
- Step 1 - select a profile you created or cloned out of any other default one;
- Step 2 - click the checkbox to enable the customization of any setting and change the values or options;
- Notice - the Profiles tab detected a user customization that will require to save the settings;
- Step 3 - click the Apply button to save settings.
Please note that settings that are not checked cannot be changed and will not override the default values.
Please note - when editing core template profiles, the framework will create profile overrides in the local profiles folder (user setup).
General Settings
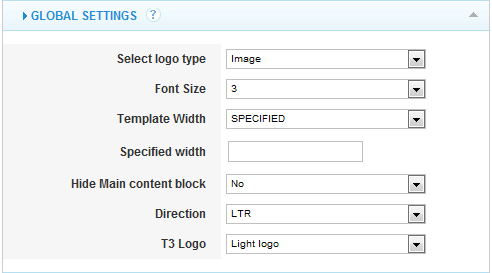
In the general profile settings you can customize:
- the logo - image / text (just like in the screenshot)
- the font size - select from six font-sizes: from 10px to 15px
- the template width - SPECIFIED PIXEL (default), SPECIFIED PERCENTAGE, AUTO, WIDE
- text direction - RTL or LTR
- you can also choose to show/hide the main content block.
- T3 Logo setting comes with 5 options:
- Don't show - will hide the T3 Framework logo
- Light Logo - show default T3 Framework logo
- Dark Logo - show dark T3 Framework logo
- Light Logo - show a small T3 Framework logo with default colors
- Dark Logo - show a small T3 Framework logo with dark colors.
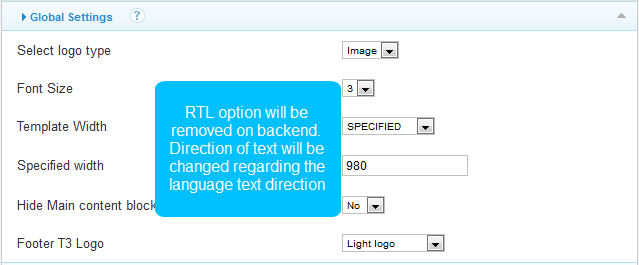
Note: For the T3 V1.6, the RTL option will be removed, then the global settings in this version has also some changes. Direction of text will be changed regrading the language direction.
Google Font API Settings
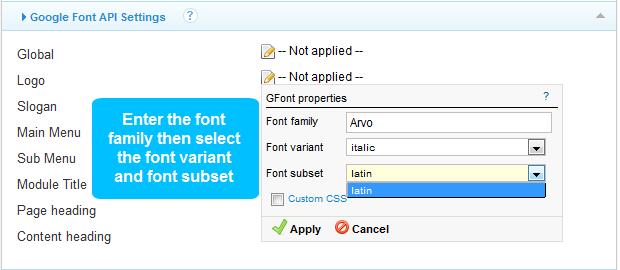
JA T3 Framework 2.0 comes with a built in font-replacement solution: Google WebFonts. In the font settings you can customize:
- Global Font - a special font to be used generally for all text content in the front-end
- Logo Font - a font to be used when you are using Text Logo setting
- Slogan - a font to be used for slogan line under the Text-Logo
- Module Title Font - a font to be used for all module titles in your website
- Page Heading Font - a font to be used for Menu Item Pages
- Content Heading Font - a font to be used for content articles or items
For each of the elements above, you can also add custom CSS styling, one style per row. Example:
font-size:18px;

font-weight:bold;
Note: To enable/edit Google Font Api, enter the Font Family. The Font variant and Font Subset will be listed due to the entered font family.
Menu Settings
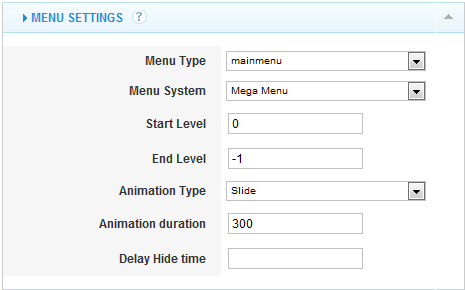
The menu settings allow you to configure the main navigation for your website:
- the menu to be loaded (mainmenu is the default setting)
- menu system: Split Menu, CSS Menu, Mega Menu, Dropline Menu
- starting & ending points of menu rendering
- if Mega Menu is selected, you can customize the animation settings:
- Animation type: none, slide, fade, slide and fade
- Animation duration - time in milliseconds for the animation
- Delay hide time - time in milliseconds for the hide time delay.
User Tools Settings
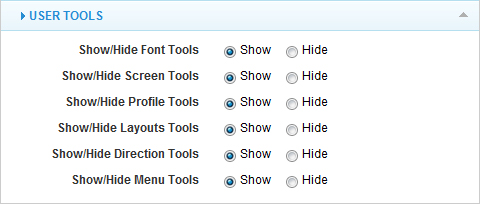
In this section you can set what tools you allow your users to use, so you can show or hide any of the user tools for each of your profiles:
- Font-size switcher
- Screen-size switcher
- Profiles-switcher - This switcher shows up when you have at least 2 PROFILES.
- Layouts-switcher - This switcher shows up when you have at least 2 LAYOUTS.
- Text-direction switcher
- Menu-system switcher
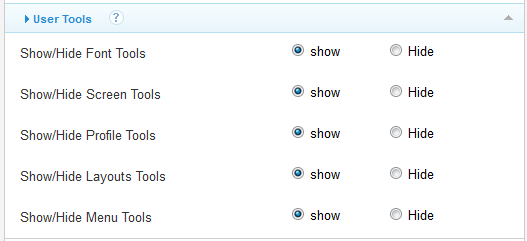
Note: For T3 V1.6 and higher, the "Show/Hide Direction Tool" is removed. The new settings will look like the image below.
Themes Settings
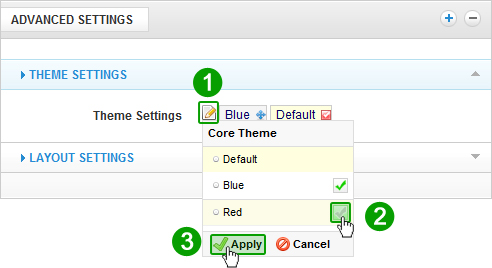
Theme Settings allow you to override the styling of the default theme. To do that, please follow the steps described below:
- Step 1 - click the Edit icon to open the theme selection box;
- Step 2 - check one or more themes to be used to override the default theme;
- Step 3 - click the Apply button;

- Step 4 - click and drag the themes and set your favorite order: the first in the left will override all in the right, and the last is the default theme that is locked and cannot be dragged.
- Step 5 - click the Apply button in the template administration panel to save the new theme settings.
Layout Settings

The layout settings allow you to set the default layout to be used as default for each user device type, for each specific profile.
You can set here:
- a default layout for desktop computers
- a default layout for Handheld devices: BlackBerry, Android Mobile, Windows Mobile, etc
- a default layout for iPhone devices
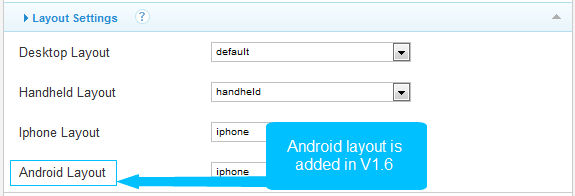
Note: For T3 V1.6 and higher, there will be more options for you to select. The Version supports Android Profile, the setting panel will look like the image below.
Layouts Panel
Layouts Panel Overview
In this panel you can manage layouts used by the template. Click here to learn more about layouts.
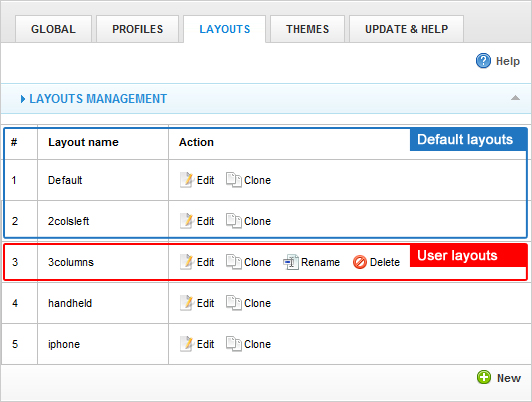
Layouts Typology
As you can see, there are two types of layouts:
- default layouts - supplied by the template developer and stand as samples end-users can use to create their own layouts. These cannot be deleted as they are part of the template core files.
- user created layouts - are created by the end-user to use his desired styling.
Editing layouts
JA T3 Framework 2.0 comes with an internal editor to easily customize layouts. To edit a layout, please follow this quick guide:
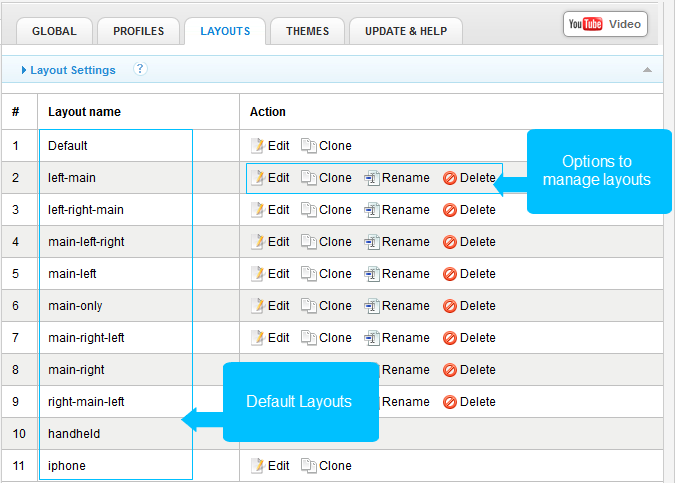
- Step 1 - In the Layouts panel click the Edit link for any of the layouts you would like to edit. This opens the layout editor you can see below.
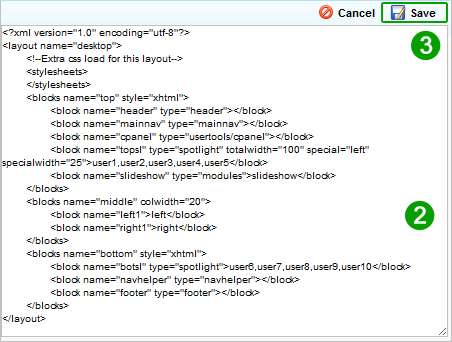
- Step 2 - Customize the layout using the internal editor. Click here to find out how.
- Step 3 - Click the Save button in the internal editor to save the layout.
Please note: By editing base-template layouts, the framework will create layout overrides in the layouts folder..
Themes Panel
Themes Panel Overview
This panel was developed to ease your work managing multiple themes. You can create your custom color themes, pack them and upload them to the template themes folder right in the back-end, just like installing a template extension.
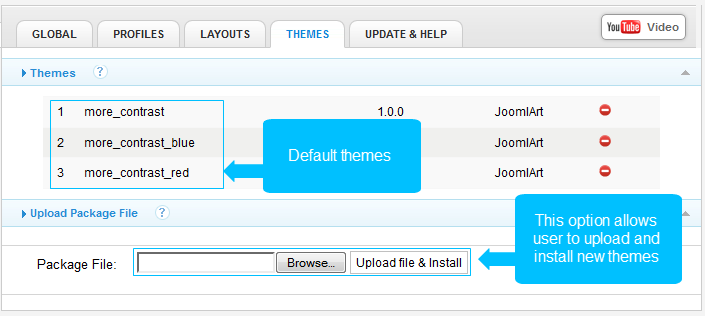
There are two type of themes:
- Default themes supplied by the template, cannot be deleted as they are part of the template core files.
- User Created Themes. Click here to learn how to create and customize the themes.
Uploading themes
Based on default core themes, you can create your own themes and upload them right in the back-end of your website. For instance you would like to design a green theme, please follow this quick guide:
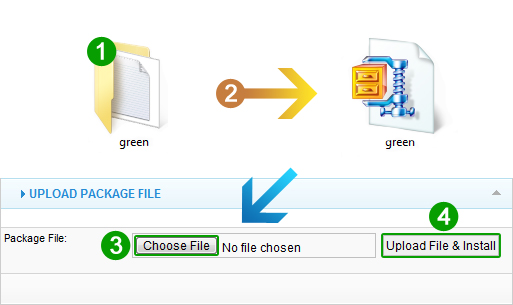
- Step 1 - Create your theme following these instructions.
- Step 2 - Pack your theme into a zip file.
- Step 3 - Click the Choose File button to browse for the green theme.
- Step 4 - Click the Upload File & Install button.
The newly uploaded theme will be listed in the Themes section of the Themes Panel.
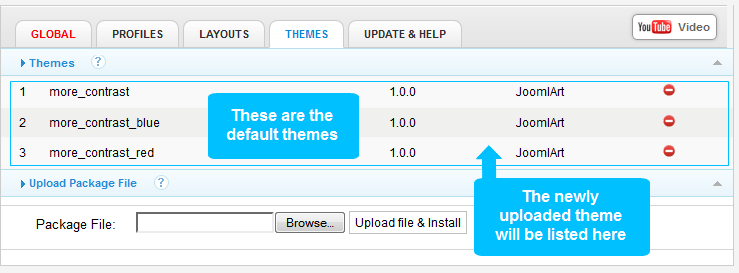
Help and Update Panel
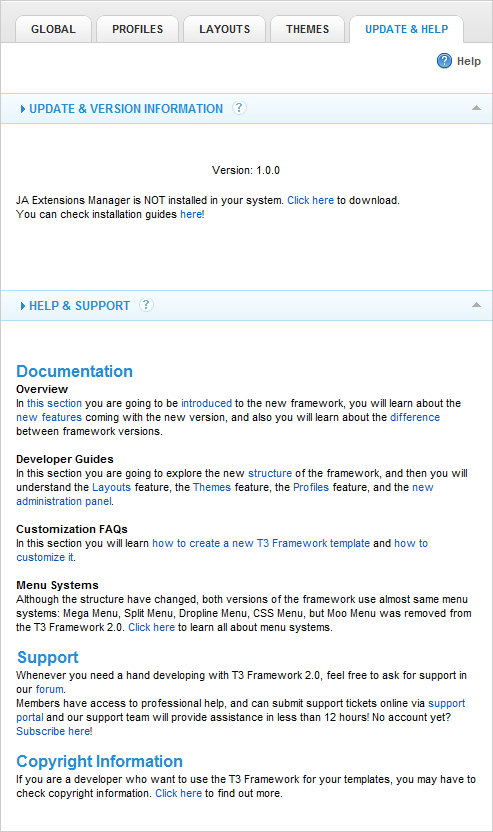
This Panel allows you to:
- View the current version information.
- Check or upgrade to the new version with our JA Extensions Manager.
Also this panel provides help and documentation resources.


