Amazon S3 and its concepts
What is Amazon S3?
Amazon S3 is storage for the Internet. It is designed to make web-scale computing easier for developersMore information can be read at: http://aws.amazon.com/s3/.
Amazon S3 concepts:
- Buckets: A bucket is a container for objects stored in Amazon S3. Every object is contained in a bucket.
- Objects: Objects are the fundamental entities stored in Amazon S3. You can think of them as being files.
- Folders:You use folders to group objects in a bucket.
- Keys: A key is like the file name; it is the unique identifier for an object in a bucket. Every object in a bucket has its own unique key.
More information can be read at: http://docs.aws.amazon.com/AmazonS3/latest/dev/Introduction.html.
JA Amazon S3 extension
JA Amazon S3 includes JA Amazon S3 component, JA Amazon S3 plugin and JA Amazon S3 Button plugin.
JA Amazon S3 Component
JA Amazon Simple Storage Service component is a powerful Cloud File Hosting to Joomla. Hybrid hosting is now possible, load site from your server and files (images/ documents/ CSS/ JS) from amazon clouds or even Amazon Cloudfront Content Delivery network (CDN). Install, upload files and enjoy the benefits of Amazon Simple Storage Service (S3) and Amazon Cloudfront CDN cloud hosting.
More information, please check the info at: http://www.joomlart.com/joomla/extensions/ja-amazon-s3.
JA Amazon S3 Plugin
JA Amazon Plug-in is a part of JA Amazon S3 Component. To use the S3 Amazon component, you need install 2 plugin named: JA System Amazon S3 Plugin and JA Button Amazon S3 Plugin.
- The JA System Amazon S3 Plug-in uses to store and manage objects in Amazon S3 instead of user hosting.
- JA Button Amazon S3 Plugin is to enable the S3 Image button in the Edit form of the Article, by clicking on this button, user can select image from S3 service in the displayed popup.
In Amazon S3 for J25 version 2.5.2, component & plug-in are combined. You only have to install the component, and the plugins are automatically loaded and enabled.

JA Amazon S3 button plugin
Once the plugin is enabled, in your article editing panel, you will see a Amazon S3 button that allows you to browse files that are stored in your Amazon S3.
Install S3 Amazon Component
As JA Amazon S3 extension includes JA Amazon S3 component JA Amazon S3 plugin and JA Amazon S3 Button plugin so you need to install the 3 extensions in your system.
- Step 1: Download the extensions at: http://www.joomlart.com/forums/downloads.php?do=cat&id=20367
- Step 2: Install the extensions video Joomla Installer - detail documentation.
Component Configuration
1. Global Configuration
From the back-end of your Joomla site (Administration) select Components >>JA Amazon S3 >> Options button on the right.

Parameter explanation:
- Profile Path Depth: An integer specifies the maximum depth (folders) of the selectable profile.
- Upload Secret Key: In order to check the upload request from a verified source.
- Cron Mode: A time-based job scheduler
2. Account Manager
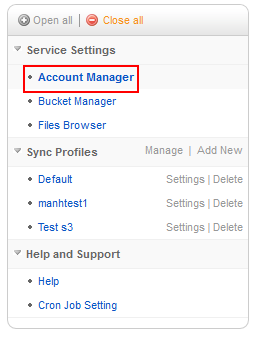
On the Joomlart Amazon S3 screen, navigate to Account Manager
2.1 Add new Amazon S3 account
Access the "Account Manager" menu then click on the "New" button.
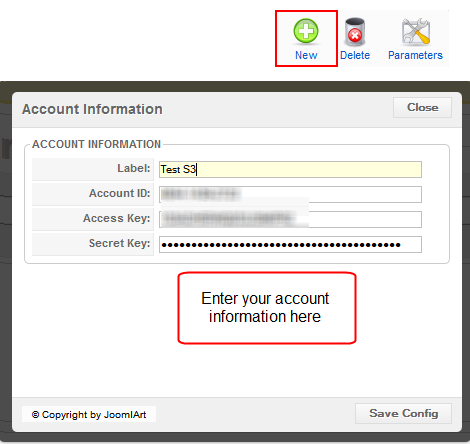
Input all the necessary information as needed, and hit the "Save Config" button.
Parameter explanation:
- Label: Basically, it is a name for your Amazon S3 account in order to keep your accounts organized with your other existing Amazon S3.
- Account ID: Input your Amazon S3 Account ID (Name)
- Access key: Input your Amazon S3 Access key
- Secret key: Input your Amazon S3 Secret key .
2.2 Edit the existing Amazon S3 account
Choose the account you need to edit, click on the "Edit" link on the right. The "Config Account" pop-up will be shown for you to start editing.
2.3 Delete the existing Amazon S3 account
Choose the account you need to edit, click on the "Delete" button on the top - right.
3. Bucket Manager
On Joomlart Amazon S3 screen, navigate to "Bucket Manager" or click on the "Bucket" link next to the selected account.

Parameter explanation:
- Options: Open Global Configuration pop-up.
- New: Create new bucket.
- Delete: Remove selected bucket(s) from the current account.
- Delete S3: Remove selected bucket(s) from the current account and from the Amazon S3 server.
3.1 Create new bucket
Hit the "New" button on top-right

Parameter explanation:
- Bucket Name: Name your bucket as desired
- URL Format: Set the format of the distributed URL.
- Cloud Front Domain: Use this Cloud Front Domain instead of the normal bucket.s3.amazonaws.com domain.
- Bucket Status: Set permission for bucket.
- Open: Public user can read/write on this directory.
- Public: Public user can read only while the owner holds both the read/write permissions on this directory.
- Private: Only owner can read/write on this directory.
- Apply to sub-folder: Whether to apply the above setting to the sub-folder or not. - Region: Select Amazon S3 server position.
- Clone from existing bucket: Make a clone of the existing bucket.
After configuring the settings, hit the "Save Config" button.
Note: When "Cloud Front Domain" is selected, the "URL Format" is inactive, and vice versa.
3.2 Edit bucket
Navigate to Joomlart Amazon S3 >> Bucket Manager then hit the "Edit" link on the right of the selected bucket.

Modify the attribute you prefer then hit the "Save Config" button when you're done.
3.3 Get bucket list from Amazon S3
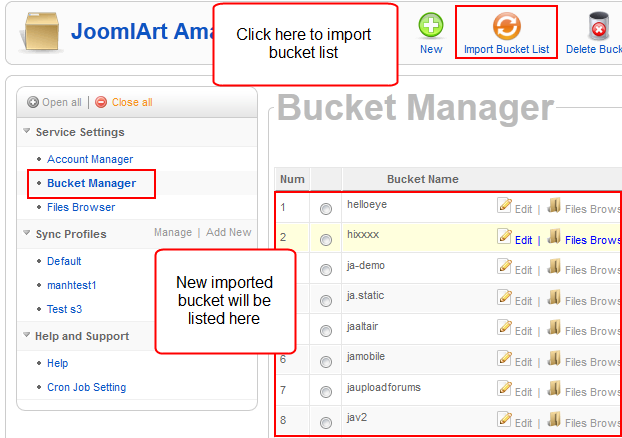
The first time you access your account on JA Amazon S3, a blank screen will be shown. To get a list of bucket from the Amazon S3, follow the below steps:
Navigate to JA Amazon S3 page >>Bucket Manager >> Hit "Import Bucket List" button on the top right corner.
4. Synchronize
All the settings to manage your items from local to Amazon S3 server will be put in here. You can create multiple profiles to control an individual task, or the integrated task.
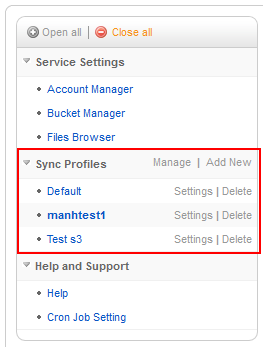
Parameter explanation:
- Manage: Handle all profiles.
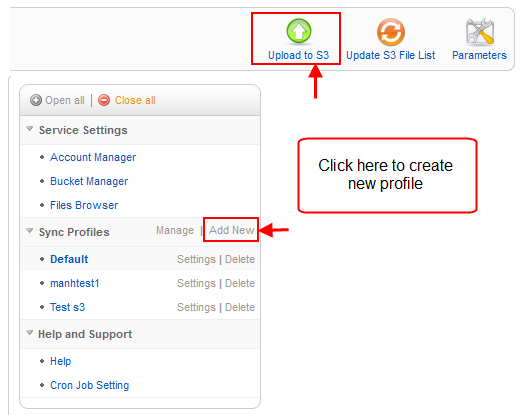
- Add New: Create new profile.
- Default: Profile that creates automatically by JA Amazon S3
- Caches folder: Profile that creates automatically by JA Amazon S3
4.1 Add new profile
Click "New" button on the right"/ or "Add New" link on "Sync Profile"
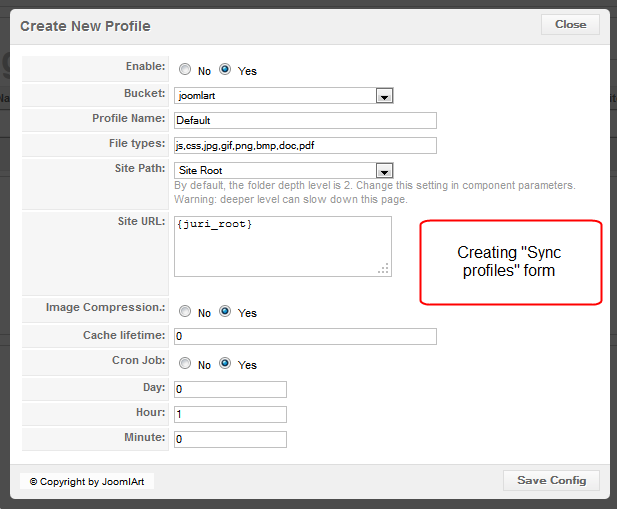
Parameter explanation:
- Bucket: Select appropriate bucket on Amazon S3. All the supported files (defined in File Types) inside
- Site Path repository will be uploaded to this bucket.
- Profile Name: Name your profile
- File Types: Define the supported file that can be recognized and uploaded.
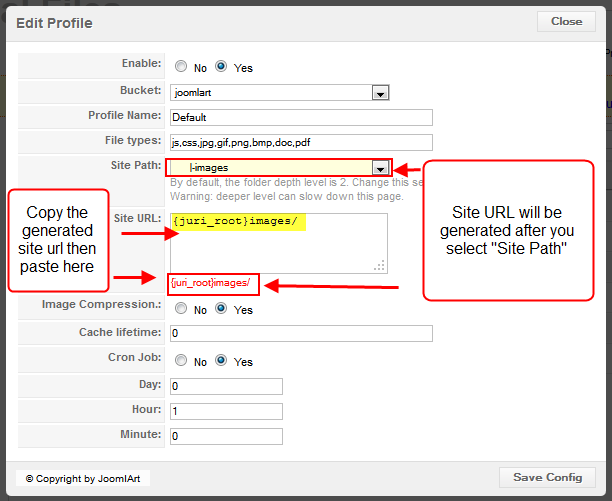
- Site Path: Define the path to store all the supported files that would be uploaded.
- Site URL: After user choosing a "Site Path", a content marks with red will be displayed, copy this content and paste to textbox.
- Use SmushIt: Use SmushIt service to compress images before uploading them to Amazon S3 server.
- Cache lifetime: Time(in second) items will be stored in your computer before they are loaded again.
- Enable Cron Job for Upload? : Whether to set the bucket as a time-based scheduling service or not. If Cron Job is enable: Set time to auto upload: Day, Hour, Minute
Note: Amazon S3 v1.0.0 for J16, like the Amazon S3 v2.1.0 for J15, supports compress image and run cron job in front-end.
To compress image, remember to select "Use Smushlt" when creating a new profile.
To run cron job in the front-end, adding your "Upload Secret Key” (that is defined in Options) after "?" mark at the end of the URL.
Ex: If your "upload secret key" is "joomlart_upload_key" then your cron job URL will be: http://www.joomlart.com/?joomlart_upload_key
4.2 Edit existing profile
Hit the "Setting" link right next to the selected profile link or "Setting" link beside profile. The "Edit Profile" pop-up window will be shown, modify the attribute you prefer.
4.3 Delete the existing profile
Choose the profile you want to delete, click on the "Delete" button on the top - right.
4.4 Local File Manager
Select the appropriate profile


Upload Files To S3
From working panel of the selected Sync Profile, select the folders which contain the images you want to upload to S3 -> Click on the "Upload" or "Upload to S3" button

There are 3 options to upload

- Option 1: Upload new & modified files. This option is to upload new and modified files -> the old files will not be uploaded.
- Option 2: Upload new files only. Only upload new files, meaning the old files and modified files will not be uploaded.
- Option 3: Upload & Delete Local files. After uploading allowed files, delete the uploaded files from local. Be careful with this option, the files will be deleted from your site.
Upload Files To S3
To upload files with URL, you need to enable "Cron Mode" option in global setting and in Sync Profile setting of profile you want to upload.
Step 1: Enable Cron Mode in global setting

Step 2: Enable Cron Mode in Sync Profile setting

Step 3: Select "Profile" then select folder to upload

5. Remote Files Manage
Navigate to Joomlart Amazon S3 -> S3 File Browser, or Joomlart Amazon S3 -> Buckets Manager, hit the "S3 File Browser" link on the right of the selected bucket.
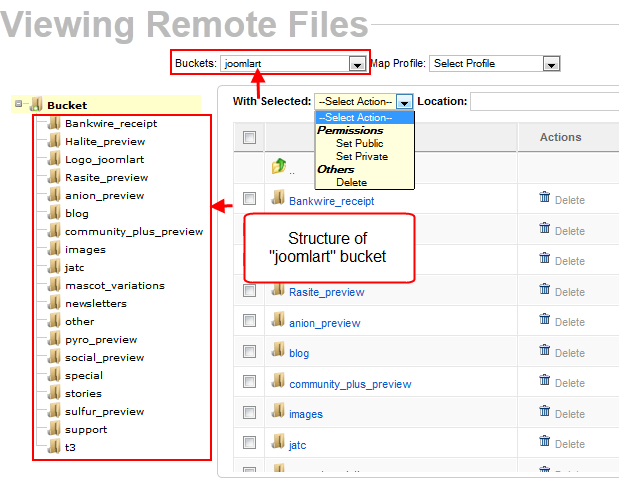
Parameter explanation:
- Update S3 file list: Update file list of selected bucket from S3
- Create Directory: Create new directory in bucket.
- Permission: Set permission for selected file(s)/directory(s)
- Open - Public user can read/write on the selected files/directories.
- Public - Public user can read while the owner holds both the read/write permission on the selected files/directories.
- Private - Only the owner can read/write on selected files/directories. - Delete: Delete selected directories or files in current buckets.
- Advance Delete: For advance users who are familiar with the Regular Expression.
Restore uploaded files
This option allows you to restore the files you uploaded to S3 Organizer and the files can be removed. Select Bucket -> Profile -> folder you want to pull your files -> click "Pull file" button

6. Insert S3 images feature
Note :Make sure that you must install & enable both plugins to use this feature.
New feature: Integrating S3 file on Joomla editor
JA Amazon S3 is now added a new feature to help you easily integrating your S3 files into your Joomla site. You now can select file from S3 bucket to insert into your articles, all operations are similar with what you would normally do with files on your server.
Open article (in the backend only) then clicking on the S3 image button :

Select Bucket

Select images

Cron Job settings
Cron job are scheduled tasks that allow uploading data to server at predefined times or intervals on the server.
Note
Be careful when scheduling cron jobs. Setting them to run too often may slow down your server. You can get upload url for specific folder of profile on "Local File Manager" page.
Cron Job configuration
1. Before you configure
Once you install the component and configure for other parts (Video to guide you how to install and configure the component. The video does not contain the Cron Job configuration), navigate to the Cron Jon Setting in the Help and Support section on the left menu.

After you navigate to the section, please read the note in this section carefully before you configure. This note also is the guide for you to configure.

2. Global setting
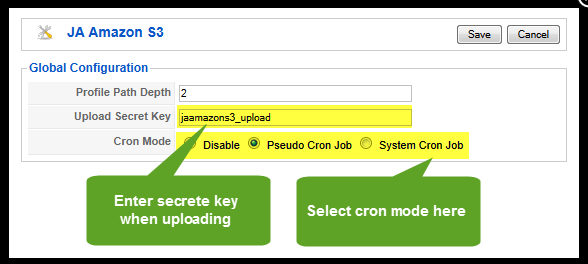
This setting allows you to select Cron job mode and set the Secret key when uploading
2.1 Cron Mode = Pseudo Cron mode
This setting allow you to upload automatically without any configuration
p>2.2 Cron Mode = System Cron modeUploading will be executed after creating cron job tab using URL with the format :http://your_site/ja_works/jaamazons3...zons3/cron.php to upload files on your hosting server
Steps to create Cron Tab ( this guide is for CPNEL, for the others, you do the same ways)
You can have some look to understand what Cron tab is and how to create a cron tab at: http://adminschoice.com/crontab-quick-reference.
Step 1. Access to your Cpanel and navigate to the "Cron Tabs". Click on this button to create new Cron tab

Step 2. Replace the URL in the command field with the URL given in the Cron job mode in the backend of the component

Note: use URL with the format: http://your_site/ja_works/jaamazons3...zons3/cron.php.
Step 3. Once you create successfully, you can now access the link you replace in the Step 2

Using IAM account to manage access to AWS
- IAM: Identity and Access Management
- AWS: Amazon Web Service
AWS Security Credentials
When you interact with AWS, you use AWS security credentials to verify who you are and whether you have permission to access the resources that you are requesting. In other words, security credentials are used to authenticate and authorize calls that you make to AWS.
For example, if you want to download a specific file from an Amazon Simple Storage Service (Amazon S3) bucket, the credentials that you use must allow that access. If your credentials aren't authorized to download the file, your request is denied. In some cases, you can make calls without security credentials to AWS, like when you download a file that is publicly shared in an Amazon S3 bucket.
Which of Security Credentials you can use in JA Amazon S3 component?
JA Amazon S3 component supports:
- Access keys (access key ID and secret access key)
- IAM user name and password
Access Keys
With Access Keys, you have root access (unlimited access) to your AWS resources.
Reference: Announcement about AWS account key change
IAM user (Recommended)
AWS Identity and Access Management (IAM) lets you create unique IAM user identities, you can grant specific Sevices and Permission for each user. In case of using JA Amazon S3, if you have many sites, it is helpful to grant access to specific buckets and permission with each buckets for each site.
How to create IAM account
#1: Login Your AWS Console Management page
#2: On the dashboard, select an IAM Service (Or you can quickly select it from drop down Services menu on any pages) to go to IAM management page

#3. On IAM management page, select Users menu on left module to go to Users management page

#4: Click on “Create new Users” button

Enter name of new users

#5: Save or download access key of new IAM account

#6: Click on user to go to manage Account page

Under User Policies section, click on “Attach User Policy” to add/manage permission for account

#7: Select “Amazon S3 Full Access” template from the list, and click on “Select” button


In “Policy Document” text box, you can see code is like below
{
  "Version": "2012-10-17",
  "Statement": [
	{
	  "Effect": "Allow",
	  "Action": "s3:*",
	  "Resource": "*"
	}
  ]
}
If you do not edit above code and click “Apply Policy”, that mean you grant full access/permission to all buckes of AWS S3 to IAM account.
If you want this account have a permission on some specific buckets, you need specify them in “Resource” setting.
For example, below settings will grant permission to only joomla3.3.3 and joomla3.3.4 buckets for IAM account.
{
	"Version": "2012-10-17",
	"Statement": [
		{
			"Effect": "Allow",
			"Action":"s3:*",
			"Resource": [
				"arn:aws:s3:::joomla3.3.3",
				"arn:aws:s3:::joomla3.3.3/*",
				"arn:aws:s3:::joomla3.3.4",
				"arn:aws:s3:::joomla3.3.4/*"
			]
		}
	]
}
Or if you want account only have some permission with your buckets, you need update “Action” setting to specify a list of permissions. You can check and get list of Permission here
{
	"Version": "2012-10-17",
	"Statement": [
		{
			"Effect": "Allow",
			"Action":[
				"s3:List*",
				"s3:Get*"
		],

			"Resource": [
				"arn:aws:s3:::joomla3.3.3",
				"arn:aws:s3:::joomla3.3.3/*",
				"arn:aws:s3:::joomla3.3.4",
				"arn:aws:s3:::joomla3.3.4/*"
			]
		}
	]
}
You can get more documentation of how to config IAM Policies here
Note: you can update policies of account any time.
Cloudflare support
What is Cloudflare.
CloudFlare protects and accelerates any website online. Once your website is a part of the CloudFlare community, its web traffic is routed through global network. It automatically optimizes the delivery of your web pages so your visitors get the fastest page load times and best performance. It also blocks threats and limit abusive bots and crawlers from wasting your bandwidth and server resources. The result: CloudFlare-powered websites see a significant improvement in performance and a decrease in spam and other attacks.
Set up to work with Cloudflare:
Create an CloudFlare account
Create an CloudFlare account and add a website, check out more info HERE
Go to: https://www.cloudflare.com, click to register:
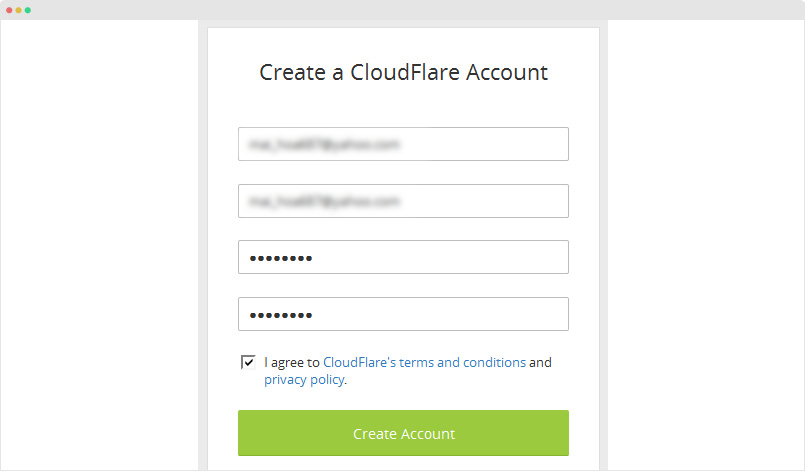
After done with Register, you will be redirected to Add Website: Add your website link to Scan DNS Record.
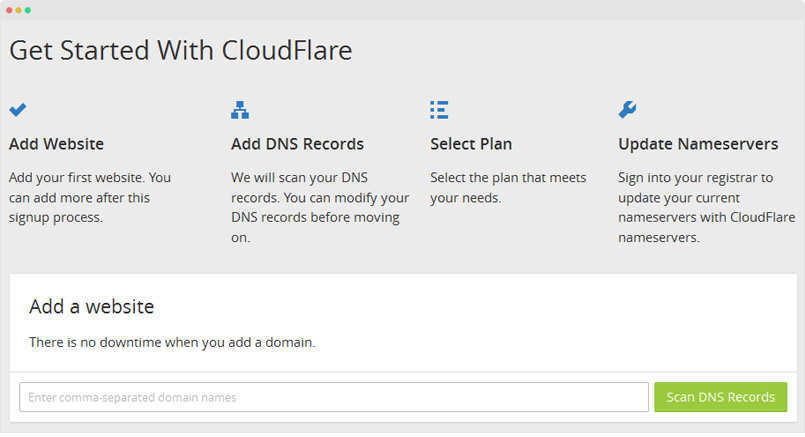
It will take about 60 second to finish scanning. Then your DNS records will be listed.
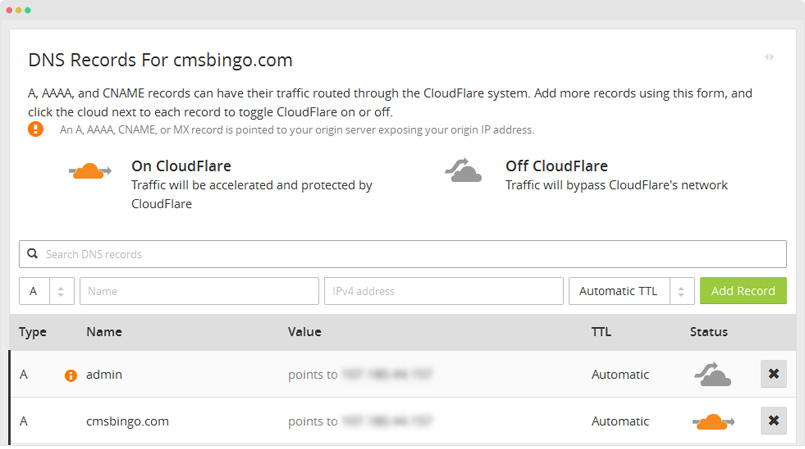
Select a plan that fits your needs and then click Continue.
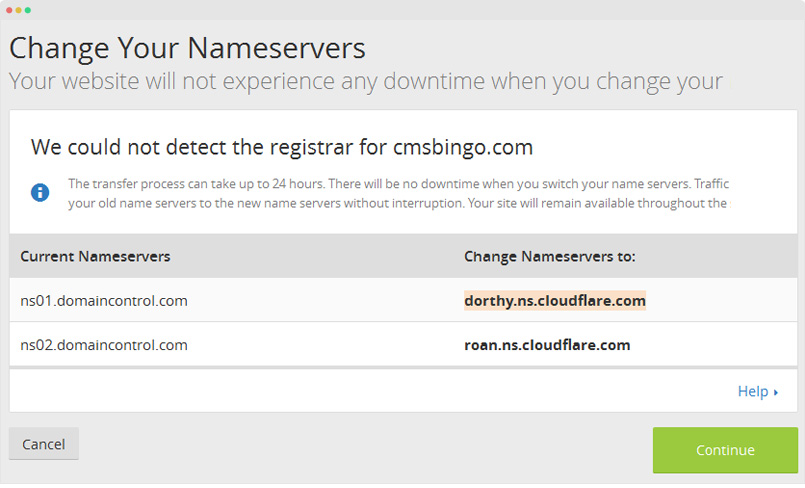
On the final step, you are given the CloudFlare nameservers for your domain. The CloudFlare nameservers are assigned to your domain and listed on this page.
On Cpanel of your site, go to part Domain, add new Domain Name.

Back to Cloudflare, waiting for all the change take affected:

b. Set up in JA S3 Amazon:
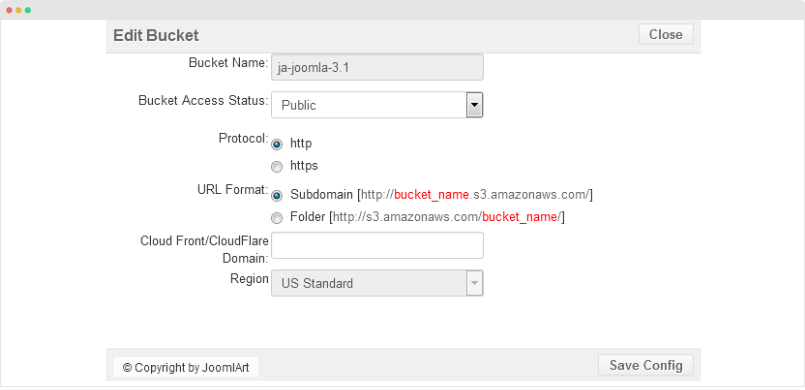
Go to Bucket Manager >> Click to Bucket you want to edit >> Add Domain of CloudFlare.
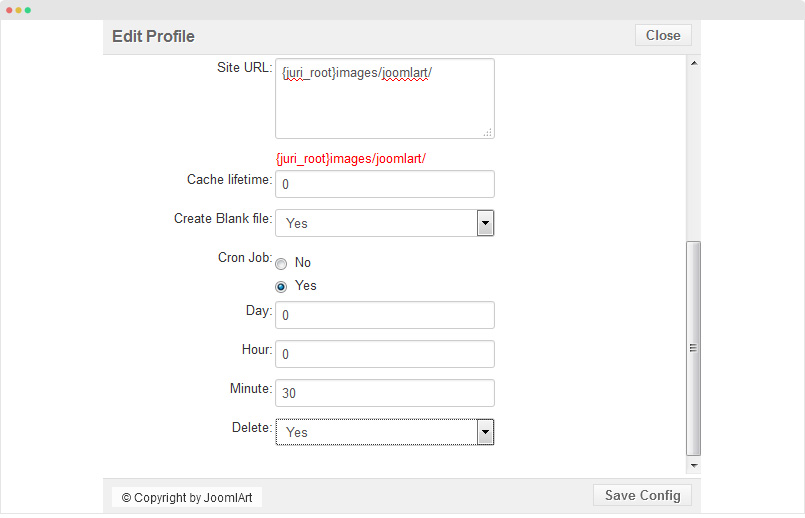
Add Option Create blank file instead of removed items
Add Option Create blank file instead of removed items after uploading to Bucket to Avoid error image missing, some component has function to check status of file, and only show display if it’s available.
If you choose to upload image to S3 then delete it, then image won’t be displayed cause of this problem. So, Create blank file function will create file with file size = 0, has the same name with uploaded file.
This function only work when you set to Delete File after upload.
After upload, a new file with same name but file size = 0KB will be created.
Version 2.5.7 upgrade Instruction
In AWS, there’s something change with bucket setting. So after upgrade to new version, you’ll have to reimport bucket from S3. Profile setting is still the same.
