Plugin Installation
Download the latest version of JA Social Feed plugin
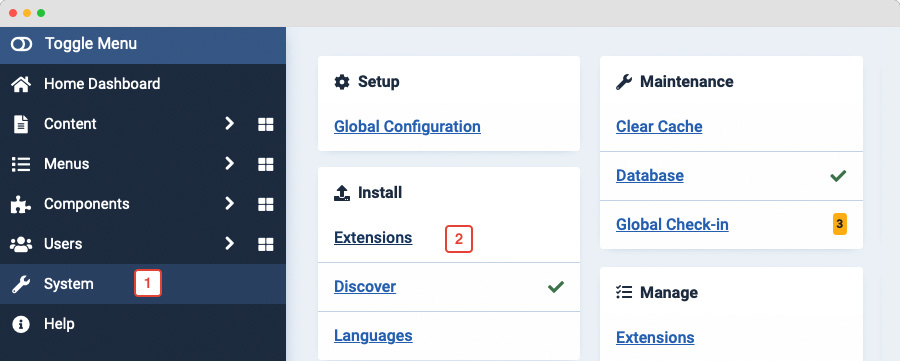
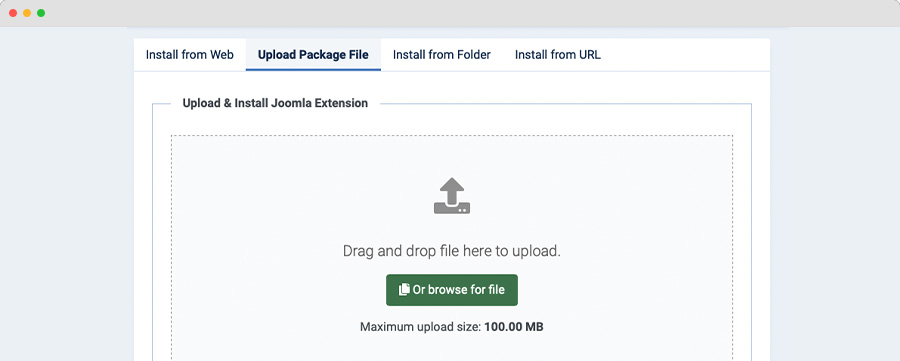
From your back-end setting panel, go to: "Extensions > Extension Manager", browse the extension installation files then hit the "Upload and Install"
Set up and configuration
The plugin allows you to import content automatically from popular social channels: Facebook, Twitter, Youtube, Vimeo, Instagram Flickr and Pinterest then save the content as Joomla articles or K2 articles. To import content, you have to follow the steps below.

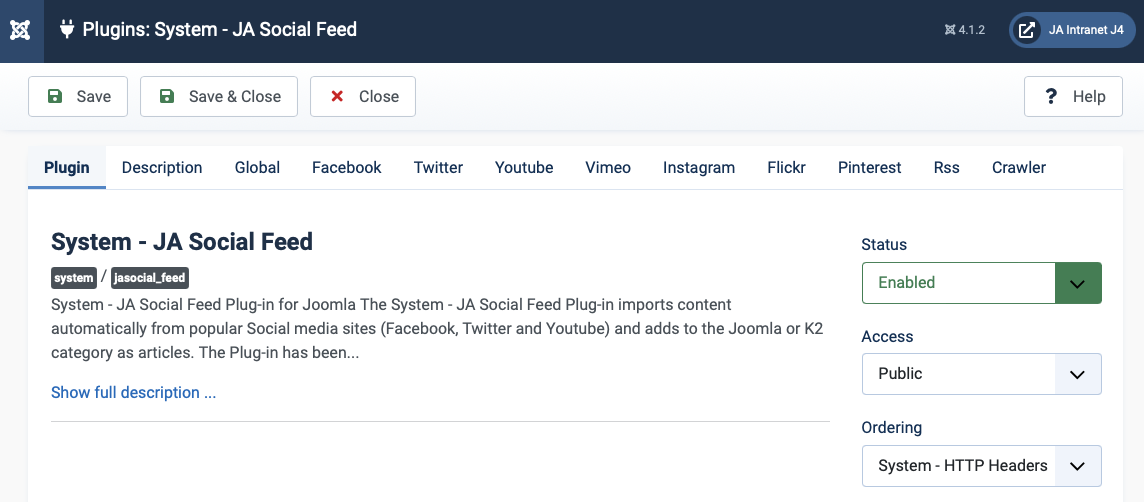
Step 1: enable the plugin
In order to import content, you have to enable JA Social plugin
Step 2: Configure the Global settings
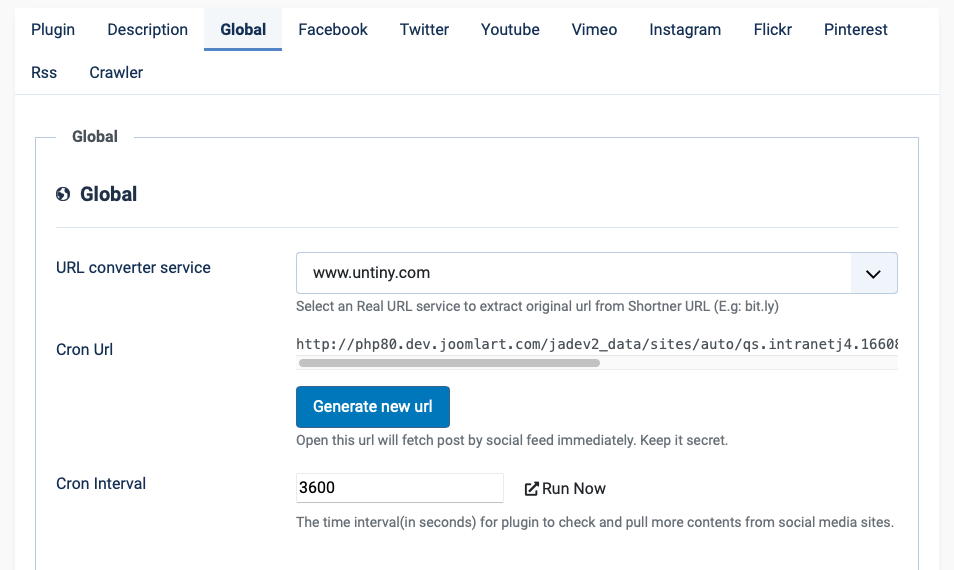
In the Global setting panel, you will see settings for import content settings
Parameter explanation:
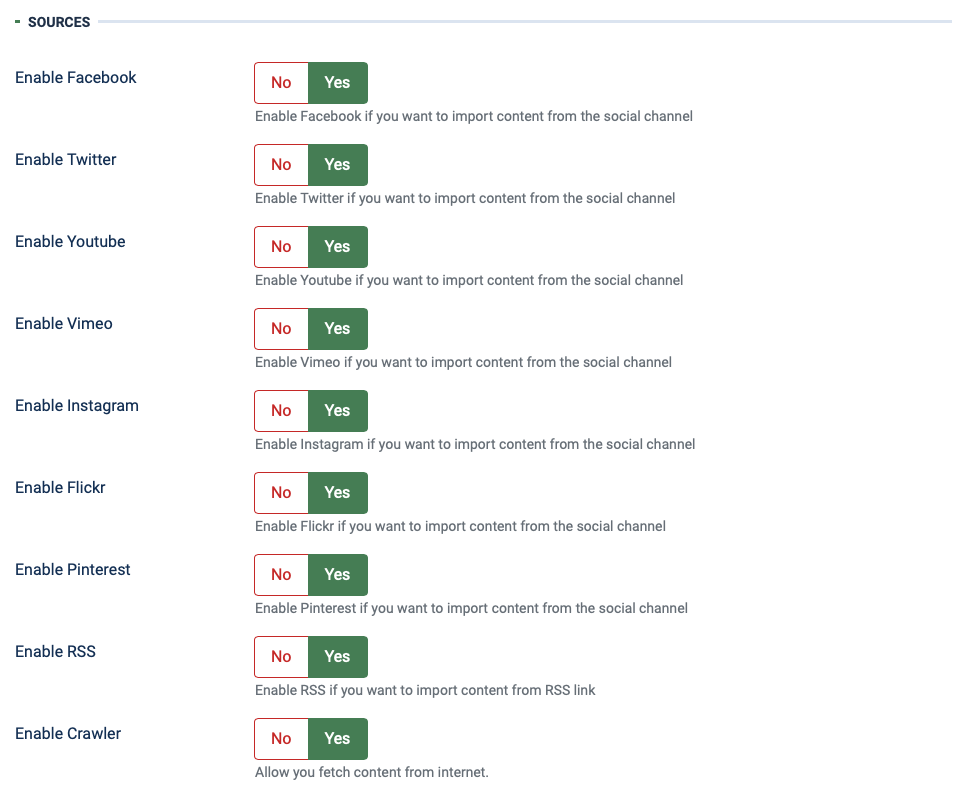
- Enable the social channels that you want to import content from. In each enabled social channel, it will import content from enabled profiles only.
- URL converter services: select service to import content (http://untiny.com/ or http://realurl.org/).
- Cron Interval: set the duration to import content AUTOMATICALLY from enabled social channels, click "Run Now" to import content immediately.
Sources
JA Social Feeds plugin allows you to import content from many social channels and RSS. Enable the social channels you want to import.
Item Settings: configure to import intro text.

API settings
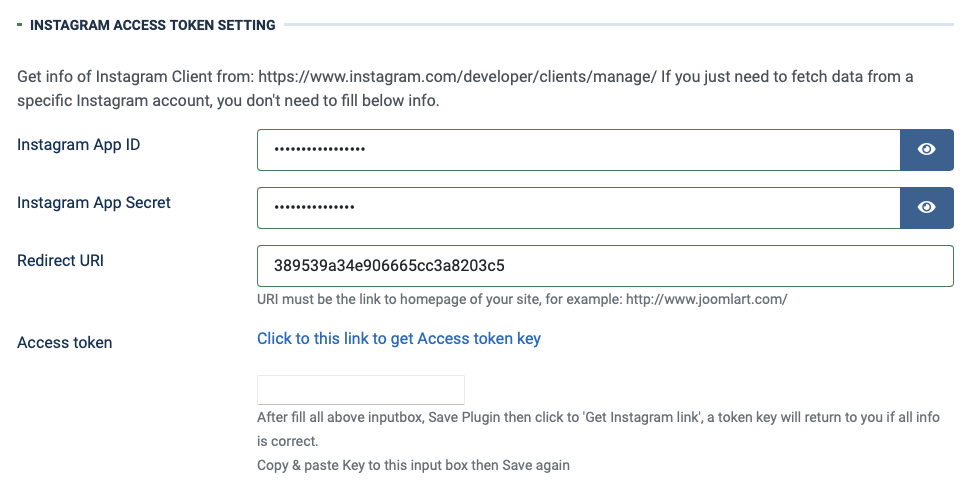
To import content from a social channel, you may need to provide API required by the social. Following is the social that requires API and Acess Token. The detailed guide to get the API, Access token is provided in the settings for each social.
Facebook: Access token setting

Instagram: Access token setting
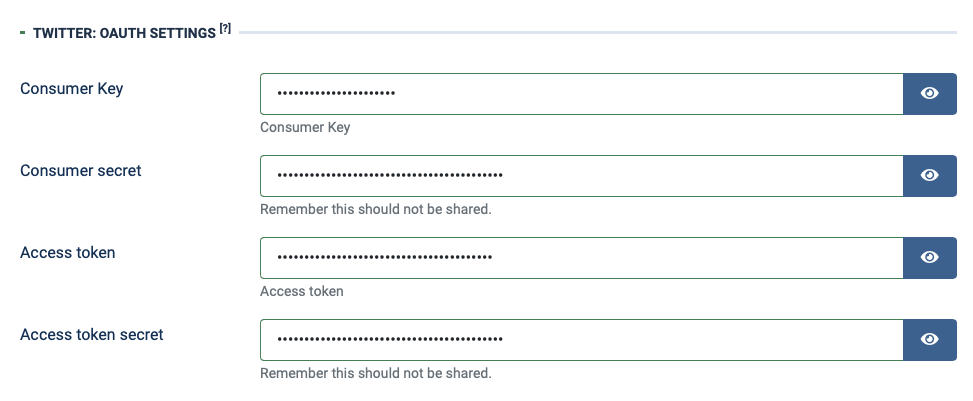
Twitter: Oauth Settings
Youtube: API key

Step 3: create profiles for social channel
Once you install the plugin, you will see numbers of profiles in each supported social channel, these profiles settings are valid so you can use the profiles to import content to your site.
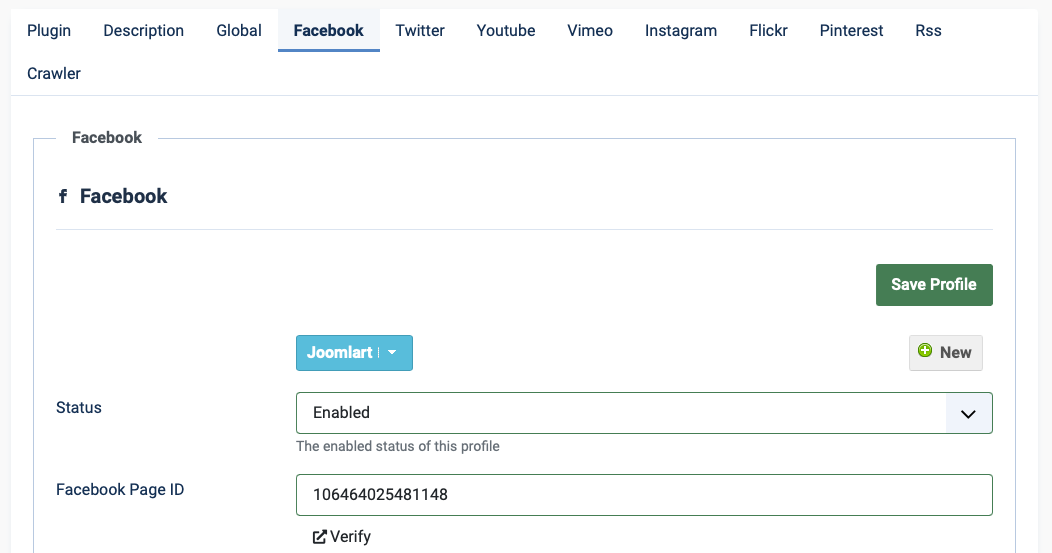
You can also create new or customize the default profiles
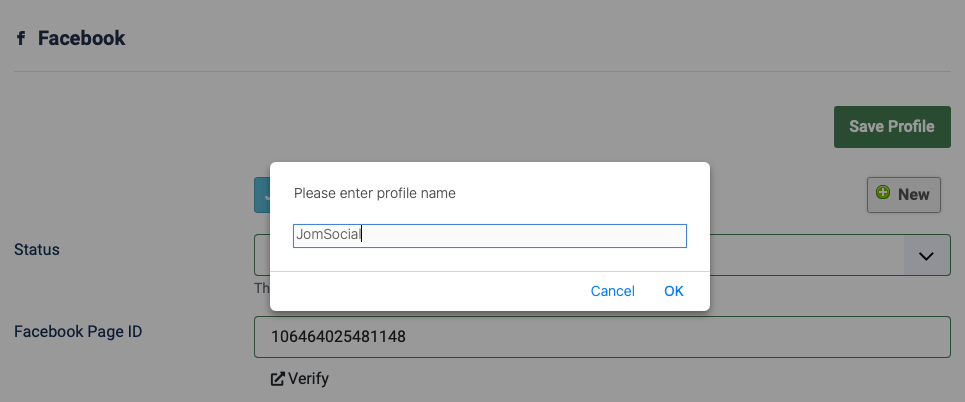
Create new profile
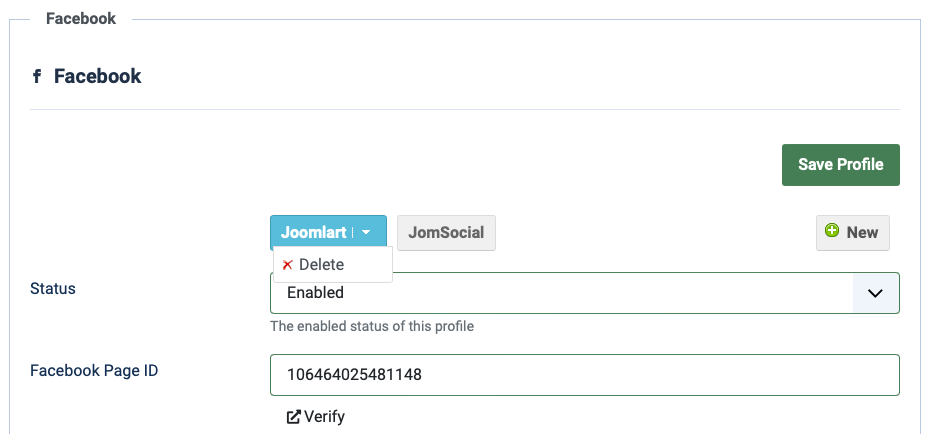
Delete a profile
Article settings: save imported content
You can save the imported content as Joomla articles or K2 articles to selected category. You can also configure other information for the imported content - depends on each social and profile.
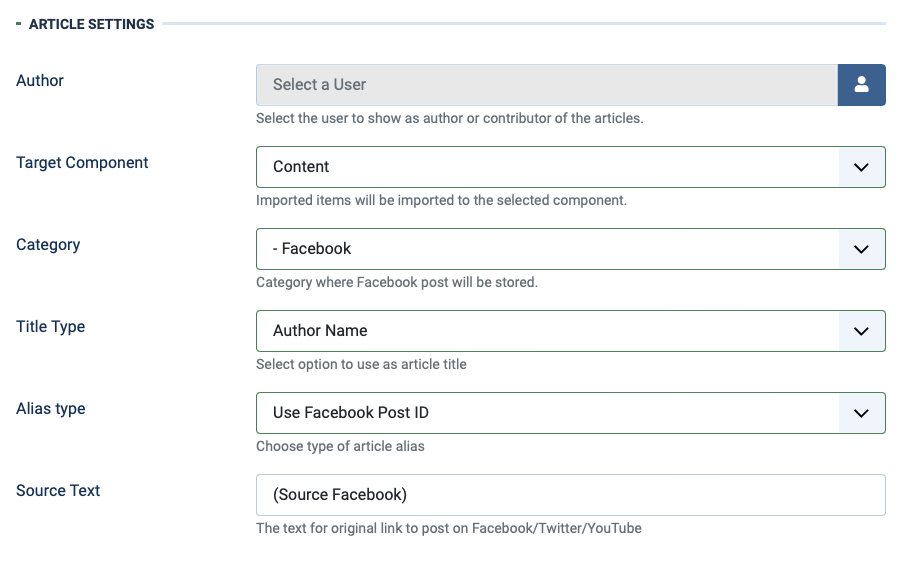
Parameter explanation:
- Author: select the author from the user list for articles imported from the profile
- Target Component: you can save the imported content as Joomla article for K2 articles. Incase you want to save as K2 articles, your site must have K2 installed.
- Category: select the category corresponding to select "Target Component" to save the imported content to
- Title Type: you can set the title for articles imported by Author name or custom text. When you select Custom Text, add the text that will be article title imported from the profile.
- Alias Type: Select Alias Type for the Articles URL
- Maximum Length: Define the no. for Title length
- Source Text: add the text that will be displayed as source
Advance settings: save image, import limit
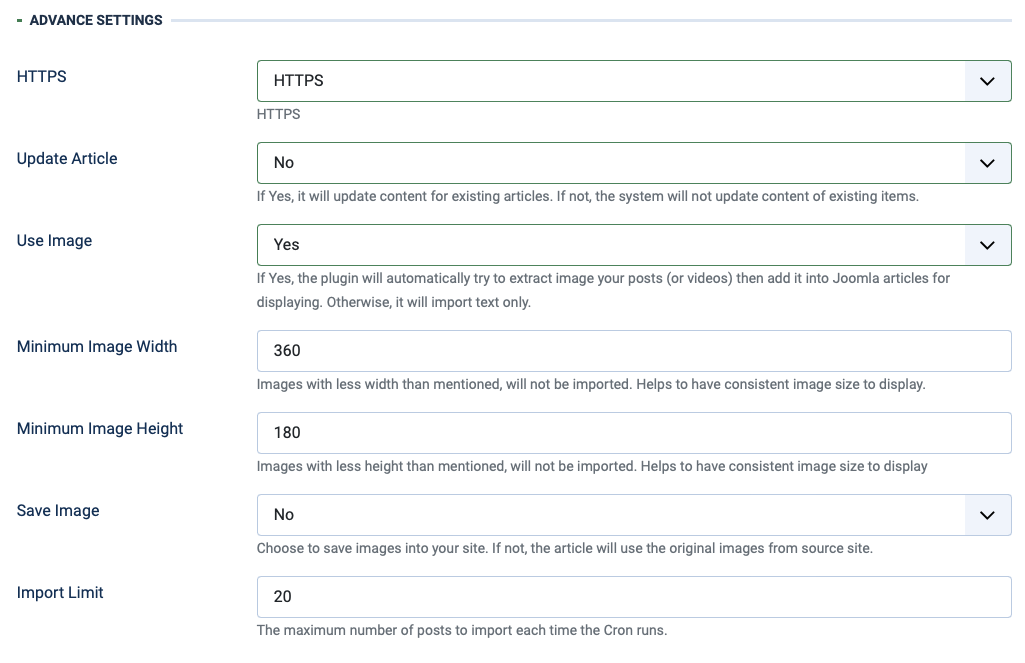
Parameters explanation:
- Update Article: if Yes, when content from source is changed, it will be updated to your site when you import content.
- Use Image: if Yes, the plugin will automatically extract image from the URL that user shares then add it into article for displaying. If No, it will import text only.
- Minium | Maximum Image Width: set the minimum size for image to be used in articles for displaying
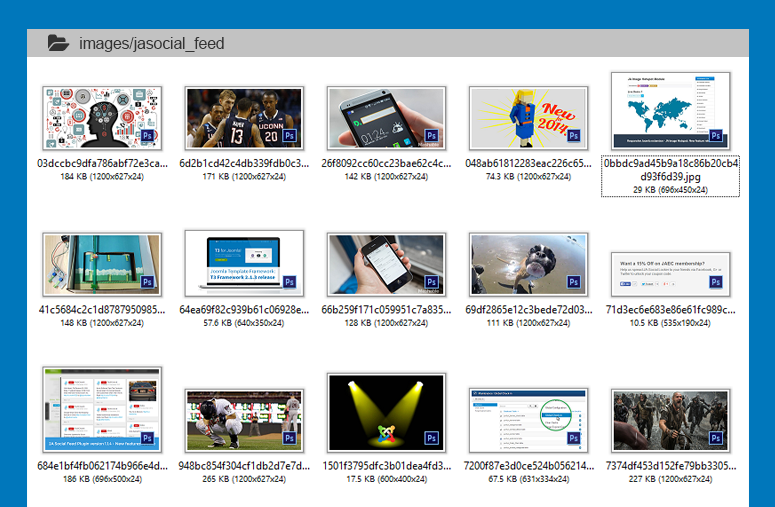
- Save Image: you can select to saved the qualified image to your site hosting. The images will saved in folder:
images/jasocial_feed. - Import Limit: set the maximum items to be imported from the profile each time you import content.
Save Image: You can select to save images to your site hosting. In profile setting of each social channel, you will see field Save image under Advanced settings, enable this option so when you import content, images will be saved to your site hosting. The images are located in images/jasocial_feed.
Step 4: display content in your site
When you have content stored in your site, you can now display them in your site. The way you display them is up to you.
Social API, Access token, profile settings
In each profile of any social channel, it includes setting of: Account settings, Article settings, and Advanced settings
Get Facebook API
Facebook updated Graph API v13.0
Things to Note :
- Your site must support https as a request of Facebook to get the data.
- Account Login to Facebook must be Admin of the Page you want to get the data.
- The Facebook profile must be verified at the first time Cron.
- Facebook profile use Facebook fan page ID, Fanpage Name no longer supported.
1. Create Facebook Application ID
Step 1: access and create account: https://developers.facebook.com/async/registration/
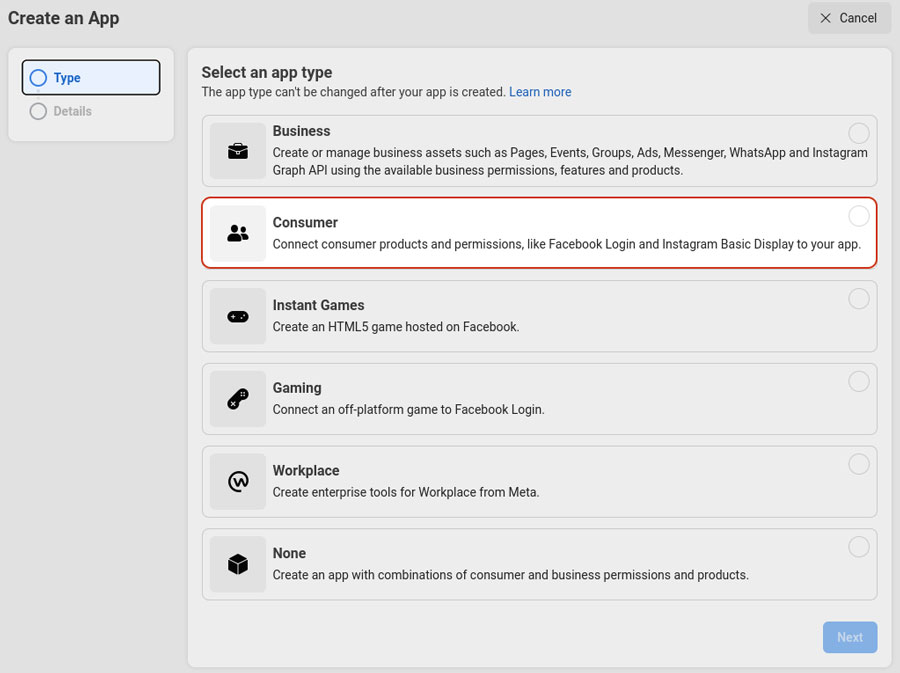
Step 2: create an application https://developers.facebook.com/apps/create/.
Please make sure an application type is Type > Consumer.
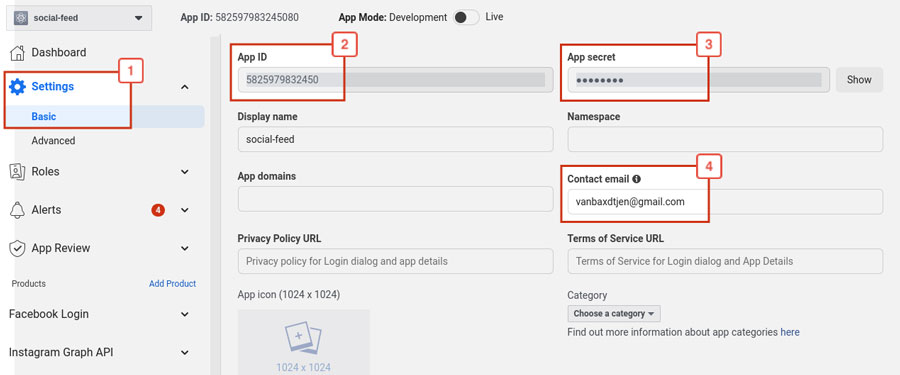
Step 3 - In the Left menu section, access Settings >> Basic, enter the info and save the settings. And take a note on App ID, App Secret. These will be used in the backend Joomla setting.
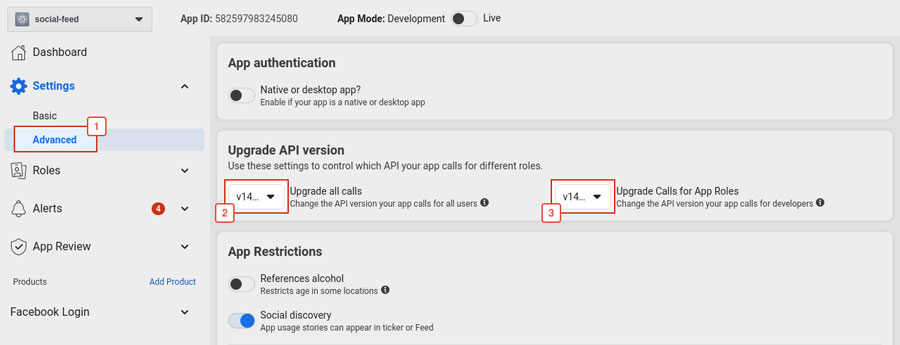
Next, go to Settings > Advanced: API versionAdd product Login must be v13.0
2. Product settings
Add product Login: click the plus icon to add New Product and choose Facebook Login then set it up.
Then add your site URL: Save and Click Next.
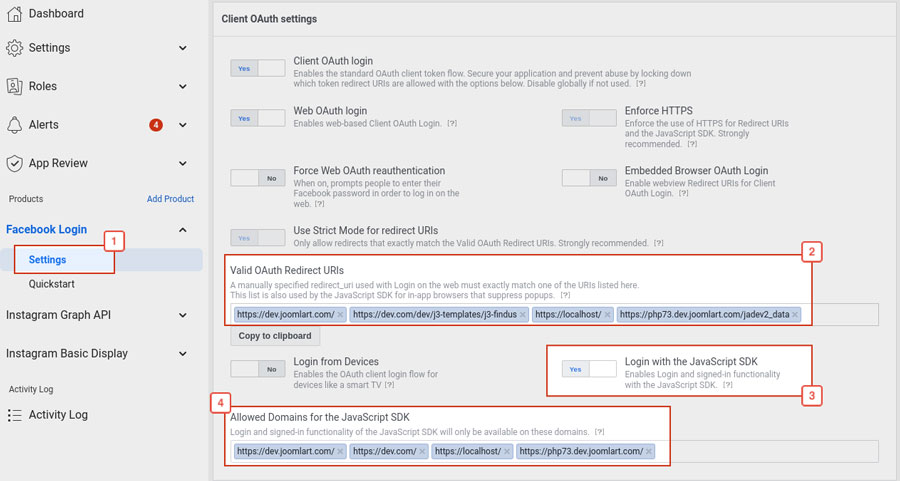
Next, access Settings and enter
- Redirect URIs,
- Domains for the JavaScript SDK,
- Turn on Login with JavaScript SDK
2.1 Get Facebook Fan Page ID
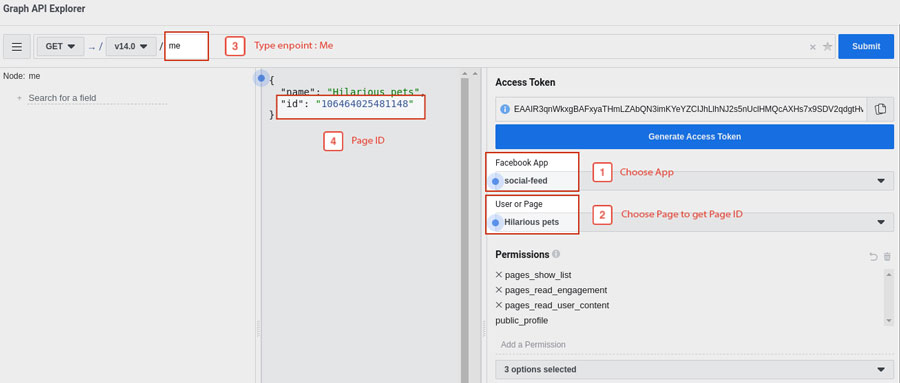
Access Facebook Graph API Explorer https://developers.facebook.com/tools/explorer?method=GET&path=me&version=v13.0.
And follow steps through the image in order to get Page ID.
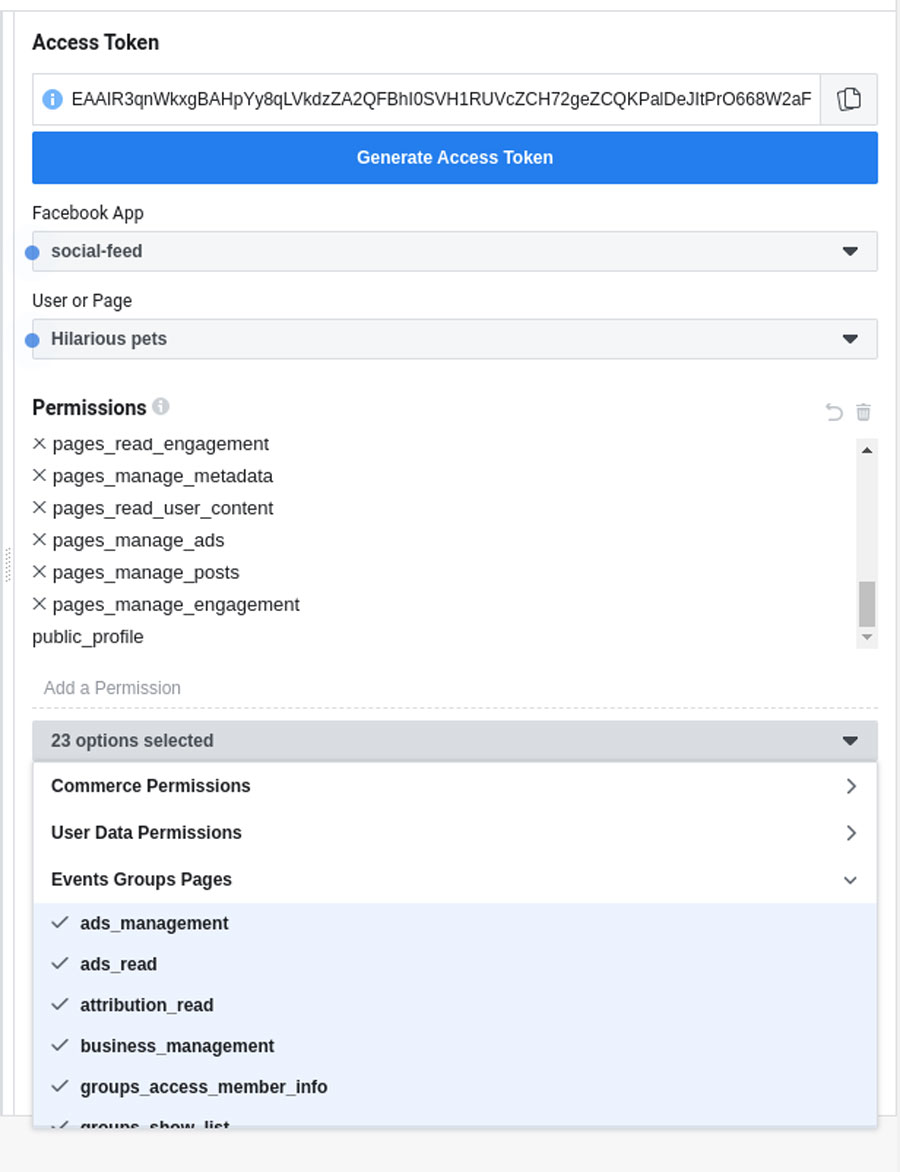
Then add permissions for pages
3. Import content
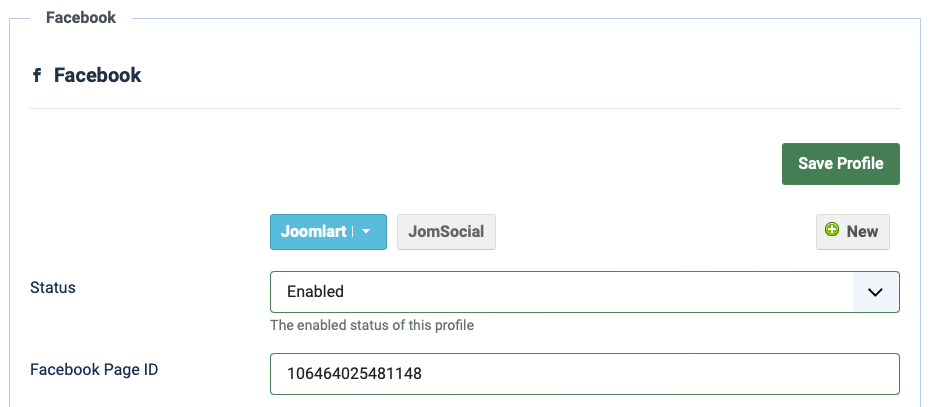
Back to JA Social Feed plugin setting on your site and paste the ID you get to Facebook Settings fields.
On the Facebook profile, enter Facebook fan page ID (must be ID), and change the setting as you want then save the settings.
Before Verifying Fanpage ID, you should make sure your site are running on https://

Next step: Click to Login with Facebook to get the account set with plugin.
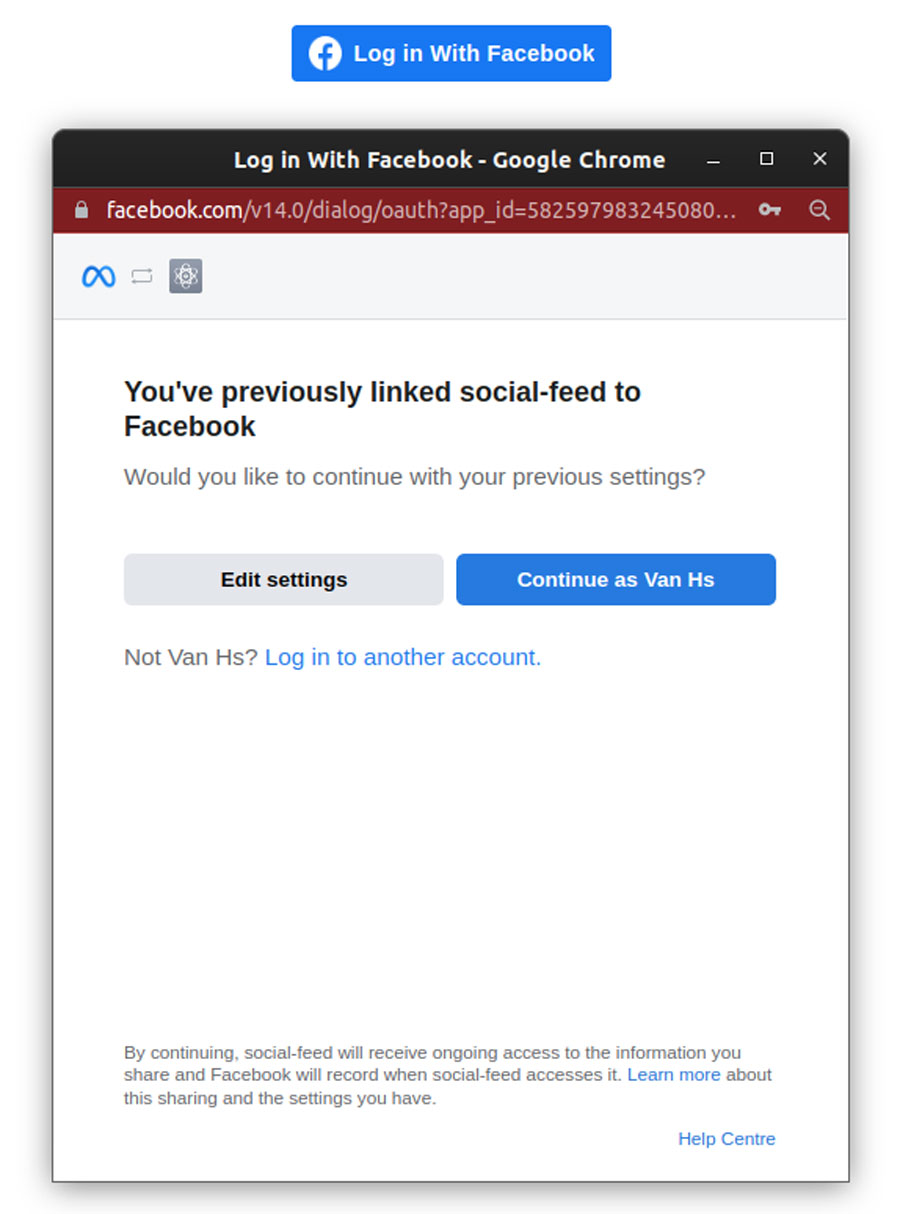
In case the permissions: read content posted, read user content, show a list,... enable these.
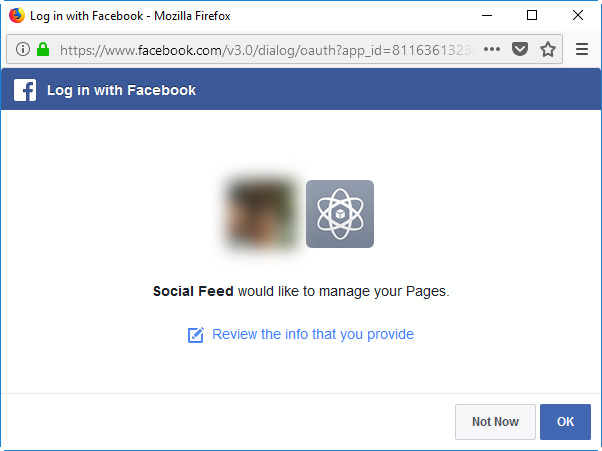
After that, select pages

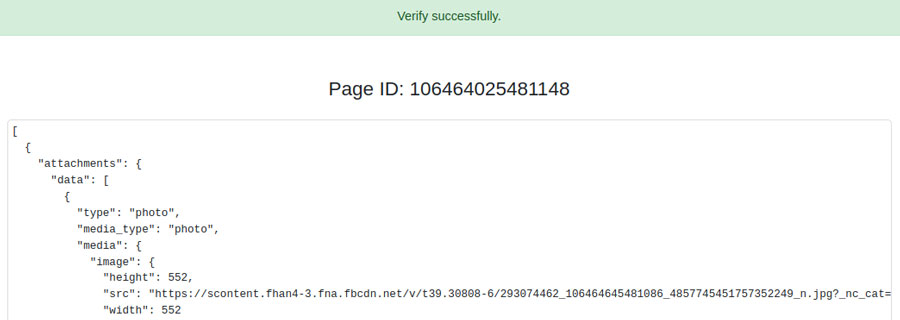
Successfully verify
Allow Social feed to manager your facebook pages to fetech the content
Now you can run the Cron to fetech the latest content
Instagram Access Token
Instagram no longer supports free API to get other accounts not belonging to the specific user.
Create account and login to create app https://developers.facebook.com/apps/create/
1.1 Choose Consumer

1.2 Click next and filling the information
Then add Instagram Basic Display https://developers.facebook.com/apps/your-app-id/dashboard/
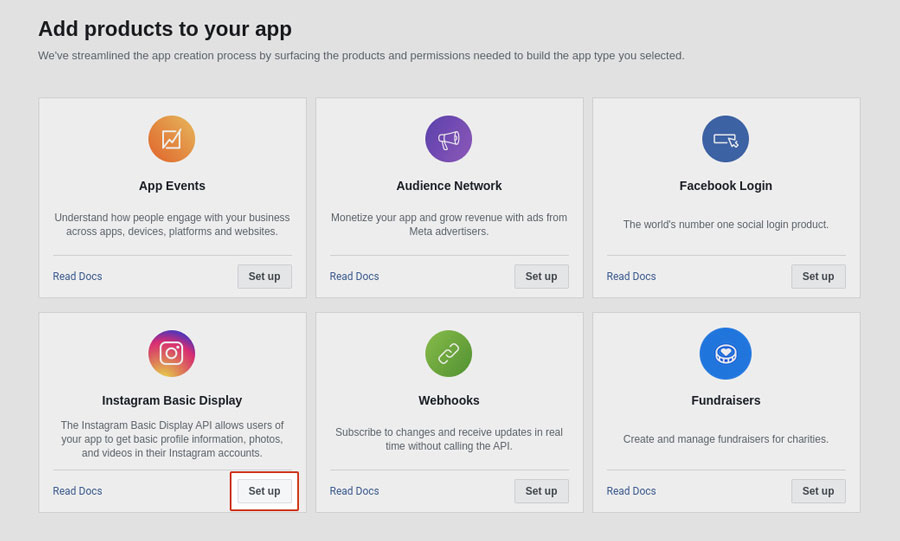
3. In Basic Display, create a new app.
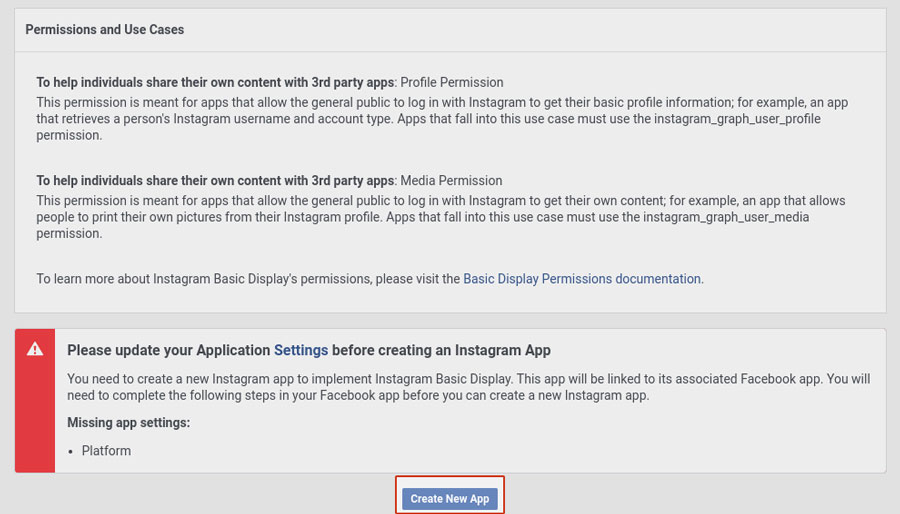
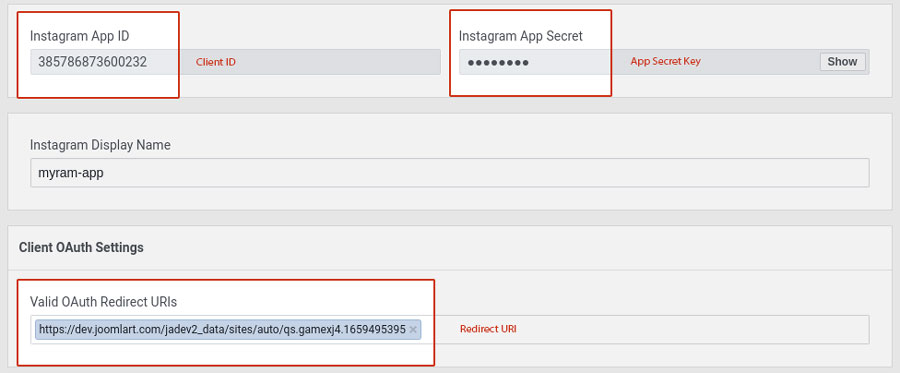
3.1 Set Valid OAuth Redirect URIs
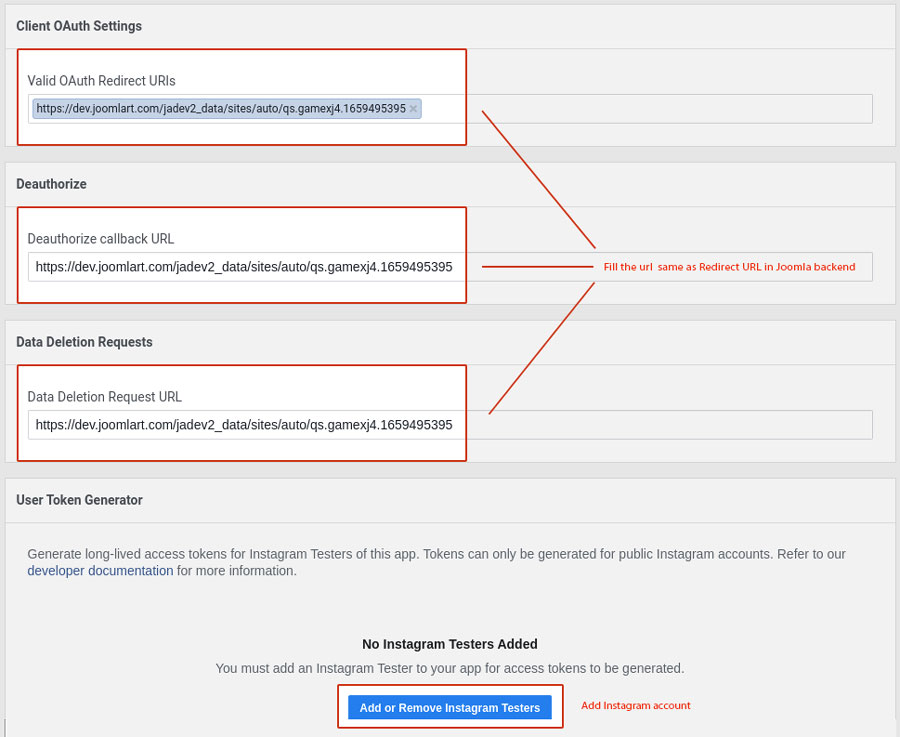
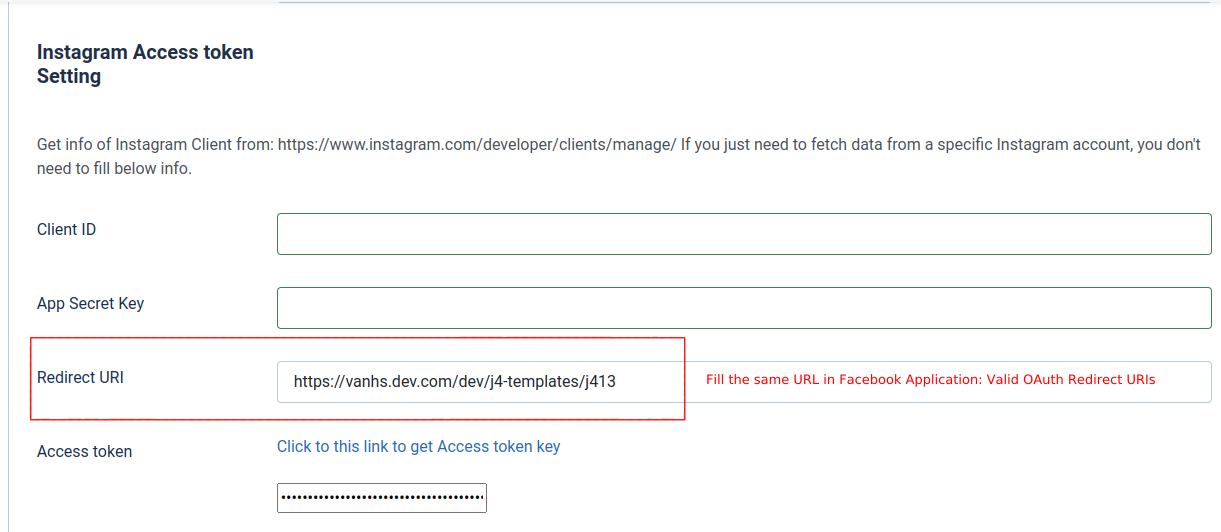
The URLs need to be the same in Plugin setting
Your-app-id

3.2 Choose Add or Remove Instagram Testers, scroll down and add your IG account https://developers.facebook.com/apps/your-app-id/roles/roles/

Then access https://www.instagram.com/accounts/manage_access/
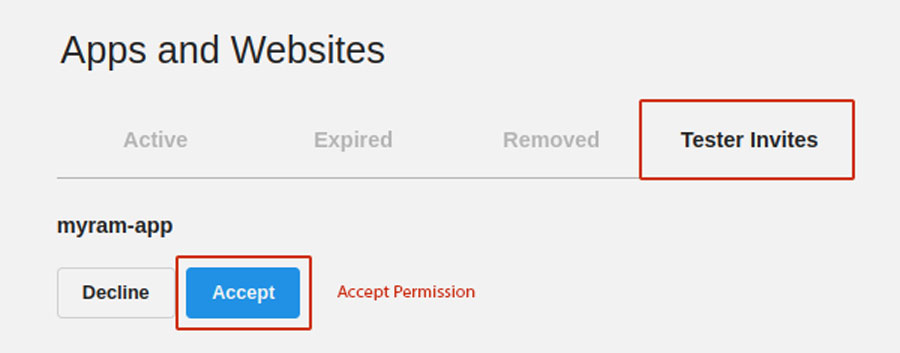
3.3 Add permissions: instagram_graph_user_profile, instagram_graph_user_media https://developers.facebook.com/apps/your-app-id/instagram-basic-display/basic-display/
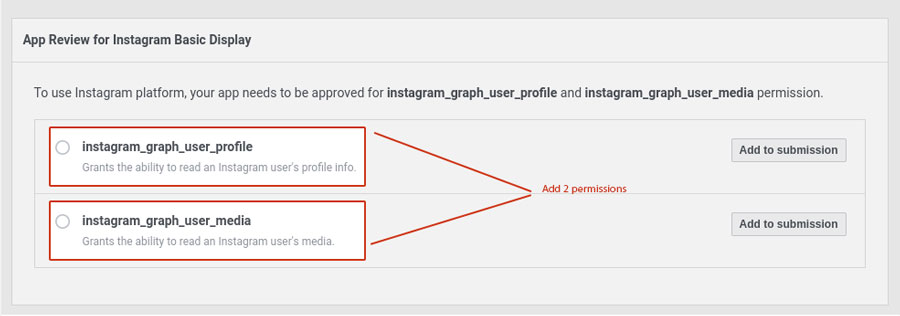
Remember to Save Changes after all actions
Take note these information: IG App ID, IG App Secret, Valid OAuth Redirects URIs. These are going to be used in the plugin setting.
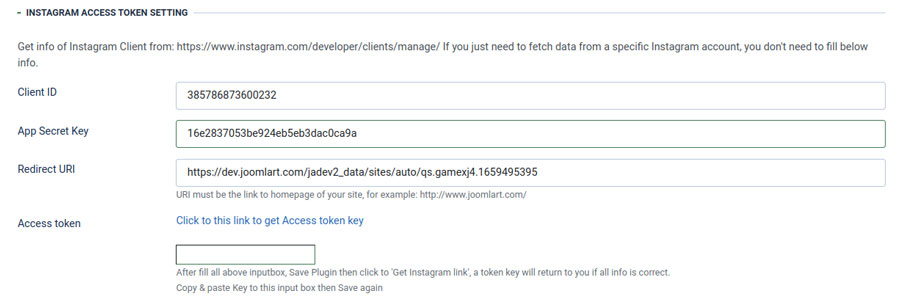
Section Plugin setting
Filling the fields with your information in the IG basic display app. Then Click to this link to get Access token key.
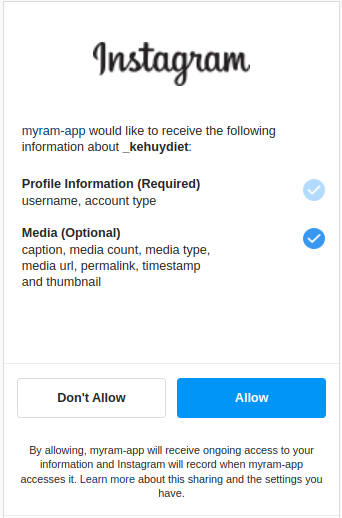
The result will be displayed as a token and a long live token. These tokens still work well.
Take note on profile Status & Category section

Twitter profile settings
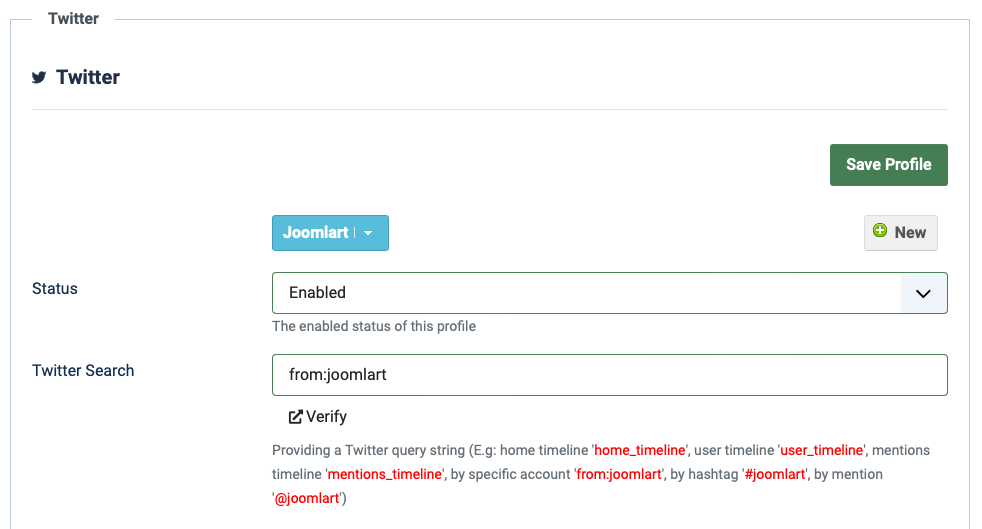
Twitter profile settings are almost same as Facebook profile settings, just make sure you add valid Twitter Search
Youtube profile settings
You can import videos from a youtube account or a playlist.
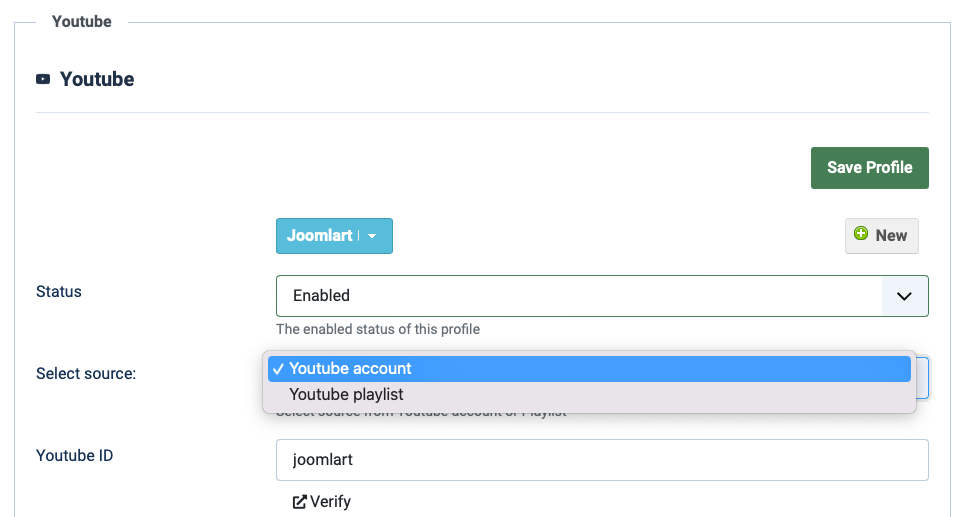
Youtube account
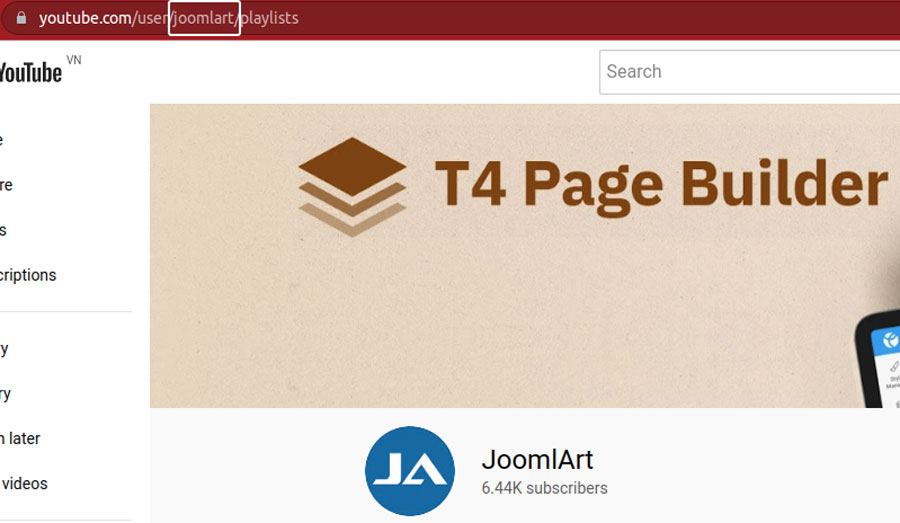
Youtube playlist

Youtube account and article settings
Enter the youtube username that you want to import content from. Other settings are the same as settings in Facebook profile settings.
Video settings
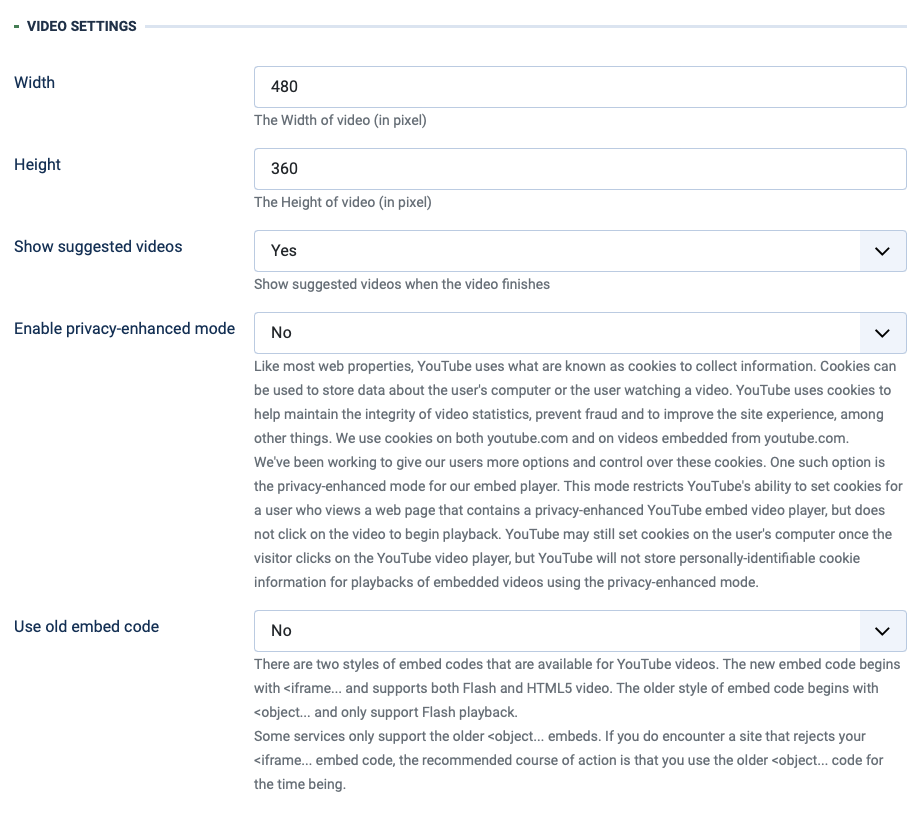
Parameters explanation:
- Width | Height: set the size of the video to be saved in an article for displaying.
- Show Suggested Videos: if Yes, the suggested videos will be displayed when the video finishes.
- Use HTTPS: the secure counterpart to HTTP, wraps a layer of encryption around the information traveling between your computer and a web server.T his is typically used to provide enhanced privacy and security for services like web browsing, email and instant messaging.
Many sites that offer HTTPS support including content from other sites. When some parts of the site do not access using HTTPS, browsers generate a "mixed content" warning since not all items on this page are secure. Sites that use HTTPS and add default Youtube video embeds could generate this warning. To avoid that, and to allow your site to support HTTPS more consistently, you can choose the new Use HTTPS embed option.
It is important to note that while embed components are all supported using HTTPS and do not generate the mixed content error, we do not yet support video streams over HTTPS. - Enable privacy-enhanced mode: Like most web properties, YouTube uses what are known as cookies to collect information. Cookies can be used to store data about the user's computer or the user watching a video. YouTube uses cookies to help maintain the integrity of video statistics, prevent fraud and to improve the site experience, among other things. We use cookies on both youtube.com and on videos embedded from youtube.com.
We've been working to give our users more options and control over these cookies. One such option is the privacy-enhanced mode for our embed player. This mode restricts YouTube's ability to set cookies for a user who views a web page that contains a privacy-enhanced YouTube embed video player, but does not click on the video to begin playback. YouTube may still set cookies on the user's computer once the visitor clicks on the YouTube video player, but YouTube will not store personally-identifiable cookie information for playbacks of embedded videos using the privacy-enhanced mode. - Use old embed code:There are two styles of embed codes that are available for YouTube videos. The new embed code begins with "_QQ_"<iframe..."_QQ_" and supports both Flash and HTML5 video. The older style of embed code begins with "_QQ_"<object..."_QQ_" and only support Flash playback.
Some services only support the older "_QQ_"<object..."_QQ_" embeds. If you do encounter a site that rejects your "_QQ_"<iframe..."_QQ_" embed code, the recommended course of action is that you use the older "_QQ_"<object..."_QQ_" code for the time being.
Twitter profile settings
1. Get Twitter OAuth information
Since 2013-06-11, Twitter has stopped supporting API v1 and fully moved to API v1.1
In API v1.1, Twitter deny non-Authorized request, that means you need to provide the information below to authorize your request.
To get content from Twitter, we need to get OAuth information. The OAuth includes: Consumer key, Consumer secret, Access token, Access token secret.
Step 1: create new application
#1: Login the site: https://developer.twitter.com/apps/with your twitter account, if you do not have a twitter account yet, please register one.
#2: Now Click on button: Create a new application

#3: Add all requred information in this form then creat the twitter application
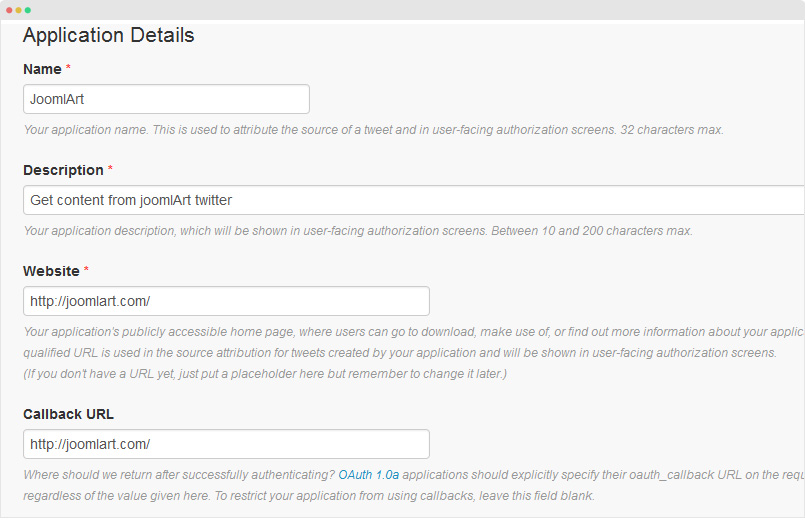
Step 2: Create my access token
When application is created successfully, open the Keys and Access Tokens tab and hit the buttons: Regenerate Consumer Key and Secret to generate consumer key then hit the button: Create my access token to create access token.
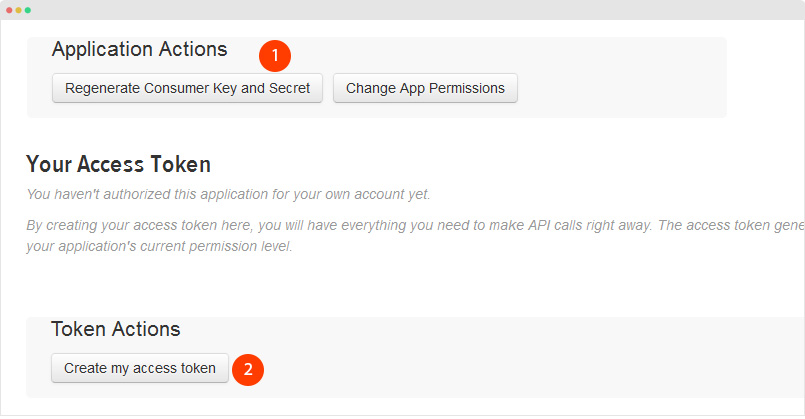
Step 3: Add OAuth information to the JA Social Feed plugin setting
After access token is created, copy the info to add to the Twitter: OAuth settings setting panel under the Global tab of JA Social feed plugin setting.

3.1 Get Tweet timelines:
Twitter introduced tweets timeline option that allow to get a list of tweets for aggregated stream of Tweets. To use this option you musth change the name of API Endpoint.
Here is list of supported Endpoints :
- GET statuses / home_timeline
- GET statuses / user_timeline
- GET statuses/mentions_timeline
GET statuses / home_timeline :It allows you to show tweets only from the authenticated user and the user he is following. It allow upto 800 tweets on timeline. More infromation here
GET statuses / user_timeline :It allows you to show tweets only from the authenticated user with screen_name or user_id parameters. It returns up to 3200 tweets from a user. The screen_name is the screen name of the user for whom to return results. The user_id is the ID of the user for whom to return results. More infromation here
GET statuses/mentions_timeline :It allows you to show tweets only from the authenticated user (20 most recent mentions). The tweets will contain @screen_name) More infromation here
Note : If config are home_timeline, user_timeline or mentions_timeline, plugin will fetch data of user that already config on Twitter: OAuth settings
3.2 Support advanced search api
JA Social feed extension support standard search API it allows simple queries against the indices of recent or popular Tweets. Here is list of Twitter search API.
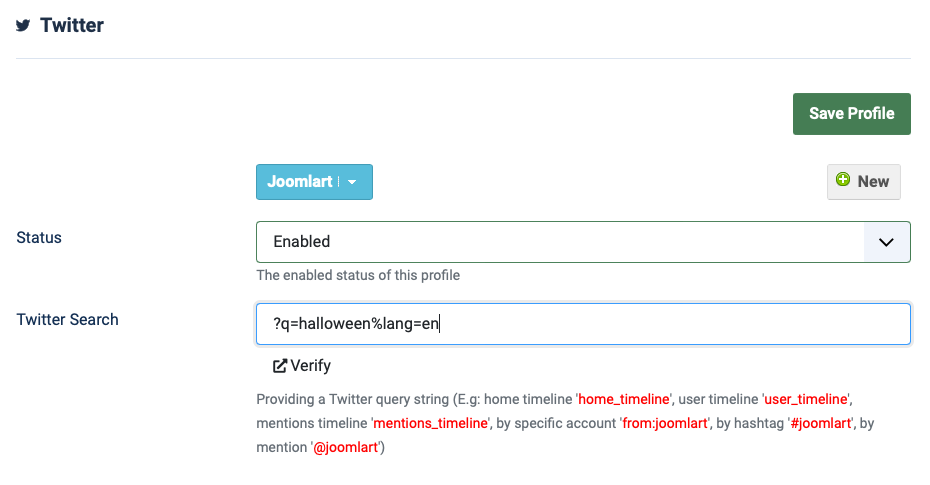
2. Twitter profile settings
Twitter profile settings are almost same as Facebook profile settings, just make sure you add valid Twitter Search
Vimeo profile settings
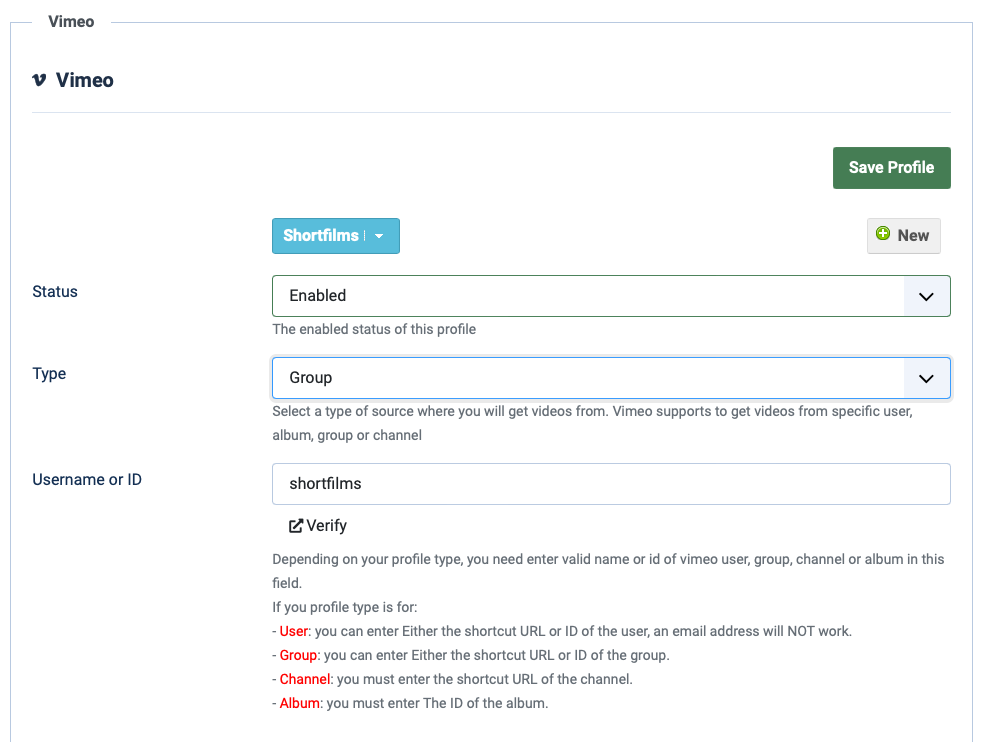
1. Vimeo account and article settings

Parameters explanation:
- Type: supported vimeo types (Username, Album, Group or Chanel)
- Username or ID: add the correct Vimeo Username or ID to import content from.
- Target Component: select to save imported content as Joomla articles or K2 articles.
- Category: select category where imported content will be saved to.
2. Video and advanced settings
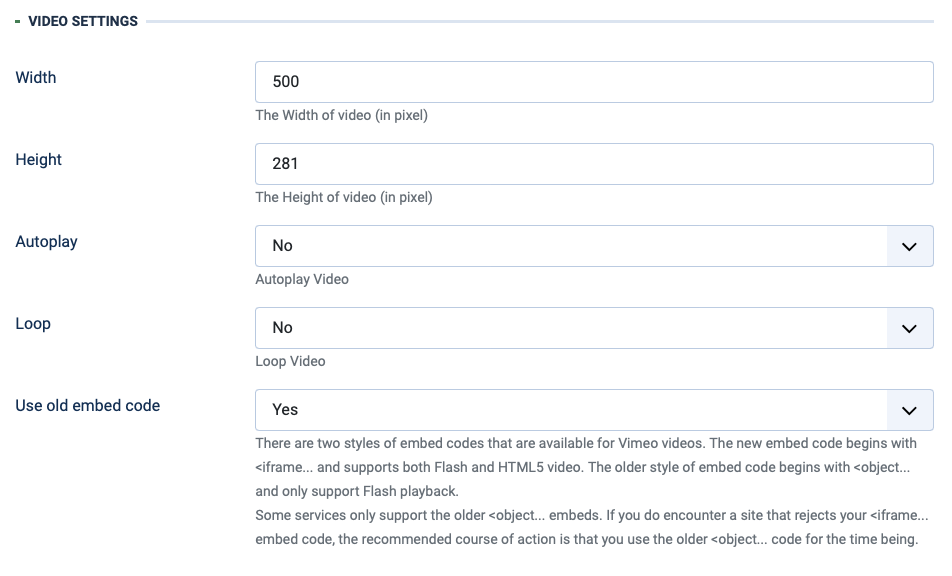
Parameters explanation
- Width | Height: set the size of video to be saved in article for displaying.
- Show Suggested Videos: if Yes, the suggested videos will be display when the video finishes.
- Auto play: select Yes if you want video to auto play when user open article contain the video in front-page.
- Loop: loop video or not.
- Use old embed code:There are two styles of embed codes that are available for YouTube videos. The new embed code begins with "_QQ_"<iframe..."_QQ_" and supports both Flash and HTML5 video. The older style of embed code begins with "_QQ_"<object..."_QQ_" and only support Flash playback.
- In the advanced setting pannel, you can select to use image in imported content or not, update article and set limitation for number of items to be imported.
Some services only support the older "_QQ_"<object..."_QQ_" embeds. If you do encounter a site that rejects your "_QQ_"<iframe..."_QQ_" embed code, the recommended course of action is that you use the older "_QQ_"<object..."_QQ_" code for the time being.
Flickr profile settings

You can display Flickr photos from specific user or a tag.
If your type of photo is :
- ID - You must enter the ID of your flickr account
- Tags - You can enter name of tags you want
- Favorite - You must enter the ID of your flickr account
- Album - You must enter the ID of your flickr account and the id of the album you want
Pinterest profile settings
You can import feeds from one or multiple Pinterest usernames
Parameters explanation:
- Pinterest Username: add Pinterest username that you want to import content from
- Pinterest board: add the pinterest board that you want to import content from. Leave it blank if you want import LATEST PINS.
- Target component: select to save imported as Joomla articles or K2 items
- Category: select category that imported content will be saved to
RSS settings
JA Social Feed Plugin allows you to import data automatically from RSS feeds channels.
General Settings
In the plugin configuration page, open the tab "RSS", create profile, add RSS feed link to get data from.

RSS Advanced Settings
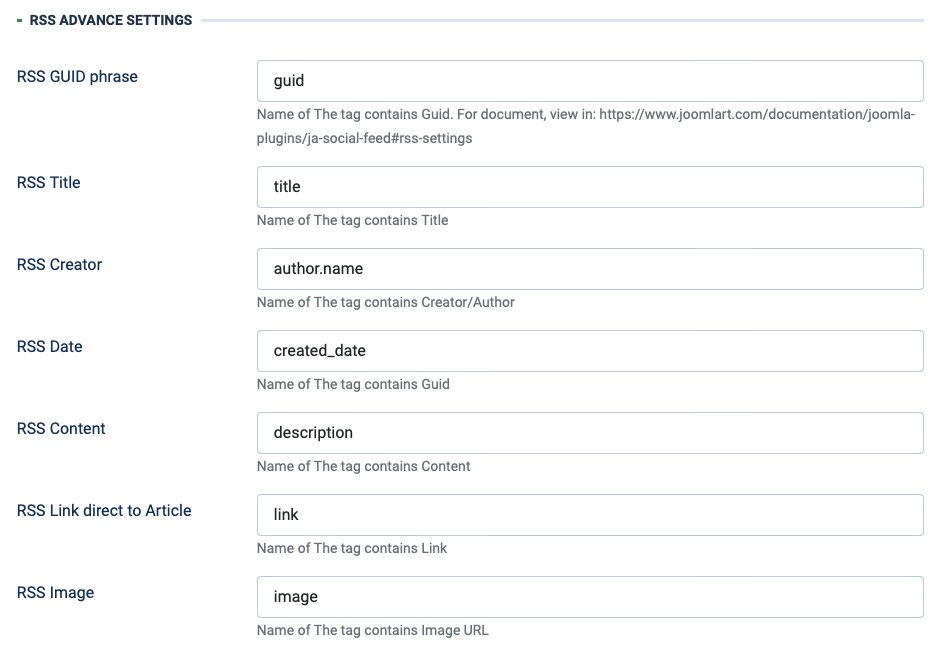
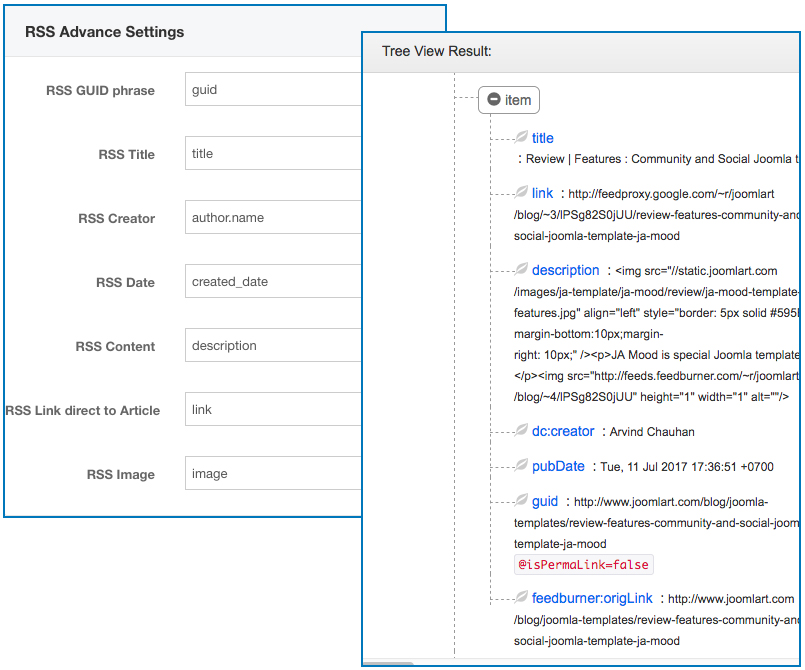
You can customize RSS item element to get data. To view this, you can check RSS feeds page you want to get data from. For example, I want to get RSS feeds from JoomlArt blog, I will:
#1: View rss feed page: http://feeds.feedburner.com/joomlart/blog
#2: View source of the page: view-source:http://feeds.feedburner.com/joomlart/blog and copy the souce code.
#3:Open http://www.xmlviewer.org/, paste the source code here and check the Tree View.
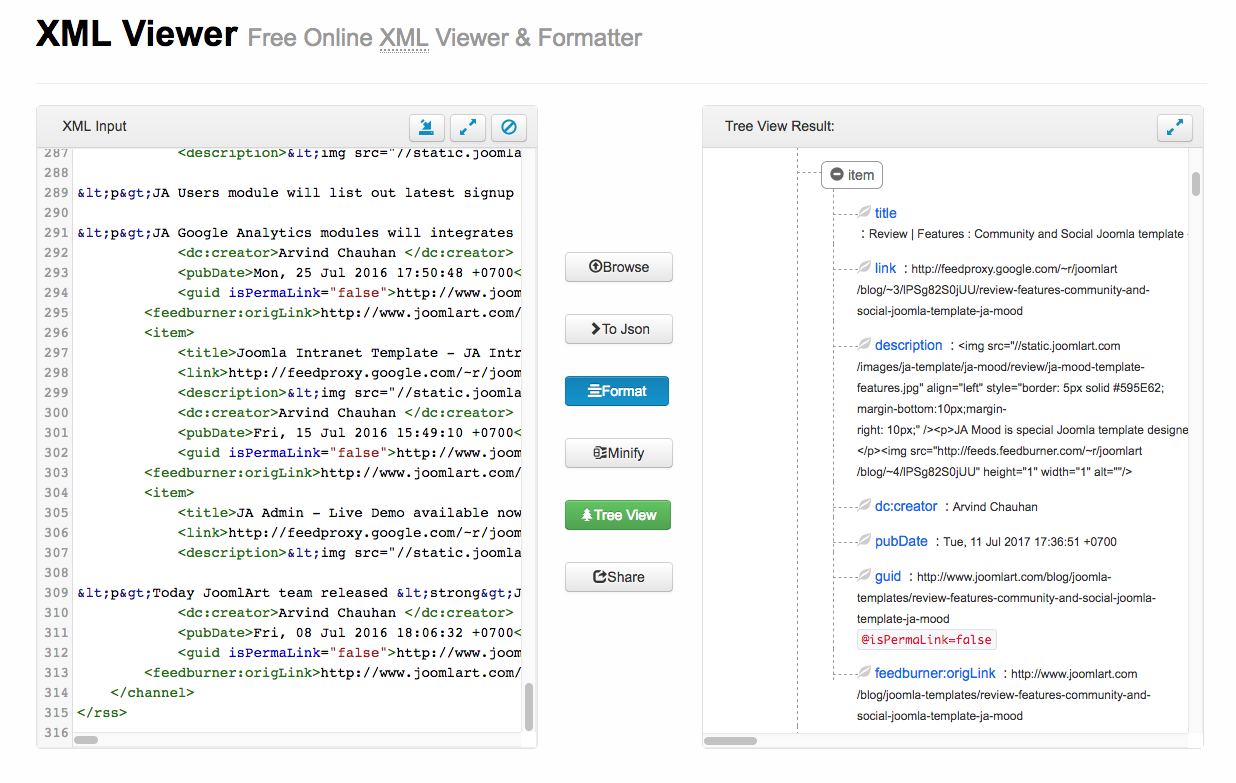
Now, for each item, you will see list of content type and the tag title: title, link, description, dc:creator, pubDate, guid, eedburner:origLink. Those elelements can be different from other RSS feed page. Update the tag title for corresponding field in the JA Social Feed - RSS Advance Settings panel.
Advanced Settings
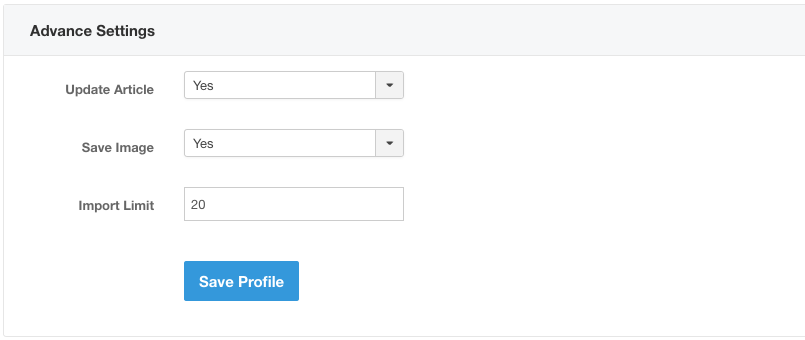
- Update Article: Enable this option if you want imported articles can get updated content if the source content is updated. Articles will be updated when you import again.
- Save Image: Enable this option so images will be saved to your site folder instead of loading it from source.
- Import Limit: set maximum number of posts to be imported each time.
Crawler Settings
JA Social Feed Plugin support Crawler, that allow you to fetch the article content from list articles in RSS feed or from an HTML page. If you have a list of articles/posts on RSS feed and you would like to import them on your Joomla articles this option is the best choice.
Identity Code Settings
An Identity code is required to fetch the data from list of feeds. It has 3 parts: [selector], [type], [attribute]. Each part will be separated by vertical bar ( | ).
The [attribute] has 2 parts: [name], [value]. They are separated by colon ( : ). The final code will look like below:
selector | type | name:value
- [selector] : is css selector. Ex: #content, .kcn-content. Crawler can find elements by using this.
- [type]: support 3 types: [text], [attr], [html], [outerhtml]. If the [type] is empty, Crawler will see it as [text]. This helps Crawler know which value type do you want to get from elements.
- [attribute] with [name] is attribute name, [value] is attribute value.
Crawl example
Lets take some example .
- if you want to find element has id “content”, and use its html, just put this code #content | html
- if you want to find element has class “kcn-content”, and use its text, just put this code .kcn-content | text
- if you want to find list link that has class “related-item” and use its href attribute, see this code a.related-item | attr | href
If you want to add class “center” to images that has class “content-image”, just use this code ( note: use this code outside of “Classes to Remove” setting won’t add any class) img.content-image | attr | class : center
Setup Crawler Url
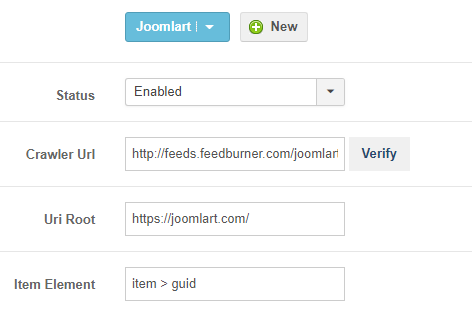
- Crawler Url: Put the url you want to scan articles. Support rss, html.
- Uri Root: Root url of the site that you fetch content from.
- Item Element: your identity code that helps to find list link on Crawl Url
For example view source feed of Joomlart see the link wrap in item > guide
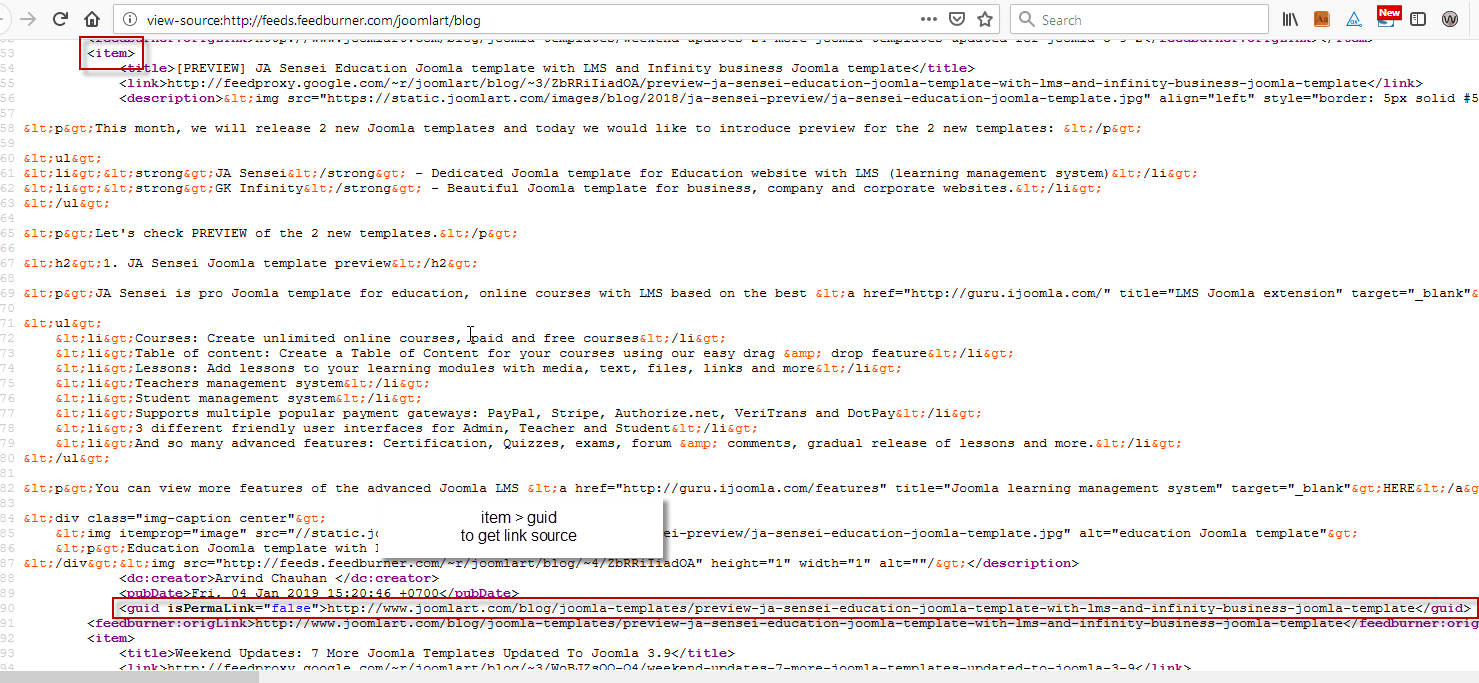
Now Click to Verify button to know which links Crawler’s gonna get content.
Please note In Verify page, it will show the demo result of one article.
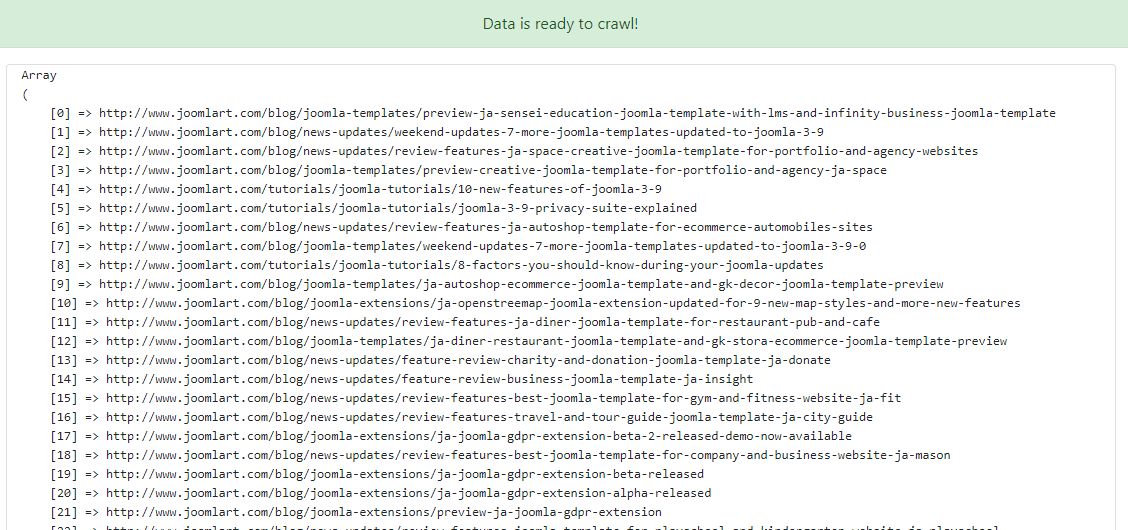
Note: better to check those links works or not. If not work, check the “Item Element” config.
Article settings
Now you got a collection of article links. This section will only apply for content fetched from those links.
- Target Component
- Category
- Author
- Author alias
- Title:
- (i) From HTML: add HTML markup code like Identify Code part where title is stored.
- (ii)Custom: insert custom text
- Alias:
- From title: base on title get in above setting
- Custom: insert custom text
- Meta Description
- From HTML: add HTML markup code like Identify Code part where the meta description is stored
- Custom: insert custom text
- Full Text Element
- Links in Full Text: removed or kept in article
-
Published Date:
- From HTML: add HTML markup code like Identify Code part where time published is stored, time will be convert to timestamp of Server
- Leave blank: get time added article to system Time added.
-
Intro Image:
- From HTML: add HTML markup code like Identify Code part where image is stored
- Custom: user load custom image. Leave blank or get wrong HTML Markup: No image is inserted.
- Elements to Remove: add HTML markup code like Identify Code part where element need to be removed, is stored
Each Element in one line.

All HTML markup code insert to field (expect Item Element) must be unique to get the right content. If not unique, if will combine all value of all element
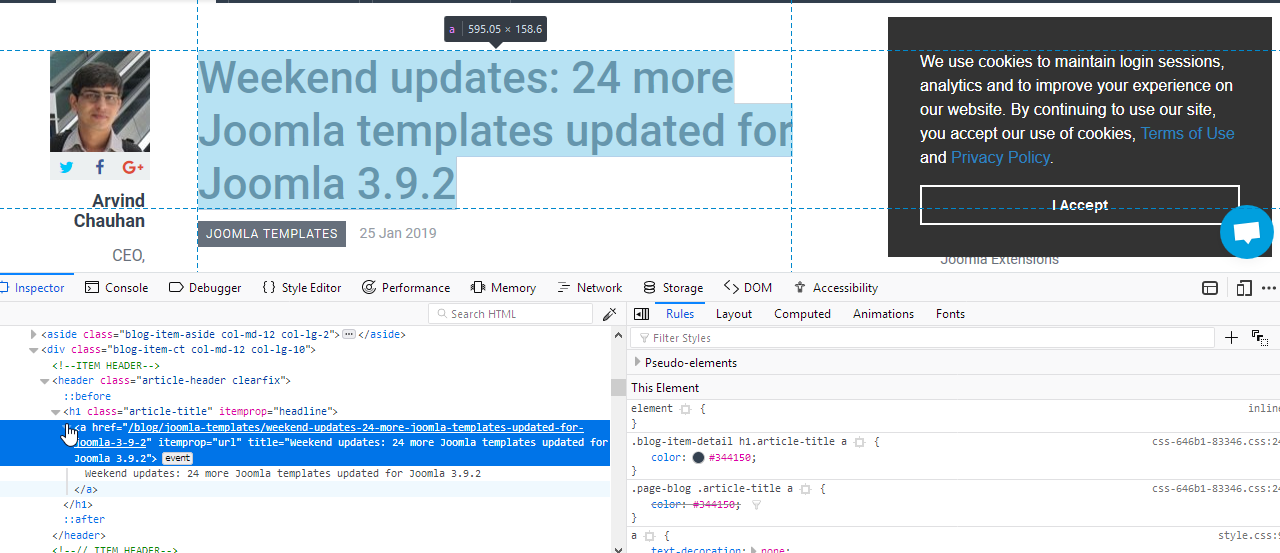
If value field is wrong, or leave blank,You will get the URL to Title
Special Settings
There are 5 special settings: Elements to Remove, Classes to Remove, Attributes to Remove, Classes, to Add, Attributes to Add.
Those settings are using textarea, in order to define multiple elements. Each line is an element.
Plugin Engine
For some reason, all the settings are not enough for you. You may need some extra works on data.
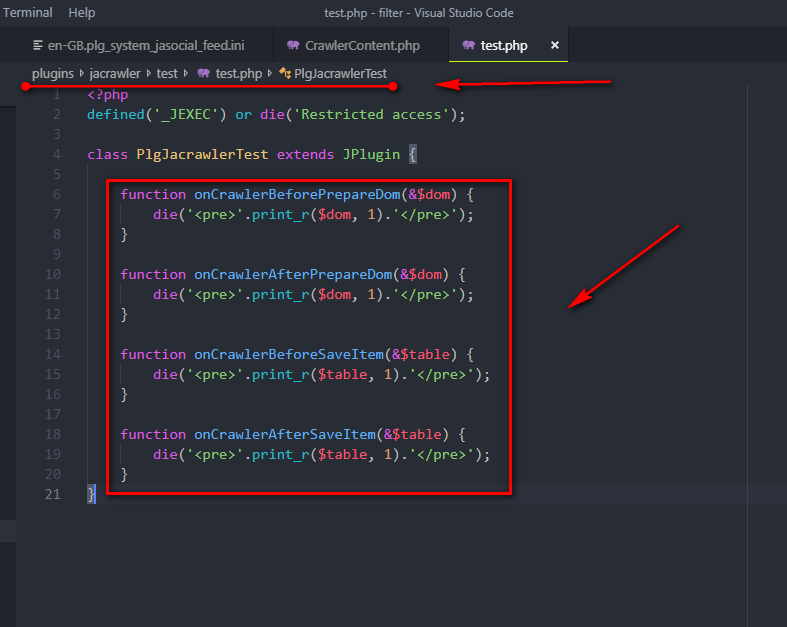
1. You can create a plugin in the group “jacrawler” and use Crawler events.
2. Crawler provides some events that help you handle the data manually.
3. onCrawlerBeforePrepareDom: trigger before prepare dom for each item.
Params: dom: the DomQuery object of item HTML. Check how to use DomQuery here
4. onCrawlerAfterPrepareDom: trigger after prepare dom for each item.
Params: - dom: the DomQuery object of item HTML. Check how to use DomQuery here
5. onCrawlerBeforeSaveItem: trigger before store item on database.
Params: - table: JTable object of item
6. onCrawlerBeforeSaveItem: trigger after store item on database.
Params: - table: JTable object of item
7. onCrawlerBeforeSaveItem: trigger after store item on database.
Params: - table: JTable object of item
Still have trouble?
If you still have trouble or you want to suggest to improve the documentation, feel free to raise a ticket in JA Social feed forum

