-
AuthorPosts
-
Hung Dinh Friend
Hung Dinh
- Join date:
- September 2014
- Posts:
- 4408
- Downloads:
- 11
- Uploads:
- 189
- Thanks:
- 309
- Thanked:
- 3310 times in 3 posts
April 10, 2009 at 10:35 am #140135JA Ruby – Userguide for Joomla! 1.5.x
I. INTRODUCTION
1.1. BASIC TERMS
JoomlArt Template: JoomlArt template is uniquely designed for Joomla CMS, defining module positions that form the layout structure, adding color themes and additional functional add-ons to enhance the template.
Built-in extensions: Depending on each template, we develop and integrate our own extensions to enrich the functional aspects. All these extensions are included in the template download package. In certain cases, we integrate third-party extensions, we might provide a download version of these extensions or url where you can download necessary files yourself.
Template download package: When download templates from JoomlArt template download section, you will get a zipped file. Get this file unzipped, you will see four folders:
- Extensions: contain all extensions built in the template
- Quickstart: is a Joomla CMS with our template integrated already as per our demo
- Template: contain template files only
- Source file: contain graphic elements of the template in PSD format
The use of these folders is clarified in section “GETTING STARTED” below.
1.2 GETTING STARTED
You can getting JoomlArt template installed using either Installation via Installer or Quickstart Installation:
Installation via Installer: Applicable when you already install a Joomla CMS on your server. You will need zipped files in “Extensions” and “Template” folders mentioned above.
Quickstart installation: Applicable when you need a fresh Joomla CMS with our template built in as per our demo. The zipped file in “Quickstart” folder is sufficient to fulfill the Quickstart installation.
Difference between the two installation options:
Quickstart installation: is a complete Joomla CMS with our template built in together with all contents and extensions as per our demo
Installation via Installer: you already installed your Joomla CMS, now you just need separately install template, extensions and add contents from scratch.II. INSTALLATION GUIDE
2.1 Installation via Installer
Step 1: Download and extract the zipped file (using zipped file in “Extensions” and “Template” folder)
Step 2: Install and configure the template (using zipped file in “Template” folder)
Step 3: Install and configure built-in extensions (using zipped file in “Extensions” folder)NOTE:- If you are new to Joomla, you might not be sure on which extensions need being installed, please don’t worry. Simply install all extensions included in the “Extensions” folder, then go to section III. Configuration below for further instruction.
- After installing the template and extensions via Installer, your front-page seems corrupt not like what you see on our demo, you need follow our guideline in section III. Configuration below to get things in neat layout as per our demo.
For full instruction how to install template and extensions, view here:
– How to install Joomla! template guide
– How to install Joomla! extension guide
2.2 Quickstart Installation
Step 1: Download and extract the zipped file (you will need zipped file in “Quickstart” folder)
Step 2: Upload the whole files in Quickstart folder to your server
Step 3: Conduct installation as normal Joomla! installationFor full instruction how to install Quickstart package, view here:
– How to install JoomlArt Quickstart package
III. CONFIGURATION- This configuration guide is applied only for Installation via Installer
- The instruction is to get the template ready as per our demo
3.1 TEMPLATE CONFIGURATION
Log in your site Admin panel, select Extentions >> Template Manager, click on template name , you will see: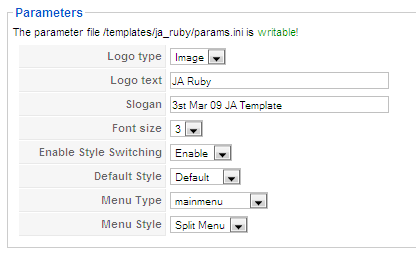
You can change all JA Ruby parameters as you wish.
- Logo type: Logo display in site, has two types: Image and Text
- Logo text: text displayed in logo if you choose Logo type is Text.
- Slogan: Slogan displayed below logo
- Font size : Increase/Decrease font size (from 1 to 6).
- Enable Style Switching: Enable/disable style switching on frontend as screen short below:
- Default style: include Default/Blue/City/City night/Gray/Green/Pink/Red styles
- Menu Type: type of menu displayed in site (Mainmenu/Topmenu…..)
- Menu Module: include Disable/Split/Css/Moo menu.

You just simply change above-mentioned parameters, then refresh your front-page to see how the changes effect.
3.2 EXTENSION CONFIGURATION
Make sure all extensions are installed properly. In JA Ruby, following extensions are included:
Note: [xx] stands for module position- [ja-slideshow] JA Slideshow 2 module
- [colmass] JA Content Slider module
Reference: JA Ruby default module positions are available Here.

With the extensions installed following our guideline in section II – Installation Guide above, you need to access configuration area of such extensions to set the position and related parameters. Details of configurations are as follows:
3.2.1 JA Slideshow 2 module(mod_jaslideshow2.zip)
[position: ja-slideshow]JA Slideshow 2 in our demo
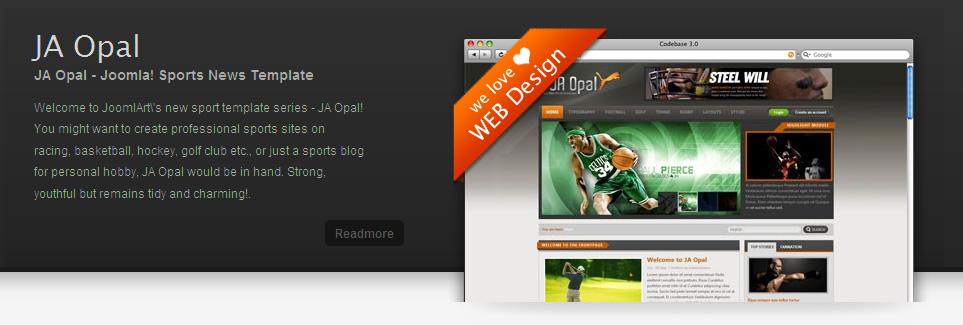
Steps to configure: In Admin panel, go to Extensions >> Modules Manager and click on module name (JA Slideshow 2) to go to configuration page.
Default settings of JA Slideshow 2 on demo:
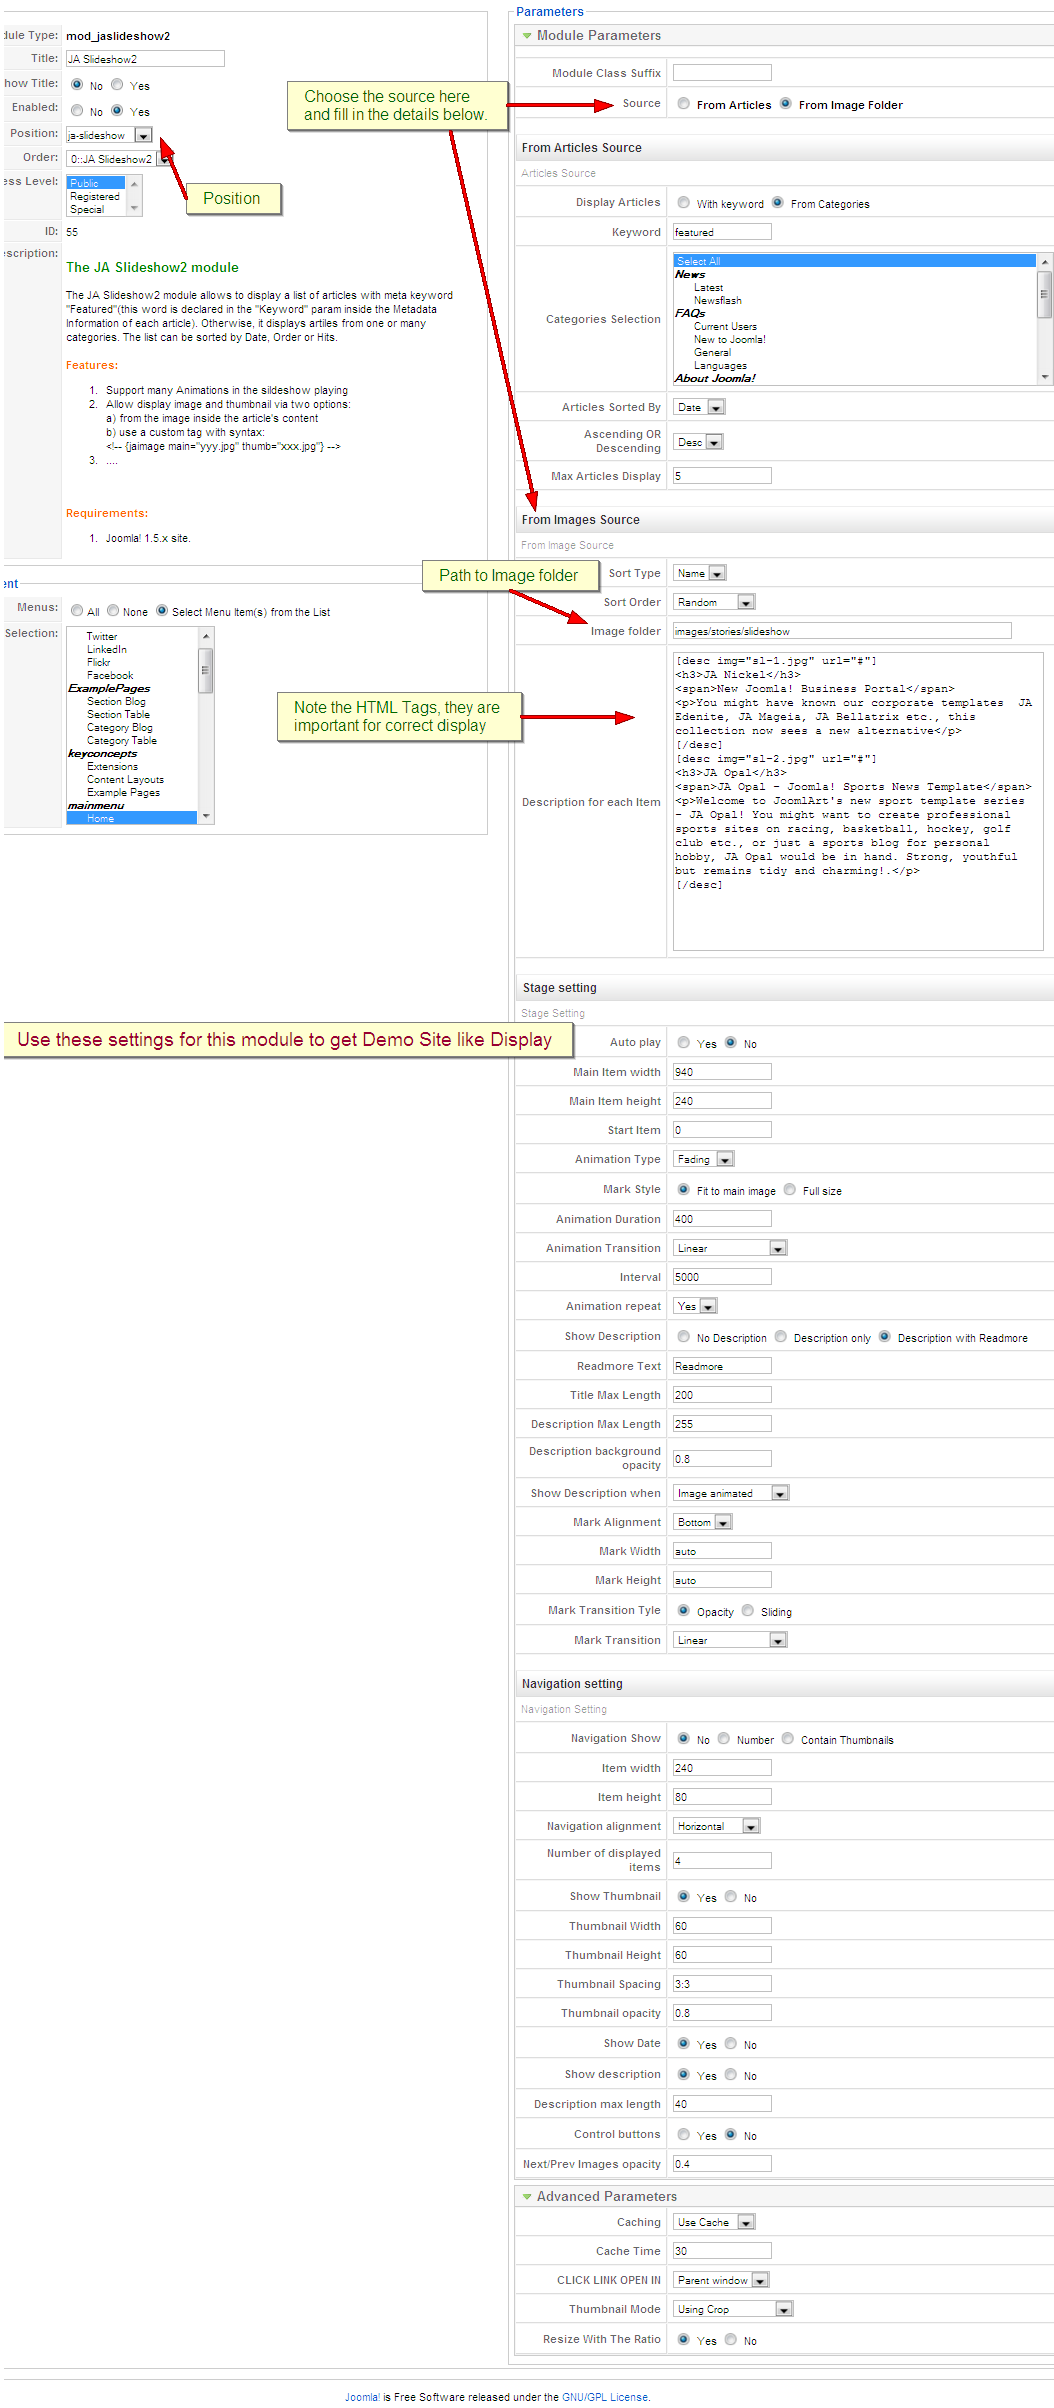
Parameters Explanation:
- Images Folder URL : URL to folder contain images in slide show. For example: images/stories/slideshow/ then photos in the slideshow directory will be showed.
- Start Item: Start item
- Main Item width: Width of main item
- Main Item height: Height of main item
- Show Description: Show/Hide description. Description includes options: Description only/Description with Readmore.
- Show Description when: Choose how to show description. Include options: Always show description/show when mouse over image/show when image animated.
- Readmore Text: Text to display in Readmore button
- Animation Duration: Main image animation duration.
- Animation Type: Animation effect you want to display, has two options: Moving/Fading
- Effect: Animation effects, only used with Wipe/Push animation.
- Container Width: Only apply for Moving animation type
- Navigation: Choose navigation type, include Number/thumbnails options.
- Thumbnail Width: Width of thumbnail (if you choose thumbnail option for Navigation)
- Thumbnail Height: Height of thumbnail (if you choose thumbnail option for Navigation)
- Thumbnail Spacing: Vertical space:Horizontal space
- Number of thumbnails: Number of thumbnail items is displayed (if you choose thumbnail option for Navigation)
- Control buttons: Show/hide control button
- Auto play: Has two option Yes/No to set Auto or not auto play. If choose Yes, the slideshow will auto switch base on time interval
- Interval: Time (in seconds) for next play/run
- Thumbnail opacity: Opacity for thumbnail
- Description background opacity: Opacity for description background
- Next/Prev Images opacity: Opacity for the displayed part of next/previous images.
- Description for each item: Write description content using HTML code according to below syntax:
Content of description
For examples:
<h3>JA Nickel</h3>
<span>New Joomla! Business Portal</span>
<p>You might have known our corporate templates JA Edenite, JA Mageia, JA Bellatrix etc., this collection now sees a new alternative</p>You need to copy your image folder into your_site_path/image/stories and fill the image_folder _path into Image folder param as per screen short below:


And set other parameters as you wish.
3.2.2 JA Content Slider (mod_jacontenslider.zip):
[position:colmass]JA Content slider in our demo:
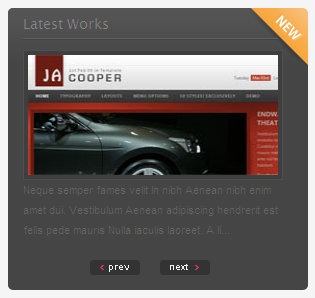
Steps to configure: In Admin panel, go to Extensions >> Modules Manager and click on module name (JA Content Slider) to go to configuration page.
Default settings of JA Content Slider on demo:

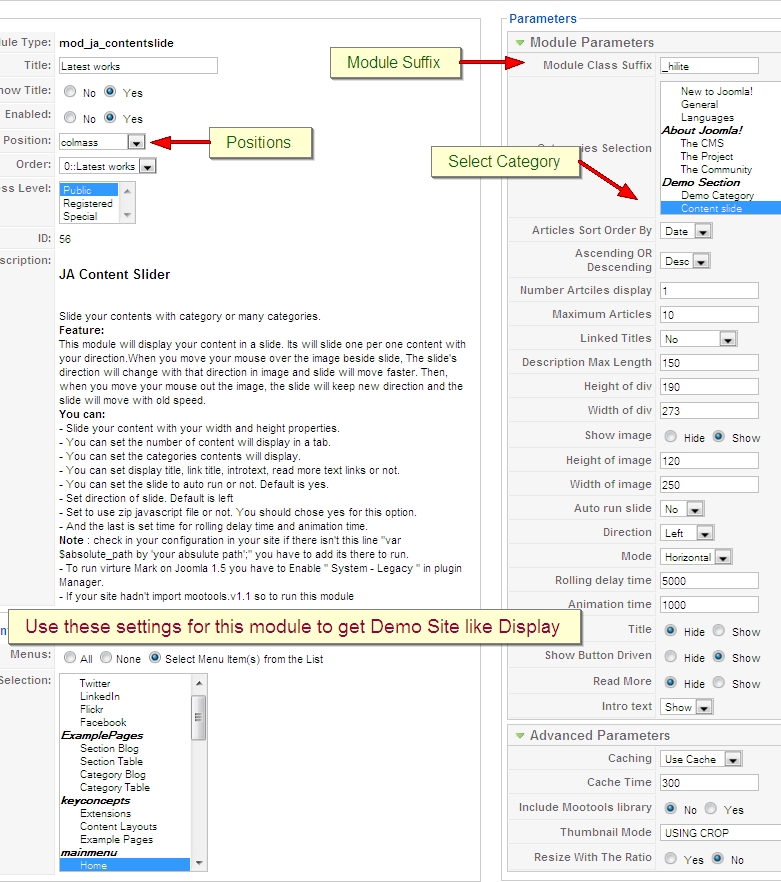
Parameters Explanation:
- Include Mootools library: Choose if you want to include mootool library or not. This module require mootools library ver 1.1x. If your page already included motools library, you don’t need to include it again.
- Module Class Suffix: A suffix to be applied to the CSS class of the Module. This allows for individual module styling.
- Title: Choose show or hide content title
- Read More: Choose to show or hide Read more… link
- Intro text: Choose to show or hide content’s intro text
- Show image: Show the images in the content or not
- Category: The category from which contents are called by JA Content Slider for the slide
- Linked Titles: Make the title linkable or not
- Number Characters: How many characters will be displayed, set to 0 for unlimited.
- Height of div: Height of the div will be displayed
- Width of div: Width of the div will be displayed
- Height of image: Height of images will be displayed
- Width of image: Width of images will be displayed
- Number Element: How many element (items) will be displayed.
- Auto run slide: The slide will run automatically or not.
- Direction: Direction for the Auto Run
- Use compression js file: Use the compressed javascript file or not
- Use Ajax: Set to use Ajax to get content or not
- Rolling delay time: The time in millisecond for items change.
- Animation time: the time in millisecond for animation.
You need to choose Category that JA Content slider will display its contents in Category param
You can:
- Slide your content with your width and height properties.
- You can set the number of content to be displayed in a tab.
- You can set the categories contents to be displayed.
- You can set title, linkable title, introtext, read more text links.
- You can set auto run option for the slide. Default is yes.
- Set direction of slide. Default is left.
- Set to use zip javascript file or not. You should chose yes for this option.
- And the last is set time for rolling delay time and animation time.


 3.2.3 Other modules
3.2.5.1 Custom module
We used Custom module of Joomla! to create articles on demo page such as: WEB DESIGN on user6 position, WEB DEVELOPEMENT on user7 position, S.E.O on user8 position TESTIMONIALS, ABOUT US on colmass position, ADV on right position and EXTRA CONTENT on user10 position, You can check How to create Custom module guides for more details.
3.2.5.2 Latest and Most read News modules
[position: user9]
Those modules are Joomla! modules to show latest and most read articles, on demo it looks like: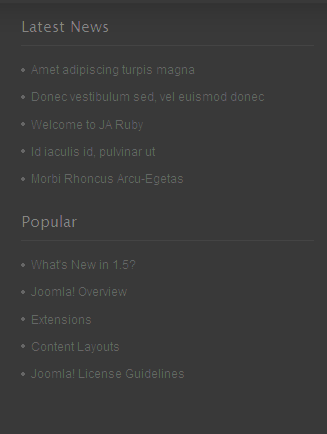
Latest News module: Go to Admin panel >> Extensions >> Module Manager >> Click New button >> Choose Latest News module to go to configuration page >> Set Title is Latest News and position is user9. Below is its parameters:
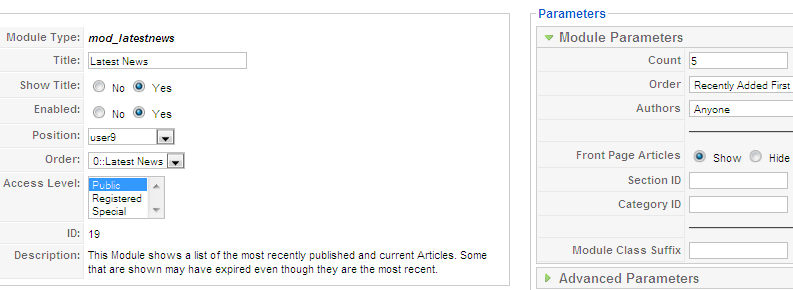
Go to Admin panel >> Extensions >> Module Manager >> Click New button >> Choose Most Read Content module to go to configuration page >> Set Title is Popular, set on user9 position. Below is its parameter:

3.2.5.3 Menu, Statistic, Login, and Who’s online module
Those modules are Joomla! modules, you need to go to Admin panel >> Extensions >> Module Manager >> Click New button >> Choose module and publish on position as you wish.
- Menu module: On demo, we publish three menu: mainmenu and othermenu is published on left position, connectmenu is published on user10 position, keyconcept is published on user11 position. In module parameter page, you set Title, Position and choose type of menu will be displayed in Menu Name paramter, thus all menu items of that menu will be displayed on this module.
- Statistic module is published on right postion
- Login module is published on user11position
- Who’s online module is published on user11position
3.2.4 Module Style (Module Class suffix)
- JA Ruby offers you many styles of module suffix to help you to get impressions from your blocks. Add the module class suffix: suffix _hilite, _testimonial, _blank to fit your site following instructions below:
- Go to Admin Panel >> Extension >> Modules Manager area and open the module you wish to change style for
- Look for “Module Class Suffix”
- Remember to save the module
Testimonial module.
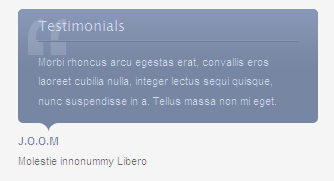
The backend settings are as below :

The HTML Code used is :
<div class=”bubble”>
<div>
<div>
<div>
<div>
<div>
<h3>Testimonials</h3>
Morbi rhoncus arcu egestas erat, convallis eros laoreet cubilia nulla, integer lectus sequi quisque, nunc suspendisse in a. Tellus massa non mi eget.</div>
</div>
</div>
</div>
</div>
<span class=”author”>J.O.O.M</span><br /> Molestie innonummy Libero</div>IV. ADDITIONAL TUTORIALS
4.1 JOOMLA BASIC
4.2 JOOMLART BASICTypography
JA Ruby came with a rich typography to give users more ability to customize content look and feel. Please check all JA Ruby typography here at JA Ruby Typography
Frequently Asked questions
Q: I want to add a template position in to my Joomla!
A: Go to your Administration Panel, Site -> Template Manager -> Module Positions. Add your template positions and hit the Save button.Q: Where can I change my footer?
A: If you want to change or remove something in the footer, just open the “ja_justicia/footer.php” then modify it to suite your needs.Q: My images take a lot of white space and do not look good?
A: The {mosimage} may show some extra padding and margin. To solve this problem, go to your Joomla! Administrator -> Mambots -> Site Mambots and change the margin and padding parameters of MOS Image mambot to 0.Q: Images without caption are stuck with text?
A: It is because Joomla! generates the code different when {mosimage} has and doesn’t have its caption. So when you decide that the image will not having a caption, put it between the div tag like this <div class=”mosimage” style=”float: left;”>{mosimage}</div>Q: What’s a module style? And module class suffix?
A: Almost modules offer you a parameter called Module Class Suffix. Set a value for this parameter and you will have your module’s appearance differs from the others. JA templates often provide you some module styles which can be found in Module Styles area of the guide.April 22, 2009 at 2:34 am #302142Can I asing diferent colors in diferent categories..
Thank youJuly 15, 2009 at 7:01 am #311141JA Content Slider (mod_jacontenslider.zip) not exist in installation or even in the zip file
nice template
thanks
January 7, 2010 at 5:50 pm #328585<blockquote>Q: I want to add a template position in to my Joomla!
A: Go to your Administration Panel, Site -> Template Manager -> Module Positions. Add your template positions and hit the Save button.
</blockquote>In my joomla instalation, I can’t find “Site -> Template Manager -> Module Positions”.
How do I add a template position in to my Joomla!?
:confused:
-
AuthorPosts
This topic contains 4 replies, has 4 voices, and was last updated by camalleaum 15 years ago.
We moved to new unified forum. Please post all new support queries in our New Forum

