-
AuthorPosts
-
Hung Dinh Friend
Hung Dinh
- Join date:
- September 2014
- Posts:
- 4408
- Downloads:
- 11
- Uploads:
- 189
- Thanks:
- 309
- Thanked:
- 3310 times in 3 posts
August 11, 2008 at 4:33 am #132062JA Wistery – Userguide for Joomla! 1.5.x
- For users who start your Joomla! site at the beginning, I recommend you using QuickStart package of JA Wistery, named as ja_wistery_quickstart_v…_j1.5.x.zip. For instruction how to use JoomlArt quickstart package, please check the QuickStart guide
- For users who new to Joomla!, there are many useful documents available at http://joomla.org about Joomla! and how to use, please spend some time to check them out.
Here is some other guides that may useful for you:
- For users that already have a site with contents and other extensions installed, please follow my instruction below to understand how JA Wistery works:
I. TEMPLATE
1.1 Template Installation
After downloading JA Wistery package and extract it, you will find template package named: ja_wistery_template_v…_j1.5.x.zip
Proceed installation of JA Wistery as other normal Joomla! templates. If you don’t know how to do installation or set a template as default, please check the How to install Joomla! template guide.
To see positions located in site, in Navigation toolbar input string “?tp=1” at the end of site link
1.2 Template Configuration
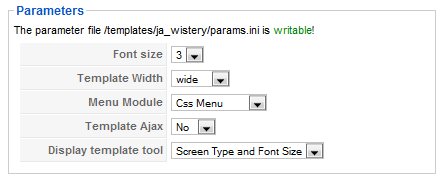
To configure JA Wistery, On Admin panel, choose Extentions >> Template Manager, click on template name , you will see parameters of template.

In here, you can change all JA Wistery parameters as you wish.
- Font size : Increase/Decrease font size (from 1 to 6).
- Template Width: type of template screen (Wide/Narrow screen)
- Menu Module: include Split/Css/Moo menu
- Template Ajax: Use or not use Ajax technology
- Display template tool:include No display/Screen type/Font size//Screen type and Font size/ Font size and Color css/All tools
Please keep your mouse hover each parameter to see description in details.
JA Wistery module positions are available here . You just need to configure your modules to be loaded on those positions to match JA Wistery style.

If you don’t know how to create module position in Joomla!, please follow this guide
II. EXTENSION INSTALLATION
When extracting JA Wistery package, you will see the folder named Extension with all extensions built in the JA Wistery, including JA Header module. That means when you install via template installer, you need to install JA Header modules separately, then configure their positions as instructed in Template configuration section.
You check How to install Joomla! module guide for installation.
Extensions built in JA Wistery comprise:
Note: [xx] stands for module position- [header] JA Header module
JA Header module(mod_jaheader.zip)
[position: header]The flashing module you’ve seen in demo page is the new, style-revamped flashing header of JoomlArt. You can choose between Fade Javascript style, or Flash Object style to display your cool images. All are XHTML validated and have flexible parameters for you to configure.
On demo, it looks like:

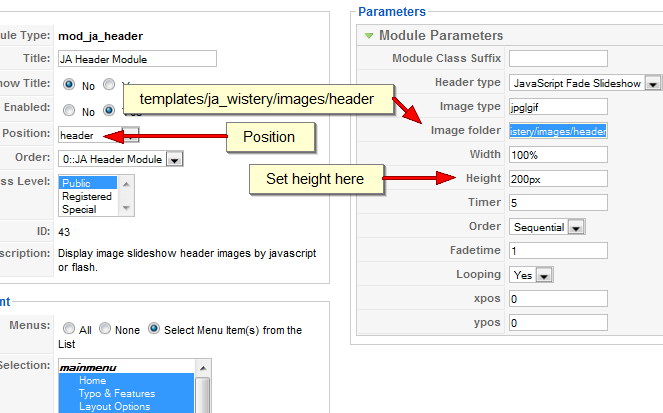
Please go to Extensions >> Modules Manager and click on module name (mod_ja_header) to go to configuration page.
Here is the setting of JA Header on demo:

Parameters explanations:
- Header type: Type of the header: JavaScript or Adobe Flash.
- Image type: Supported image types. Use “|” as a separator.
- Image folder: The folder that module will look for images. The default folder is templates/ja_antares/images/header. Change it to templates/ja_wistery/images/header to get JA Wistery’s images. Note: Use forward slashes instead of backward slashes.
- Width: Width of the header, you can use percent or pixel as unit.
- Height: Height of the header, use pixel as unit.
- Timer: Time for the next image that will be appeared. Use second as unit.
- Order: Determine how image will be appeared: sequential or random.
- Fadetime: Speed of the transition. Use 1 as slowest speed.
- Looping: Repeat option in sequential mode.
- xpos and ypos: The offset of the image in its container. Use 0 as default.
For JA Wistery, use 152px as the height of the module.

Module Styles:
- JA Wistery offers you many styles of module suffix to help you to get impressions from your blocks. Add the module suffix -orange, -green, -blue to fit the highlight module with your color theme.
- If you’d like to set a module to be another colour, you only need to follow the instructions I’ve set out for you below:
- Go to Admin Panel >> Extension >> Modules Manager area and open the module you wish to change colours for
- Look for “Module Class Suffix”
- Remember to save the module
III. TYPOGRAPHY
JA Wistery came with a rich typography to give users more ability to customize content look and feel. Please check all JA Wistery typography here at JA Wistery Typography
IV. FREQUENTLY ASKED QUESTION
Q: How can I create module position in Joomla! ?
A: Please follow this guide to create module positions.
Q: How can I make a custom HTML module?
A: In Module Manager, Click on New button. Then select Custom HTML, and click Next. Fill your HTML code to Custom Output textarea and click Save. You will have a new Custom Module as you expected.Q: Why I need to do many things to make template work? Why don’t you just provide template only?
A: JoomlArt template is More than just a Template. When you download template package from JoomlArt, you will have all extensions included. The template simply will not be perfect without a hand of extensions. It will not only make your site more attractive but also provide users more features and ability to explore your site easier.November 20, 2008 at 5:16 pm #279798if I insert an immagin in the article and I specify a horizontal space the text it comes attached however to the photo.
!————————-!IText example text example
!xxxxxxxxxxxxxxxxxxxx!
!——IMAGE ———!
!xxxxxxxxxxxxxxxxxxxx!
!xxxxxxxxxxxxxxxxxxxx!
!————————-!Orizontal space (hspace): 10 (but it doesn’t work)
Help me!
-
AuthorPosts
This topic contains 2 replies, has 2 voices, and was last updated by acrobata 16 years, 2 months ago.
We moved to new unified forum. Please post all new support queries in our New Forum

